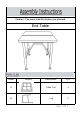
Caution : You must read this before you proceed End Table Label Picture Description QTY A Table Top 1 B Leg 2 Page 1 OF 7
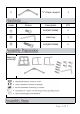
C "V" Shape Support 1 Description QTY ① Bolt(M6*12MM) 4 ② Allen Key 1 ③ Bolt(M6*40MM) 5 Label Picture Before Beginning Assembly: Page 2 OF 7
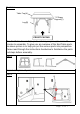
Overview Table Top(A) "V"Shape Support(C) Leg(B) FRONT FACING This End Table has multiple parts and may require up to some 30 minutes to assemble. To give you an overview of the End Table parts, the above picture is to help you put the various parts into perspective. Please read through the instructions herebelow to familiarise the parts and steps before assembly. Step 1 Unpack and place all parts on a clean soft surface.
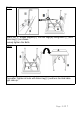
Place the Table Top(A) facedown onto a clean, non-marring surface. Align the mounting positions on the Table Top(A) and the Leg (B). Attach Leg(B) to Table Top(A) using Bolts (③) with Allen Key(②) as shown. Loosely tighten the Bolts. Step 3 Repeat this process with the remaining Leg. Loosely tighten the Bolts. Step 4 Attach the "V" Shape support(C) into the Table Top(A) using Bolts (①) with Allen Key(②) as shown. Loosely tighten the Bolts.
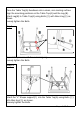
Step5 Attach the "V" Shape support(C) into the Legs(B) using Bolts (①) with Allen Key(②) as shown. Loosely tighten the Bolts. Step6 Thereafter,Tighten all nuts with Allen Key(②) and turn the End table right side up.
Step7 Your Table is now ready to for use. Caution: This Table can only be used on a flat, level surface.
Page 7 OF 7