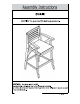
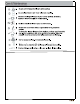
CHAIR NOT a TOY. bay in the process of assembly.
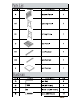
No. Description Qty A Backrest Panel 1 B1 Right Leg Panel 1 B2 Left Leg Panel 1 Cc Seat Panel 1 D1 Front Footrest 1 D2 Back Footrest 1 E Seat Cushion 1 No.
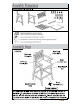
Before Beginning Assembly: # REBUINSGUEHORE, ole ted Sy = Saved adults bondmen or mere (eg?) = Dopotassermbile on Searing or pam: Bon LW Robespierre on sickish nonstaining surface. {peaking foams GPE & maim stibokagivg URE OVERVIEW Right Leg Backrest Panel (B1) Panel (A) Seat Left Leg Cushion (E) Panel (B2) Seat Panel © Back Footrest Front KR Footrest (D1) (D2) FRONT FACING This Chair has multiple parts and may require up to some 30 minutes to assemble.
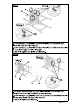
Unpack and place all parts on a clean, non-marring surface. Step 2 Step 2.2 2.1) Position Backrest Panel (A) and Seat Panel (C) to Left Leg Panel (B2) as shown in picture above 2.
3.1) Secure Right Leg Panel (B1) to Seat Panel (C) by using Bolt (2), Sleeve Nut and Allen Key ((D) 3.2) Secure Right Leg Panel (B1) to Seat Panel (C) and Backrest Panel (A) by using Screw and Allen Key (1D) Do not fully tighten the Bolts and Screws. Step 4 Step 4.2 4.1) Position Front Footrest (D1) and Back Footrest (D2) to Right Leg Panel (B1) and Left Leg Panel (B2) as picture shown 4.
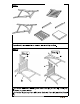
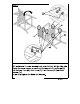
With assistance from your adult partners, turn the Chair into the other side Repeat the same process of step 3 and 4 to secure Left Leg Panel (B2) with Backrest Panel (A), Seat Panel (C), Front Footrest (D1) and Back Footrest (D2) Do not fully tighten the Bolts and Screws.
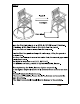
If wobble Test again 30cm-50cm Place the Chair right side up on a LEVEL SURFACE to see if it wobbles. If it wobbles, lift the Chair 30cm to 50cm high from the ground. Keep your feet and toes well away from the drop zone. Drop the Chair freely and vertically with all four legs, hitting the ground at the same time. This Drop Test will help to ensure that all the Bolts, Screws and gaps reach full alignment status. Test again for evenness on a LEVEL SURFACE.
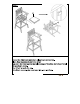
Inspect the Chair and make sure all parts are connected. Place Seat Cushion (E) on to the Chair Lay down the Chair and tie the Velcro straps of Cushion (E) to Seat Panel (C) as shown above. Your Chair is ready for use. This Chair can only be used on a flat, level surface.
not put hot items directly on furniture surface [og 0 Do not clean furniture with harsh cleansers or polish. a To obtain the longest lifespan of your outdoor products, minimizing ~ LE * exposure to direct sunlight is recommended. Children should not climb or jump on the furniture. Do not write on furniture without a padded barrier to protect the surface. To obtain the longest lifespan of your outdoor products, avoid extended and lengthy exposure to rain, snow, and direct sunshine.