
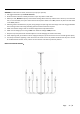
Installation & Assembly


Page: ‐4‐/5
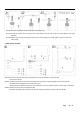
3. Makepre‐installation
StepC1:
By measuring, determine the correct number of links needed for proper hanging height. Using the chain pliers,
disconnect and discard the remaining chain.
StepC2:Attachaquicklink(J)toloop(L)onthetoptube(M)andtoconnecttheendofchain(K).
StepC3:Gentlylacewiresthroughchain(K),toptrim(M),longchain(K)tothetopofanotherquicklink(J)
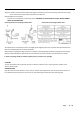
4.Turnoffpower
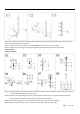
5.Makeinstallation
StepD1:.Attachsinglebar(B)tooutletboxwithmountingscrew(D).Thesideofsinglebarmarked"GND"mustfaceout
Unscrewthreadedring(H)fromcollarloop(I)
StepD2:Raisethecanopy(G)throughcollarloop(I)andscrewthecollarloop(I)toaproperpositionbymeasuring.
Unscrewthreadedring(H)fromcollarloop(I)andremovethecanopy(G).
StepD3:Slipthreadedring(H)overthechain(K)andwires,thendothesamewiththecanopy(G)
StepD4:Openthequicklink(J)thenattachtothescrewcollarloop(I).Closethequicklink(J).