
Installation & Assembly

1
1
2
2
3
3
QTYCODE HARDWARE
12
16
16
1
4
1
2
3
4
5
1/4” x 15 Allen Bolts
Ø6.5 x 1.5 Spring Washers
Ø13 x Ø6.5 x 1.5 Flat Washers
Allen Wrench
1/4” x 18 Allen Bolts
CARE & MAINTENANCE
:
The touch of a so cloth is all the maintenance the finish will ever need. Please do not use harsh or abrasive cleaners for polishing, as they may
cause damage to the finish. Periodic checks are recommended to make sure that all hardware is securely ghtened.
QTYCODE COMPONENTSCOMPONENTS
1C
CODE
D Cross BraceSeat Frame
1E Chair Back
QTY
1
F Wood Seat1
1A B Right LegLe Leg 1
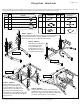
STEP 1 - Figure 1
Begin assembly by aaching Front Legs (A and B) to Seat Base
(C) using 2 Allen Bolts (1), 2 Spring Washers (2) and 2 Flat
Washers (3) per leg. Do not ghten bolts this step.
STEP 2 - Figure 2
Next aach Cross Brace (D)
to Front Legs (A and B)
using 1 Allen Bolt (1), 1
Spring Washer (2) and 1
Flat Washer (3) per leg. Do
not ghten bolts this step.
STEP 3 - Figure 3
Aach Seat Base (C) to Chair
Back (E) using 2 Allen Bolts (1),
2 Spring Washers (2) and 2 Flat
Washers (3) per side. Aach Cross
Brace (D) to Chair Back (E) using 1
Allen Bolt (1), 1 Spring Washer (2) and 1
Flat Washer (3) per side. Do not ghten
bolts this step.
STEP 4 - Figure 4
Finally aach Wood Seat (F) to Seat Base (C)
2 Allen Bolts (5), 2 Spring Washers (2) and 2 Flat
Washers (3). Tighten all bolts with Allen Wrench (4)
provided. The assembly is now complete.
FIGURE 1
FIGURE 2
FIGURE 3
FIGURE 4
E
A
A
B
B
C
C
C
D
D
F
1
2
3
1
2
3
1
2
3
1
1
1
2
2
2
3
3
3
5
2
3
5
2
3
5
2
3
5
2
3
Dining Chair - Wood Seat
Page 1 of 1
Examine all packaging material for small parts that may have come loose during shipment. Periodic checks are recommended to insure that all components are
in proper posion, ght and free from damage. Keep this assembly instrucon for future reference. Adult assembly is required.