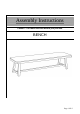
Assembly Instructions Caution : You must read this before you proceed.
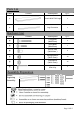
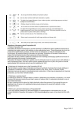
Parts List Label Picture Description QTY A Bench With Fold Legs 1 B Leg Connector 1 Description QTY ① Long Bolts (M6x55mm) 3 ② Short Bolts (M6x35mm) 7 ③ Sleeve Nuts (M6x18mm ) 5 ④ Spring Washer (M6x1.5mm) 10 ⑤ Flat Washer (M6x1.
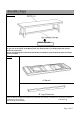
Assembly Steps Overview FRONT FACING This Bench has multiple parts and may require up to 20 minutes to assemble. To give you an overview of the Bench parts, the above picture is to help you put the various parts into perspective. Please read through the instructions herebelow to familiarise yourself with the parts and steps before assembly. Step 1 A. Bench B. Leg Connector Place the Bench (A) with its back side face skywards onto a clean, soft surface to avoid any scratches or damages to the product.
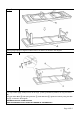
Step 2 Lift bench legs upright in degrees until the braces are locked, as shown in the diagram. Step 3 Attach the Leg Connector (B) to the Bench (A). You may need to apply a little pressure to the Legs - pushing outwards to position, the Leg Connector (B). Using the Short Bolts ② with Spring Washer ④ & Flat Washers ⑤, tighten the bolts by using the Allen Key ⑥, as shown in the diagram. WARNING!! DO NOT OVER TIGHTEN. OVER TIGHTENING COULD LEAD TO DAMAGE OF THE PRODUCT.
Step 4 Using Long Bolts ① with Spring Washer ④ & Flat Washer ⑤, as shown in the picture (1) and Short Bolts ②, Spring Washer ④ & Flat Washer ⑤ with Sleeve Nuts ③, as shown in the picture (2).Tighten with using the Allen Key ⑥. NOW, go back to all bolts previously loosely fasten, drive in and tighten all bolts in sequential manner. This sequential manner will reduce possible distortion of frame. CAUTION !! DO NOT OVER TIGHTEN. OVER TIGHTENING COULD LEAD TO DAMAGE OF THE PRODUCT.
Page 6 OF 6