
Installation & Assembly
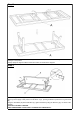
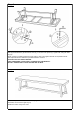

Step 2
Place the Bench (A) with the fabric face skywards onto a clean, soft surface to avoid any scratches or
damages to the product.
Lift legs upright in degrees until the braces are locked, as shown in the diagram.
Step 3
Attach the Leg Connector (B) to the Bench (A),
You may need to apply a little pressure to the Bench Legs - pushing outwards to position the Leg Connector
(B).
Using the Short Bolts (D) with Flat Washer (F), tighten the bolts by using the Allen Key (G), as shown in the
diagram.
CAUTION !! LOOSELY TIGHTEN.
OVER TIGHTHENING COULD LEAD TO DAMAGE OF THE PRODUCT.
TIGHTEN BOLTS IN A SEQUENTIAL MANNER, UNTIL SECURE AND STABLE.
4 OF 6