
Digital Audio Satellite Radio - Radio Tuner User Manual
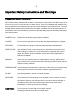
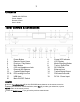
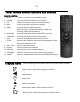
Table Of Contents
- User’s Guide Table of Contents
- Please read before installation
- NOTE: Registration is NOT required for your tuner to connect to over 16,000 free tuner stations. However, if you would like to register your tuner to experience premium music selections please refer to the “Registering your tuner / creating an account at HYPERLINK "http://www.grace.reciva.com" www.grace.reciva.com’ section of this manual. You can only register your tuner and create an account if you tuner is successfully connected to your Wi-Fi network and internet connection.
- Contents
- TUNER GDI-IRDT200
- Power Adapter
- Remote Control
- User’s Guide
- Tuner controls & connections
- Tuner remote control functions and controls
- Display icons Icons are displayed on the bottom left row of the LCD display including:
- Getting Started
- Step 2 - Scan for a wireless network connection
- Step 3 - Connect to the wireless network
- W
- I
- C
- N
- t
- N
- I
- E
- O
- E
- T
- O
- A
- <
- T
- N
- H
- A
- O
- Y
- N
- W
- W
- Wired connection, settings & network configurations
- Other options under ‘Settings’ include
- Settings & Network Configurations
- Changing the volume – headphone connection
- Choosing a tuner station to listen to
- 1. Press the ‘Select’ button. NOTE: IF you make an error at any point, press the ‘Back’ button to return to the previous screen
- Main Menu
- Choosing a Pandora tuner station
- 3. Choose desired selection. This function will also create a new station on your Pandora web site.
- NOTE: when your Alarm turns on, the tuner’s back light display will turn on and show a menu asking if you want to turn on the tuner or not. If within 60 seconds after the display turns on your tuner does not connect to your Wi-Fi network and the tuner station starts playing, the buzzer will announce instead. For optimal performance choose a tuner station that typically buffers very quickly.
- Setting the sleep timer
- Registering your tuner / creating an account
- Configuring “My Profile
- Configuring “My Stations’
- Configuring “My Streams’
- Configuring ‘My Podcast’
- Configuring “My Pandora’
- Accessing Pandora Feedback Menu
- Set Up your Windows PC to enable the tuner to access your audio files via Windows Shares
- 5. The tuner should now be able to access the MAC from its ‘Media Player > Windows Shares’ menu after entering in the MAC account’s short name and password on the tuner.
- 2. Press the SELECT button. ‘Track Added To Queue’ will be displayed.
- 4. Use the SKIP TO NEXT TRACK button to start playback of the next track in the queue.
- 7. To remove all tracks from the queue, keep pressing BACK until the ‘Media Player’ menu item is selected, press SELECT and then turn the Dial to select ‘Clear Queue’ and press SELECT again.
- Playing tracks in random order
- Playing tracks in the list (queue) repeatedly
- Set up a Windows PC to allow the tuner to access your audio files via a UPnP server
- Locating and playing media files using the tuner and UPnP
- Browsing the list of tracks currently arranged (queued up) for playback
- Arranging (queuing up) UPnP tracks for playback later
- Arranging (Queuing Up) albums for playback later
- Controlling playback
- 4. Use the SKIP TO NEXT TRACK button to start playback of the next track in the queue.
- 7. To remove all tracks from the queue, keep pressing BACK until the ‘Media Player’ menu item is selected, press SELECT and then turn the Dial to select ‘Clear Queue’ and press SELECT again.
- Troubleshooting
- Please read the User’s Guide carefully to ensure proper use of your system and to enjoy your TUNER’s basic and advanced features.
- Please keep this User’s Guide for future reference. If you experience any trouble with your internet radio TUNER, then you may find it useful to visit the help section on our webpage: http://grace.reciva.com/ , or http://www.reciva.com
- Specifications
- License Information and Warranty
- Customer Service and Support

8
the 1
st
letter or number in your password is located and positioned in the center of the tuner’s
display. Press the dial inward to select the 1
st
letter. Continue this process until the final letter
or number is selected. Once your password is entered, scroll, located and select ‘END’.
NOTE: If you make a mistake at anytime, press the ‘back’ button to erase the letter(s) or
number(s) and select then select the correct entry. After the final letter or number in your
password is selected rotate the dial until the word ‘END’ is in the center of your display. The
word ‘END’ is located in front of the beginning of the alphabet. Choose ‘END’ by pressing the
dial inward. The tuner will display ‘connecting to ….’, followed by a series of messages. When
the tuner has successfully connected the main menu will be displayed.
Step 5: You are now connected to your Wi-Fi network and the internet. To listen to a station,
choose ‘Internet Tuner’ on the main menu. The tuner will then request the most recent tuner
station update and display ‘Station update from Reciva’. When the station update is complete
the tuner will display various search methods: ‘location’, ‘genre’, and ‘search’ etc. Choose the
method you desire and continue through the menu until you see a list of stations. Select the
station by pushing the large select dial inward when the brackets are on both sides of the
station’s name. After the station finishes buffering you may turn the volume up on the tuner to
adjust the volume source to your stereo system or headphones.
If you are unable to listen to the station you selected please try other stations (pressing the
back button will take you to the previous menu to choose another station). Some stations
may not currently be online. IF you are unable to access or listen to any station you select
please see the trouble shooting section in this manual.
NOTE: Registration is NOT required for your tuner to connect to over 16,000 free tuner stations.
However, if you would like to register your tuner to experience premium music selections please
refer to the “Registering your tuner / creating an account at HYPERLINK
"http://www.grace.reciva.com"
www.grace.reciva.com’ section of this manual. You can only
register your tuner and create an account if you tuner is successfully connected to your Wi-Fi
network and internet connection.
FAST PLAY / CONNECTION OF TUNER STATIONS As a factory default setting when you
turn your tuner off (in standby mode – only the clock is showing on the display) your tuner will
be disconnected from your wireless network. Each time you turn your tuner on, the tuner will
reconnect to your network before buffering and connecting to a station to play.
IF you would like your tuner to start playing the current tuner station quicker you can choose
the tuner to keep its Wi-Fi connection on your wireless network. To set this function go to the
tuners’ main menu (Internet tuner choice is at the top of the menu) scroll until you reach the
bottom of the menu and choose ‘settings’. In the settings menu choose ‘Network Config’. In
the Network Config menu scroll to the bottom of the menu and choose ‘wireless Standby’ then
choose ‘yes’. You tuner will now connect and play your station much quicker when you turn
your tuner on.