
Monitor Controller Owners Manual
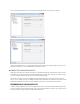
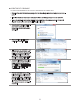
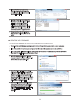
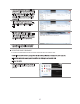
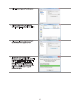
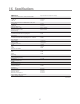
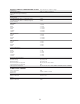
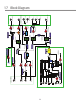
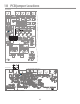
Table Of Contents
- 1 Welcome
- 2 Important Safety Information
- 3 Safety Marking Symbols
- 4 Service Information
- 5 m905 features
- 7 Unpacking and Installing
- 8 Connecting the m905
- 9 Normal Operation Mode
- 10 Setup Mode
- 11 General Setup
- 12 ABOUT CROSS-FEED
- 13 Communication Error Handling
- 14 Computer Audio Setup
- 15 Updating Firmware
- 16 Specifications
- 17 Block Diagram
- 18 PCB Jumper Locations
- 19 Wiring Diagrams
- 20 Cleaning and Maintenance
- 21 Warranty Information
- 22 Manual Revisions

35
• Once the reprogramming is complete, the
m905 RCU will disconnect/reconnect itself
from the computer. Open the folder again.
The file named “SUCCESS.TXT” should be in
the folder. This is your indication that the
firmware update process has completed
successfully.
• If the m905 ACU encounters any prob-
lems during the USB upgrade process, the
folder will contain a file named “ERROR.
T X T ”.
• The type of problem encountered is
reported on the Status line in ERROR.TXT.
In this example, a firmware file for the RCU
was accidentally uploaded as indicated by
the “Incorrect file for this device” error.
• Disconnect the USB cable from the ACU
and then cycle the power to the m905.
UPDATING XMOS FIRMWARE
TO UPDATE THE FIRMWARE ON THE M905 XMOS PERFORM THE FOLLOWING STEPS:
• Download the m905 firmware package from the Grace Design Website and unzip it on your computer.
• Turn off the m905 and connect your PC via USB to the USB 2 port on the m905 ACU.
• Turn on the m905.
• Open the USB Audio Class Driver Control
Panel which is located in the system tray of
your PC.