
Owner's Manual


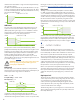


Table Of Contents

6
8 Connecting ROXi to Stuff
8.1 XLR MIC / ¼” LINE COMBO INPUT
This input can accommodate any type of microphone -
dynamic, condenser or ribbon - via the XLR input, or any ¼”
mono instrument input via the center ¼” phono jack. The XLR
connector is wired pin 2 positive, pin 3 negative and pin 1
ground. The ¼” center of the combo jack is for connecting any
instrument with a pickup, electret mic or line out jack to the
ROXi. The jack is a standard 1/4” wired tip signal, sleeve ground.
The ring is used only for 12V mic power if needed.
8.2 FX SEND AND RETURN
These send and return jacks create a buered, unbalanced
insert point (pre-boost) for connecting outboard eects to
ROXi. This allows mono outboard signal processing to be
placed in series with the signal, while still utilizing all of ROXi’s
output capabilities. The insert send has an adjustable pad if
you are using an eect pedal with lower headroom. The pad
has 3 settings (o, -6dB and -16dB) that can be set via internal
jumpers.
SEE JUMPER DIAGRAM page 12
8.3 AMP OUT
This output is for sending a balanced or unbalanced, non-
transformer isolated output to a stage amp or anywhere else
you may need an additional signal. This output has the added
benet of a level control, which is on the top panel. This output
is muted when the MUTE / tune footswitch is activated.
8.4 TUNER OUTPUT
This is another unbalanced output which is always active –
provided as a dedicated stage tuner out. When the MUTE is
activated, your stage tuner will continue to receive signal,
allowing you to tune silently. The tuner output level follows
the Amp Out level control. NOTE: because the tuner output
level follows the AMP level control, if your AMP level control is
turned down, your tuner won’t work.
8.5 DI OUTPUT
This output is balanced and transformer isolated, for sending
signal to a front of house, monitor console, or any mixer or
interface where balanced, isolated signal needs to be sent. XLR
pin-out is: pin 2 positive, pin 3 negative and pin 1 ground.
This output has a level setting switch – side panel DIP switch
#1, labeled line and mic. In the ‘mic’ setting, the output is
padded down -26dB to interface properly with mic inputs at
the console, while the ‘line’ setting is not padded for better level
matching with line level inputs at the console or interface.
8.6 100-240VAC POWER INPUT
ROXi is powered by a universal AC power supply. This means
that no matter where your musical wanderings take you, ROXi
can plug into the wall and it will work. And it also means one
less wall wart you’ll own in your life. All units are shipped with
a standard AC cable suitable for the country where it is going.
This is a standard, o-the-shelf IEC power cable, so in the event
you misplace the one that came with your ROXi, you can just
borrow one from a bandmate and go. Tell them we said so.
8.7 9V @ 500mA DC POWER OUTPUT
This output jack will power other 9VDC pedals you may have
at your feet. The jack is a standard 2.1mm BOSS™ style, with
the center negative. Maximum output current is 500mA, which
means you need to add up the current draw of all the pedals
you wish to power to ensure they don't exceed that. To connect
multiple pedals, you'll need an o the shelf multi-plug daisy
chain cable.
9 Operation
9.1 WHERE TO PUT ROXI?
Great question. We recommend you put it wherever you want.
It will look very pretty when you rst pull it out of its box, but
trust us, it's built to stand up to just about any kind of stage
shenanigans you might encounter. All the pots have metal
shafts and are well mounted to the top panel. All the 1/4” jacks
have heavy duty metal bushings. The top panel is 1/4” extruded
aluminum, and the bottom chassis is heavy-duty aluminum.
As you probably know, the main inspiration for this product
was to provide studio-grade audio hardware, properly
ruggedized to work on stage or mounted to a pedal board.
Velcro is ne. The installed rubber feet will thread out so your
Velcro mount will be ush. Hang on to those rubber feet,
though, they're pretty nice.
9.2 MICROPHONE / LINE INPUT
To connect a microphone to ROXi, rst make sure the top panel
gain knob is turned all the way down and the adjacent red 48V
phantom power switch is set to o (pushed out). Then connect
your microphone and if 48V is needed, simply activate it with
the 48V switch. Always remember to turn 48V power on after
connecting your microphone and o before disconnecting
your microphone.
To connect an instrument, simply plug a 1/4" instrument cable
into the center of the combo jack.
9.3 SETTING THE GAIN
The rst knob on the left side of the top panel is the GAIN
control. With your mic or instrument connected to the input
and signal owing, turn the GAIN knob clockwise until the
signal / clip LED indicator is on and lit solid green. This will