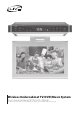
Wireless Undercabinet TV/DVD/Music System User’s Guide for Model IKTD1037S v1840-01 For the most up-to-date version of this User’s Guide, go to www.iLiveElectronics.
Safety Instructions & Warnings CAUTION RISK OF ELECTRIC SHOCK DO NOT OPEN ATTENTION RISQUE D' ÉLECTROCUTION NE PAS OUVRIR WARNING: To reduce the risk of electric shock, do not remove cover (or back). No user-serviceable parts inside. Refer servicing to qualified service personnel. The exclamation point within an equilateral triangle is intended to alert the user to the presence of important operating and maintenance (servicing) instructions in the literature accompanying the appliance.
Table of Contents Setup ������������������������������������������������������������������������������������������������������������������������������������������������������������������������������������������������ 4 Includes Power Battery Backup Orientation ������������������������������������������������������������������������������������������������������������������������������������������������������������������������������������ 5 Front Panel Controls Device Inputs Remote �����������������������
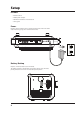
Setup Includes • Remote control • AC/DC power adapter • Wall-mount hardware and instructions • User's guide Power Plug the small end of the power cord into the DC Input on the side of the unit, and the large plug into a standard wall outlet. Battery Backup Requires: 2 AA-size, batteries (not included). The battery backup is intended for short power outages only. The unit’s primary functions cannot run on the battery backup alone.
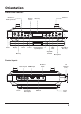
Orientation Front Panel Controls Channel ±/ Memory Presets Power Remote Sensor Display Timer Source Volume ± Disc Tray Pair/Play/Pause/ Speakerphone Skip/ Tune Stop/USB/ End Call Memory Open/Close Disc Tray Microphone Device Inputs Stereo Inputs Line In HDMI Input Composite Video Input DC Power Input USB Port TV Antenna (rear) Screen Latch 5
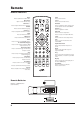
Remote Remote Functions Power Press to power the TV ON or OFF. Timer Press to set the timer. Open/Close Open or close the disc tray. Source Press to select media source. Channel +/ − Press to adjust the television channel. Audio/CC Press to adjust the audio settings and closed captions for the loaded DVD. Subtitle Press to select subtitle language. Volume +/ − Press to adjust the volume. Volume +/ − Press to adjust the television volume. Exit/USB Press to exit the setup menu.
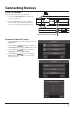
Connecting Devices Cable/TV Antenna Required: cable/antenna wire (not included). 1. Connect the Cable/Antenna wire to the input on the rear of the unit. 2. Press the Source button to switch to "tV". Note: Due to the way in which the display reads, the letter "V" can appear to read as the letter "U". TV Antenna Input on rear of unit. Automatic Channel Search 1. Press the Setup button on the remote to access the Main Menu. 2.
Connecting Devices HDMI HDMI offers superior sound and picture quality when compared to Composite or other connection types, and is the easiest way to connect your media devices to the television. Required: a device that supports HDMI and a HDMI cable (not included). 1. Connect the device’s HDMI output to the HDMI input on the side of the unit. 2. Press the Source button to switch to the connected input "Hd" (HDMI). HDMI HDMI input on side of unit.
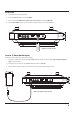
USB Drive 1. Load a USB drive into the USB Port. 2. Press the Source button to switch to "DVD". 3. Press and hold the USB button on the unit or the remote to switch to USB mode. 4. Use the Arrow/OK buttons to select and play content from the connected USB drive. USB port on side of unit. Line In (3.5mm Audio Input) Required: 3.5 mm audio input cable (not included). 1. Connect a 3.5mm audio cable to the Line In Input on the side of the unit and the audio output/headphone jack on an audio device.
Bluetooth Wireless Pairing & Playing Audio After initial pairing, the unit will stay paired unless unpaired manually by the user or erased due to a reset of the device. If your device should become unpaired or you find it is unable to connect, repeat the steps listed here. (Bluetooth). The pairing indicator on the display 1. Power the unit on and press the Source button to select will begin flashing slowly. 2. Hold the Pair button to begin pairing. The pairing indicator will begin quickly flashing blue.
DVD & CD Loading and Playing a DVD/CD Note: This unit is not compatible with MP3 CDs. 1. Press the Source button to select "DVD". 2. Press the open/close button to open the Disc Tray and place a disc into the tray, label side facing up. 3. Press the open/close button to close the Disc Tray 4. Use the controls on the remote or the unit to play, pause, adjust volume, etc. Programming a DVD or CD 1. While a DVD or CD is playing, press the Program button on the remote. 2.
Company Information Contact Information Warranty Website: www.iLiveElectronics.com For Warranty Information and the most up-to-date version of this User’s Guide, go to: Email Support: prodinfo@dpiinc.com Email Parts: partsinfo@dpiinc.com www.iLiveElectronics.com Phone Support: 1-888-999-4215 International Support To download this User’s Guide in English, Spanish, and French, or to get answers to frequently asked questions, visit the support section at: www.iLiveElectronics.