PD708B INSTRUCTION MANUAL Contents Warnings & Precautions.................................................................................... 2 Important Safety Instructions............................................................................. 3 In the Box & Features........................................................................................ 4 Power & Battery Information............................................................................. 5 Playing a DVD or CD.....................
Warnings and Precautions TO PREVENT FIRE OR SHOCK HAZARDS, DO NOT EXPOSE THIS UNIT TO RAIN OR MOISTURE. This symbol, located on back or bottom of the unit, is intended to alert the user to the presence of uninsulated “dangerous voltage” within the product’s enclosure that may be of sufficient magnitude to constitute a risk of electric shock to persons.
Important Safety Instructions 1. Read Instructions - All the safety and operating instruction should be read before the product is operated. 2. Retain Instructions - The safety and operating instruction should be retained for future reference. 3. Heed Warnings - All warning on the product and in the operating instructions should be adhered to. 4. Follow instructions - All operating and use instructions should be followed. 5. Cleaning - Unplug this product from the wall outlet before cleaning.
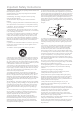
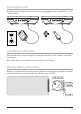
In the Box Portable DVD Player AC/DC Adapter DC Car Adapter Earbud Headphones Remote Control Features • DVD / CD Playback • Plays DVD-R/RW, DVD+R/RW & JPEG Discs • Plays CD/CD-R/CD-RW Audio Tracks • Chapter / Title Search & Select • Supports Multiple Languages and Language SubTitles • NTSC • Programmable CD Tracks • Skip / Search Tracks • Color Display Viewing Screen • 7” TFT LCD Screen • Dual Stereo Headphone Jacks • Video/Audio Input Jack, 3.5mm type • Video/Audio Output Jack, 3.
Powering the Unit Power the unit and charge the internal battery by plugging it into a standard AC (120V - 60Hz) Outlet. Unit Battery Information The internal battery can be charged by using the included AC/DC Adapter, or the DC Car Adapter. With a full charge, the internal battery can last up to 2.5 hours. Remote Battery Information Danger of explosion if the remote control’s batteries are incorrectly installed. Replace only with the same or equivalent battery.
Playing a DVD 1. Press the Open Button to open the CD/DVD Drive. 2. Load a DVD into the CD/DVD Drive of the unit. The DVD will begin to play automatically. If the DVD does not begin to play automatically, press the Play/Pause Button. 3. Press the Play/Pause Button to play or pause the DVD. 4. Press the Stop Button to stop the DVD during play. 5. Press the F.BWD Button to skip backwards through the DVD’s chapters. Press and hold the F.BWD Button to search backwards through the DVD. 6. Press the F.
Programming a DVD 1. Insert a DVD into the unit. See the “Playing a DVD” operation on page 6. 2. After the DVD is inserted and loaded, press the Program Button on the remote control to display the Program Menu. 3. Use the Directional Buttons to move through the different program slots. 4. Highlight a slot and enter a Title (TT) number and Chapter (CH) number using the Number Keypad on the remote control. Repeat steps 3 and 4 until the desired titles and chapters are programmed. 5.
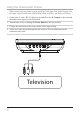
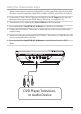
Using the Video/Audio Output When connecting two products using an RCA Cable, match the colored ports with the same colored connection. (Red to Red, White to White, and Yellow to Yellow) 1. Connect the 3.5mm - RCA Cable (not included) to the AV Output on the unit and the audio/video inputs on the Television. 2. Turn the unit on by switching the Power Button to the On position. 3. Change the television to the correct audio/video input setting. 4.
Using the Video/Audio Input When connecting two products using an RCA Cable, match the colored ports with the same colored connection. (Red to Red, White to White, and Yellow to Yellow) 1. Connect the 3.5mm - RCA Cable (not included) to the AV Input on the unit and the audio/video inputs on the DVD Player, Television, or Audio Device. 2. Turn the unit on by adjusting the Power Button to the On position. 3. Press and hold the Stop/DVD/AV In Button to switch to AV In Mode. 4.
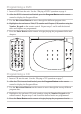
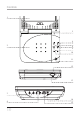
Controls 1 5 2 6 7 8 9 10 11 12 13 3 4 14 15
Control Definitions 1 LCD Display 7” TFT LCD Screen. 2 DVD/CD Door Open the DVD/CD Door to expose the DVD/CD Drive. 3 Headphone Jacks Connect headphones or earbuds to the Headphone Jacks to listen to the unit in private. 4 Audio/Video Input and Output Use the Audio/Video Input and Output to connect the unit to a television, DVD Player, or other audio device. See pages 8 and 9. 5 TFT On/Off The TFT On/Off switch turns the TFT Display off whenever the unit folds. 6 F.FWD Button Press the F.
Controls 16 29 17 30 18 31 19 20 32 21 33 22 34 23 24 35 25 36 26 37 27 38 28 39
Control Definitions 16 Display Button Press the Display Button to view the on screen display and see time information on the DVD or CD that is playing. 17 DVD/AV In/Power Button Press and hold the DVD/AV In/Power Button to switch between DVD and AV In Mode, or press to turn the power off and on. 18 Volume Buttons Press the Volume Buttons to adjust the volume of the unit. 19 Repeat A-B and 1/ALL When playing a DVD, press the Repeat A-B and 1/All Button once to designate an “A” point.
Control Definitions 31 Number Keypad Use the Number Keypad when entering numbers in for operations. 32 Wide Button In DVD Mode, press the Wide Button to switch between a 4:3 viewing ratio and a 16:9 (wide screen) viewing ratio. 33 Stop Button In DVD Mode, press the Stop Button to stop a DVD or CD during play. 34 Directional Buttons Use the Directional Buttons to navigate through a DVD or CD. 35 Slow Button In DVD Mode, press the Slow Button to view a DVD movie in slow motion.
Setup Menu To enter the Setup Menu, press the Setup Button on the remote control. - - GENERAL SETUP T V D I S P L AY LCD M O D E OSD L A N G SCR E E N S AV E R PAG E Wi d e Wi d e ENG OFF - - General Setup Page TV Display - The TV Display setting is automatically locked to Wide. LCD Mode - The LCD Mode can be switched between 4:3 (Low) or 16:9 (Wide) aspect ratios. OSD LANG - The On-Screen-Display Language can be adjusted to English, French, or Spanish.
Service Information Address Phone Fax Email Website 2116 Carr Street, St. Louis MO, 63106 1-314-621-2881 1-314-588-1805 prodinfo@gpx.com www.gpx.com To download this Instruction Manual in English, Spanish, or French visit the Support section at www.gpx.com. © 2007 DPI, Para descargar este manual de instrucción en inglés, español, o francés visite la sección de la ayuda en www.gpx.com. Pour télécharger ce manuel d’instruction en anglais, espagnol, ou le Français visitez la section de soutien à www.gpx.