
User manual


GMC-I Messtechnik GmbH 35
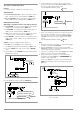
Setting all Required Values for a Sequence
Read the detailed explanations included in chapter 4.6 and 4.7.3 first.
1 Press the <FUNCTION>. key.
2The function groups or functions menu appears.
3 If the functions menu is not displayed, press the <CE/LOCAL>
key in order to return to the function groups menu.
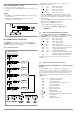
4 If the functions menu is displayed, repeatedly press the
<FUNCTION> key until SEq appears at the left-hand display (the
right-hand display remains blank).
5 Press the <ENTER> key to access the sequence functions
menu. tSEt appears at the left-hand display.
6Adjust Uset and Iset with the rotary knob and/or the <> and
<> keys if necessary.
[Uset and Iset value can be adjusted at any time, and assigned to a
memory location by pressing the <SAVE> and <ENTER> keys.]
The display can be returned immediately to the previously edited function (in
this case tSEt)
by pressing the <FUNCTION> key.
7 Select a tSEt value with the <> or the <> key if necessary,
and continue by pressing the <FUNCTION> key.
8Set SSEt to on or oFF with the <> key or the <> key.
9
Press the <
SAVE
> key. The memory location (
Sto
) is displayed.
10 Select the desired memory locations (between 11 and 255)
with the <> key or the <> key.
11 Press the
<
ENTER
> key. The setting is stored to the memory
location and the
memory address
is automatically increased by 1.
12 Enter the next setting for Uset, Iset, tset and SSEt , and
continue until all values have been entered for the entire
sequence.Use rotary knobs only for Uset and Iset settings.
Press the <FUNCTION> and <> keys for tset settings.
Press the <FUNCTION> key only for SSEt settings.
13 After saving the last step of the sequence loop (13a) with the
<SAVE> and <ENTER> keys, press the <FUNCTION> key in
order to continue to the tdEF setting.
14 Enter a tdEF value if necessary, acknowledge by pressing the
<FUNCTION> key and/or jump to the next function.
15 Strt - Entry of a sequence start address is prompted.
16 Select a start address with the <> key or the <> key if
necessary, acknowledge by pressing the <FUNCTION> key
and/or jump to the next function.
17 StoP - Entry of a sequence stop address is prompted.
18 Select a stop address with the <> key or the <> key if
necessary, acknowledge by pressing the <FUNCTION> key
and/or jump to the next function.
19 rEP - Entry of the number of sequence repetitions is prompted.
20 Select the desired number of repetitions with the <> key or
the <> key if necessary, acknowledge by pressing the
<FUNCTION> key and/or jump to the next function.
21 SEq Go blinks at the display, indicating that the sequence can
now be started.
22 Press the <ENTER> key. The sequence is run using the
selected values.
Jump from the Uset / Iset settings to the last edited function, or from a
given function to the next function by pressing the <FUNCTION> key.
Press the <FUNCTION> key and the <> key to jump back to the
previous function.
The LOCKED/SEQ LED blinks to indicate that a sequence is running.
The example included here is only intended to demonstrate reliable
sequence programming. You can use other procedures as well, which
may be easier or faster for you.
Figure 4.7.3 m Setting all Required Values for a SEQUENCE
ENTER
ENTER
SAVE
The start address must be entered,
and the ENTER key then increases
FUNCTION
FUNCTION
FUNCTION
FUNCTION
FUNCTION
FUNCTION
ENTER
+
FUNCTION
Function
Groups Menu
Functions
Menu
CE/LOCAL
FUNCTION
Repeatedly press the FUNCTION key
until SEq appears at the left-hand
or
or
Uset
Iset
FUNCTION
FUNCTION
FUNCTION
+
the address by 1 automatically.
FUNCTION
+
FUNCTION
+
FUNCTION
+
FUNCTION
+
FUNCTION
11
1
2
3
4
5
6
7
8
9
10
12
13
14
15
16
17
18
19
20
21
13a
Display Blinks
ENTER
22
display