
Manual
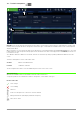


Table Of Contents
- 1 System requirements for local and client installation
- 2 Versions of IZYTRONIQ
- 3 Downloading BUSINESS and CLOUD Variants
- 4 Initial installation of BUSINESS Starter / Advanced / Professional / Premium
- 5 Initial installation of the ENTERPRISE Variant
- 6 Licensing
- 7 Update
- 8 Uninstallation
- 9 Login / Logout
- 10 Basics of operation
- 11 Home screen
- 12 Main modules
- 12.1 Module for portable objects
- 12.2 Module for stationary objects
- 12.3 Test device management
- 12.4 User management
- 12.5 Recycle bin
- 12.6 Settings
- 12.7 Synchronization (ENTERPRISE Ultimate only)
- 12.8 Help
- 13 Lists
- 14 Print
- 15 Document management
- 16 PUSH/PRINT
- 17 Sequence editor
- 18 Automatic process control for a test – remote function
- 19 Working in multi-user mode (floating license)
- 20 Data replication using the server
- 21 Editing report templates
- 22 SECUTEST/SECULIFE ST – first steps
- 23 PROFITEST – first steps
- 24 METRAHIT – first steps
- 25 NEXONIQ
- 25.1 License – Right of Utilization – Activation
- 25.2 Download
- 25.3 System Requirements of Local and Client Installation
- 25.4 Setup of User Interface
- 25.5 Reading out data from test instruments the formats of which are not compatible with IZYTRONIQ
- 25.6 Data import from ETC file
- 25.7 Importing the converted files into IZYTRONIQ
- 26 VIDEOS – Tutorial
- 26.1 “Sequence editor”Function “Input, change, list” – Portable Objects
- 26.2 Structure of the index cards – portable objects
- 26.3 File import – portable objects
- 26.4 Conflict manager – portable objects
- 26.5 Function “Input, change, list” – stationary objects
- 26.6 Structure of the index cards – stationary objects
- 26.7 Management and creation of test instruments
- 26.8 User management – BUSINESS Version except Premium variant
- 26.9 Global settings
- 26.10 Catalogs
- 26.11 Lists
- 26.12 Generation of test report
- 26.13 Push/Print
- 26.14 Sequence editor
- 26.15 Editing report templates

110 GMC-I Messtechnik GmbH
Functions of the toolbar
Save changes
Cancel editing
Add Role
Delete Role:
Exception: the current user cannot be deleted.
Duplicate role:
This command copies the marked role. The name of the role is adopted, with the suffix “Copy”.
Procedure to add a role
1. Select the desired role you wish to assign to a certain user in the upper window in line Role management by means of the pull-
down menu (e. g. administrator, inspector or clerk). Optionally, you can create a new role, which will then also appear in the pull-
down menu.
In the list of users you can see afterwards for which users this selected role permission is already active or existing, which is shown
by a check mark in the ACTIVE column in this case.
2. Proceed by ticking the check mark in the ACTIVE column next to the user who is to be assigned the role with the associated per-
missions selected beforehand. The current role permissions are shown in the ROLES column.
3. By storing, the new role is definitely transferred to the selected user.
Procedure to remove a role
1. Select the desired role you wish to cancel for a certain user in the upper window in line Role management by means of the pull-
down menu (e. g. administrator, inspector or clerk).
In the list of users you can see afterwards for which users this selected role permission is already active or existing, which is shown
by a check mark in the ACTIVE column in this case.
2. Proceed by removing the check mark in the ACTIVE column next to the user for whom you wish to cancel the role with the associ-
ated permissions selected beforehand. The current role permissions are shown in the ROLES column.
3. By storing, the removed role is definitely deleted.