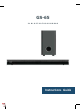
GS-65 2.
Contents What’s In The Box? ---------------------------------------- 1 Controls And Functions -----------------------------------2-5 Support ----------------------------------------------------- 6 Instructions Guide ---------------------------------------- 7-12 Using the HDMI (ARC) Input --------------------------- 7 Using the Optical Input ---------------------------------- 8 Using the MP3 Link Connection (Line In) -------------- 9 Connecting to the Mains Supply ----------------------- 10 Connecting the So
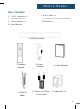
What’s In The Box? Box Contents 1. GS-65 Soundbar x 1 2. Remote Control x 1 3. Power Adapter x 1 5. AUX In Cable x 1 6 . 3 .5 mm to 3 .5 mm Line In Cable x 1 7.Subwoofer x 1 4. User Manual 1.GS-65 Soundbar 2. Remote Control 5. AUX IN Cable 3. Power Adapter 6. 3.5mm to 3.5mm LineIn Cable 4. User Manual 7.
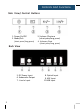
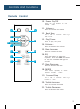
Controls And Functions Side View/ Control Buttons 1. Power On/Off 2. Mode/Pair (short press/long press) Back View 5. DC Power Input 6. Subwoofer Output 7. Line-In Input 2 3. Volume-/Previous (shrot press/long press) 4. Volume+/Next (shrot press/ long press) 8. Optical Input 9. ARC Input 10.
Controls And Functions Remote Control 1 0. Power On/ Off Switch the unit Standby mode between on and 1 1 . Volume + 10 18 Press to increase the volume 1 2. Back Step Use in 12 19 13 Bluetooth mode to go 1 3. Play/ Pause Press to play and pause Press to decrease the volume 20 15. Bass Increase Press to increase the bass 16. EQ 16 17 or 14. Volume - 14 15 USB back a track . 11 21 Press the button to adjust the equaliser.
Controls And Functions Using the Remote Control The remote control sensor at the front of the soundbar is sensitive to the remote control’ s commands up to a maximum of 8 metres away and within a maximum arc of 30 degrees. Please note that the operating distance may vary depending on the brightness of the room.
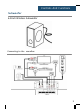
Controls And Functions Subwoofer 6.
Support Support Thank you for your purchasing the GS- 65 Soundbar. Please follow the guidance of the user manual to set up your new purchase and begin enjoying its features.
Instructions Guide Using the HDMI ARC Input You will need: An audio source with an ARC Audio Output and a ARC Audio cable ( not included) . Connect the ARC Audio cable to the ARC output on the audio source and to the ARC Input on the soundbar. Press the POWER button on the soundbar or POWER button directly on the remote control ( Rem. 10 ) to switch on the unit. Press the MODE button on the remote control ( Rem.
Instructions Guide Using the Optical Input You will need: An audio source with an Optical Audio Output and a Digital Optical Audio cable ( included) . Connect the Digital Optical Audio cable to the optical output on the audio source and to the Optical Input on the soundbar . Press the POWER button on the soundbar or POWER button directly on the remote control (Rem.10) to switch on the unit. Press the MODE button on the remote control (Rem .
Instructions Guide Using the MP3 Link Connection ( Line In) Plug one end of a 3.5 mm to 3. 5 mm Line In cable ( included) into the Line In port on the unit. Before use, disconnect any cables connected to the Stereo RCAInputs. Plug the other end of the cable into the audio output/ headphone output on an MP3 player or other audio source . Press the Power button on the soundbar or POWER button directly on the remote control ( Rem . 1 0 ) to switch on the unit .
Instructions Guide Connecting to the Mains Supply Ensure that the power supply voltage is in the voltage of 100V~240V. This unit is designed to use adapter. Connecting the unit to any other power source may cause damage to the unit . Unwind the mains cable to its full length. Connect the mains plug to a mains socket. Make sure the mains plug is fully inserted into the mains socket. Connect the adapter to the unit via the DC input Socket.
Instructions Guide Connecting the Soundbar and Subwoofer Connect the subwoofer cable to the soundbar. Please ensure that your soundbar is being mains powered and switched ‘ON’ for initial set up. To do this, press the Power button on the unit or the POWER button on the remote control . If you are having connectivity issues, please move the subwoofer closer to the soundbar for set up.
Instructions Guide Using the Bluetooth Operation Pairing a Bluetooth Device for the First Time Press the POWER button on the unit or the POWER button on the remote control (Rem.10) to switch on the unit. Select and press the MODE button repeatedly on the remote control until in Bluetooth mode ( Rem .1 8 ) or press the Mode button repeatedly on the soundbar to enter Bluetooth mode. Using the native controls on your Bluetooth device, select the “GS-65” in your Bluetooth settings to pair.
Instructions Guide Playing Audio Wirelessly Follow the instructions for pairing a Bluetooth device. Use the native controls on the connected Bluetooth Device to select a track . To Play/ Pause the track or Skip Forwards/ Backwards to a selected track, use the remote control (Rem.13,12,19). Audio played through the connected Bluetooth device will now be heard through the speakers. Using the USB Operation Insert USB to Play Music Automatically .
Troubleshootingg Troubleshooting If the soundbar does not work properly as desired, please check the following. Malfunction Possible causes/ measures No power / function Check whether the power is switched on or off at the wall. Check whether the power adaptor is properly connected to power outlet or not. No sound Check whether cables are properly installed. If they are, please try alternative cable to connect to your TV if possible. Check unit is out of standby and in mode .
Specifications Power Supply (Soundbar) DC 24V / 2.5A Power Consumption 2 x20W+60W Speaker Size & Number of Speakers 2.25" Mid-Tweeter x 4 +6.5" x1 Working Environment (Temperature) -10~ + 45C Relative Humidity 5% ~ 90% Frequency Response 40Hz - 20KHz Bluetooth Version V 5.0 Bluetooth Distance ≥10M Dimension (LxDxH) (Soundbar) 90.6 x 10.7 x 7.
Hang the soundbar Place the paper guide on the wall where you want to hang the soundbar. Locate the screw holes on the paper guide and mark a point with a pencil. Wall Mount Installation Guide Verify with a level gauge that the inclination angle of the soundbar is zero degrees. Make the holes with the corresponding drill bit according to the type of wall.
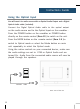
Quick System Installation Guide When all the kits connecting with power supply, the subwoofer is flat placed in the middle under the soundbar, or placed closely on the left and right side of the soundbar, but not too far from the soundbar. Detached Surround Speaker from main Soundbar to be Standing Speaker. Each wireless surround speaker is flat placed on the left and right sides of the sofa, their speakers are facing right and left ears of people setting on the sofa.
Safety Information 1. 2. 3. 4. 5. 6. Read these user manual. Keep these user manual. Heed all Warnings Follow all instructions Do no clean the apparatus near or with water Do not block any ventilation openings . Install in accordance withthe manufacturer’ sinstructions 7 . Do not install near any heat sources such as radiators, heat registers, stoves, or other apparatus ( including amplifiers) that produce heat. 8.
FCC Statement FCC Warning Statement Changes or modifications not expressly approved by the party responsible for compliance could void the user’s authority to operate the equipment. This equipment has been tested and found to comply with the limits for a Class B digital device, pursuant to Part 15 of the FCC Rules. These limits are designed to provide reasonable protection against harmful interference in a residential installation.