
User Manual
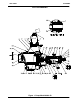
Table Of Contents

OM-00862
80 SERIES
MAINTENANCE & REPAIR
PAGE E - 8
If heating the bearings is not practical, use a suit
ably sized sleeve and an arbor (or hydraulic) press
to install the bearings on the shaft.
When installing the bearings onto the
shaft, never press or hit against the outer
race, balls, or ball cage. Press only on the
inner race.
Slide the shaft and assembled bearings into the
pedestal until the inboard bearing is fully seated
against the bore shoulder.
When installing the shaft and bearings into
the bearing bore, push against the outer
race. Never hit the balls or ball cage.
Position the oil seal (11) in the pedestal bore with
the lip positioned as shown in Figure 1. Press the
oil seal into the bore until fully seated.
Position the oil seal (19) in the bearing retainer (18)
with the lip positioned as shown in Figure 1. Press
the oil seal into the retainer until fully seated.
Replace the bearing retainer O‐ring (23) in the ped
estal, and lubricate it with grease. Press the bear
ing retainer into the pedestal until it seats against
the bearing. Be careful not to cut the oil seal lip on
the shaft keyway. Be sure the setscrews (21) in the
bearing retainer are positioned horizontally inline.
Install the same thickness of bearing adjusting
shims (16) as previously removed. Reinstall the re
taining ring (17) and check shaft endplay.
NOTE
Shaft endplay should be .002 to .005 inch (0,05 to
0,12 mm). Add or remove bearing adjusting shims
to obtain this endplay.
Install the slinger ring (27) and shaft key (20). Install
any leveling shims used under the pedestal feet.
Seal Reassembly and Installation
(Figures 1 and 3)
Clean the seal cavity and shaft with a cloth soaked
in fresh cleaning solvent.
Most cleaning solvents are toxic and
flammable. Use them only in a well‐ven
tilated area free from excessive heat,
sparks, and flame. Read and follow all
precautions printed on solvent contain
ers.
The seal is not normally reused because wear pat
terns on the finished faces cannot be realigned
during reassembly. This could result in premature
failure. If necessary to reuse an old seal in an emer
gency, carefully wash all metallic parts in fresh
cleaning solvent and allow to dry thoroughly.
Handle the seal parts with extreme care to prevent
damage. Be careful not to contaminate precision
finished faces; even fingerprints on the faces can
shorten seal life. If necessary, clean the faces with a
non‐oil based solvent and a clean, lint‐free tissue.
Wipe lightly in a concentric pattern to avoid
scratching the faces.
Inspect the seal components for wear, scoring,
grooves, and other damage that might cause leak
age. Clean and polish the shaft sleeve, or replace it
if there are nicks or cuts on either end. If any com
ponents are worn, replace the complete seal;
never mix old and new seal parts.
If a replacement seal is being used, remove it from
the container and inspect the precision finished
faces to ensure that they are free of any foreign
matter. Discard the spring centering washer in
cluded with the seal. It is not used in this applica
trion.
To ease installation of the seal, lubricate the bel
lows, sleeve and stationary seat O‐ring with water
or a very small amount of light lubricating oil, and
apply a drop of light lubricating oil on the finished
faces. Assemble the seal as follows (see Figure 3).