GB Instructions for use Refrigerator-freezer
We thank you for the confidence you have shown by purchasing our appliance. We wish you a lot of pleasure using the appliance. The refrigerator-freezer (hereinafter referred to as the appliance) consists of two parts: the upper part is the refrigerator compartment, and the lower part is the freezer compartment – freezer chest. The refrigerator compartment is intended for use in households, for storing fresh food at temperatures higher than 0°C.
• This appliance is manufactured in compliance with relevant safety standards. However, it is still advisable it is not used without due supervision by persons with diminished physical, motoric, or mental capabilities or persons with inadequate experience or knowledge. The same recommendation applies to minors using the appliance. • Before connecting the appliance, carefully read the instructions for use which describe the appliance and its correct and safe use.
• Warning! Ventilation slots on the appliance or a built-in element must always be clean and unobstructed. • Warning! Do not use mechanical devices or tools to defrost the refrigerator, nor any other methods except for those recommended by the manufacturer. • Warning! When installing, cleaning, or removing the appliance, make sure the insulation on the refrigeration system parts is not damaged. Thus you will also prevent damage to the environment.
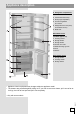
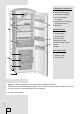
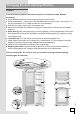
Appliance description A Refrigerator compartment 1 Control unit 2 Interior illumination lamp 3 Shelf (height adjustable) 4 Fruit and vegetables bin / drawer 5 Refrigerator door rack (deep and shallow version) 6 Bottle rack B Standard freezer (standard appliances) 7 Freezing drawer 8 Storage drawer 9 Storage drawer 10 Freezer door rack* 11 Water discharge groove* 12 Foot* 13 Wheel* B NO FROST freezer 7 Storage drawer 8 Freezing drawer 9 Storage drawer • Appliance interior equipment may change subject to app
A Refrigerator compartment 1 Control unit 2 Interior illumination lamp 3 Shelf (height adjustable) 4 Fruit and vegetables bin / drawer 5 Refrigerator door rack (deep and shallow version) 6 Bottle rack B Standard freezer (standard appliances) 7 Freezing drawer 8 Storage drawer 9 Storage drawer 10 Freezer door rack* 11 Water discharge groove* 12 Foot* 13 Wheel* B NO FROST freezer 7 Storage drawer 8 Freezing drawer 9 Storage drawer • Appliance interior equipment may change subject to appliance model.
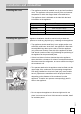
Installation and connection • The appliance should be installed in a dry and well ventilated room. The appliance will operate correctly if the environment temperature is within the ranges listed in the table below. The appliance class is indicated on the label with the basic information on the appliance.
• Handles are fitted under the housing at the front side to make moving the appliance easier (only with some models). The appliance may stand freely or it can be placed next to a kitchen furniture element or a wall. Mind the space required to open the door and pull out the drawers and shelves (see installation diagram). Remark: * Applies to OLD TIMER appliances. Connecting the appliance 260437 8 • Use the power cord to connect the appliance to the power mains.
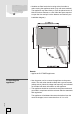
Changing the door opening direction Version I Tools required: ring spanner (box-end wrench) No. 8, screwdriver, torx25, flathead screwdriver 1. Use a flathead screwdriver to remove the hole plugs/covers A and B1. 2. Unscrew and remove – one by one, in the specified order from top to bottom – the hinges (C, D, and E1) and the door (F, G). Make sure the door is not damaged. 3. Move the hole plugs / covers (H) to the opposite side. 4.
Version II Required tools: socket spanner nr. 8, screwdriver, torx 25. Caution! After unscrewing of before fixing hinges, hold the door to prevent it from falling and damaging. 1. Remove upper hinge cover (save it for eventual later use), remove also the cover on the opposite side of the upper hinge cover (on the opposite side you will insert the attached cover during the assembly), and remove the cover on the opposite side of the upper part of the door. 2.
Operating the appliance with electronic controls CONTROL UNIT I 260437 A Temperature setting knob, turn on/off, and SF/SUPER 11
CONTROL UNIT II A Temperature setting and on/off button B Signal light: on when the appliance is in operation C Refrigerator sound alarm acknowledgement button D Signal light: flashes if refrigerator temperature is too high E Freezer boost button F Signal light: on when freezer boost function is activated G Digital refrigerator temperature display displays actual temperature in the appliance in the range from +1°C to +9°C* * Only with some models.
To switch on the appliance, rotate the A dial towards the max position. Signal light B will light up (only with some models). The appliance is switched off when the position of the recess sign (there is still voltage in the on the dial is aligned with the appliance). Selecting the temperature in the appliance • Set the desired refrigerator temperature by rotating the A dial in the interval from min to max. • Recommended setting is at the eco position.
• If your appliance is fitted with a digital display, it will flash while changes are made to the temperature setting and the currently set temperature will be indicated. When the flashing stops, the setting is saved and automatically stored. When the appliance is switched on for the first time, temperature +9°C is displayed and display flashes. This value is displayed until temperature in the refrigerator drops below this value.
If the temperature is too high, acoustic alarm will be activated (intermittent beep) and the D signal light will flash. In models with a display unit, temperature display (+9°C) will flash as well. The alarm will be switched off automatically as soon as the temperature in the fridge drops to a level that no longer presents spoilage hazard.
CONTROL UNIT III Appliance with a valve and temperature display A Refrigerator / freezer compartment selector switch B Signal light: on when the appliance is in operation C Freezer sound alarm acknowledgement key D Signal light: flashes if freezer temperature is too high E On/off and temperature control key F Signal light: on when freezer boost function is activated G Digital temperature display: displays actual temperature from +1 °C to +9°C for the refrigerator compartment and -16°C to -24°C (and SF) for
Switching the appliance on/off Use the A switch to choose the freezer compartment. Then, press and hold (for three seconds) the E key to switch on the appliance. Both the refrigerator and the freezer compartment will be switched on. When the appliance is on, the B signal light will also be on. If the E key is pressed and held for three seconds again, the entire appliance will be switched off.
High freezer temperature alarm If the temperature inside the refrigerator is too high, an acoustic alarm will be activated (intermittent beep) and the signal light D will flash. • Deactivate the alarm by pressing the C key. Signal light D will go off when the freezer temperature drops to a level that no longer presents food spoilage hazard. • Acoustic alarm will be activated every 24 hours if the freezer temperature is still not low enough and there is danger of food spoilage.
Operating the mechanically controlled appliance CONTROL UNIT IV Appliance with Dual Compressor System Temperature setting and on/off knob for the freezer compartment Temperature setting and on/off knob for the refrigerator compartment Lighting on/off key Red LED: excessive temperature warning 260437 A B C D 19
Turning the appliance on/off Turning on the freezer: rotate the thermostat knob A in clockwise direction towards the Max position. Turning off: rotate the A knob back until the arrow is aligned symbol (the appliance is still powered). with the Turning on the refrigerator: rotate the thermostat knob B in clockwise direction towards the Max position. Turning off: rotate the B knob back until the arrow is aligned symbol (the appliance is still powered).
CONTROL UNIT V Appliance with a single compressor, without a fan 260437 A Temperature setting and on/off knob B Illumination on/off button 21
Appliance with a single compressor, with a fan A Temperature setting and on/off knob B Illumination on/off button 260437 22
Turn on: rotate the thermostat knob A in clockwise direction towards the Max position. Turn off: rotate the thermostat knob A back into a position (in this case, the where the arrow is pointing at the symbol appliance is still powered). Setting the appliance temperature • Set the desired refrigerator compartment temperature by rotating the A knob so that the arrow is pointing to a position between the Min. and Max. sign.
Fan (only with some models) • The fan contributes to more equal distribution of temperature and faster cooling, as well as reduces formation of dew on the shelves. It only operates when the compressor is activated. • Turning on the fan is recommended as an additional function in the following cases: - increased temperature in the room (over 30°C), - increased humidity (during the summer), - when inserting larger quantities of food (rapid cooling).
Recommended food arrangement in the appliance Refrigerator compartment areas: - upper area: canned / preserved food, bread, wine, pastry, etc. - medium area: dairy products, ready-to-eat meals, deserts, juices, beer, cooked food, etc. - lower area: meat, meat produce, delicatessen, etc. - vegetable drawer / bin: fresh fruit, vegetables, salads, root vegetables, potatoes, onions, garlic, tomatoes, tropical fruit, sauerkraut, turnips, etc.
Storing food in the refrigerator Important warnings on food storage Appropriate use of the appliance, appropriate food packaging, maintaining the appropriate temperature and observing the hygienic guidelines will affect decisively the quality of food storage. Observe the best before dates indicated on the product packaging. Food stored in the refrigerator should be placed in closed containers or otherwise suitably packed to prevent emitting scent and moisture.
• Interior side of the refrigerator door is fitted with racks and bins intended for storing cheese, butter, eggs, yoghurt, and other smaller packages, tubes, cans, etc. The lower part of the door is fitted with a bottle rack. • The rack fitted on the interior side of the freezer compartment door (only with some models) is intended for storing frozen food that is used often and requires quick access (ice cream, open packages of frozen vegetables, etc.).
Freezing fresh food and storing frozen food Freezing procedure Maximum quantity of fresh food that can be introduced into the appliance at a time is indicated on the label with basic information on the appliance. If this quantity is exceeded, freezing quality will deteriorate, as will the quality of the already frozen food.
Important warnings on freezing fresh food The freezer should only be used for freezing food that is appropriate for freezing. The food should always be fresh and of adequate quality. Choose an appropriate packaging for the food and package it correctly. The packaging should be airtight and watertight to prevent loss of humidity or vitamins from the food. Indicate the type of food, quantity, and freezing date on each food package.
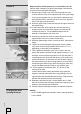
Defrosting the appliance Automatic refrigerator defrosting The refrigerator does not require defrosting, as ice accumulated on the back wall of the refrigerator compartment interior is melted automatically. The accumulated ice is thawed when the compressor is not operating. The drops will drip through the opening in the refrigerator back wall into a container above the compressor, from where they will evaporate.
Cleaning the appliance Before cleaning, disconnect the appliance from the power mains – rotate the thermostat knobs A (and B) to position and unplug the power cord. • Use a soft cloth to clean all surfaces. Cleaners containing abrasive particles, acids, or solvents, are not appropriate as they will damage the surface. Clean the appliance exterior with water or a mild solution of suds. Lacquer-coated and aluminum surfaces can be cleaned with lukewarm water to which some mild detergent was added.
Troubleshooting Problem: After connecting to the power mains, the appliance does not operate: Cooling system has been working continuously for a long period of time: Excessive build-up of ice on the back wall of refrigerator interior may result form the following: Water is dripping from the refrigerator: Signal light D flashes: Door won’t open easily: 260437 32 Cause or remedy: • Make sure the wall outlet is powered and that the appliance is plugged in. • Too high environment temperature.
Problem: Replacing the bulb: Cause or remedy: • Before replacing the bulb, disconnect the appliance from the power mains (unplug the power cord from the wall outlet / socket). Remove the cover using a screwdriver, replace the bulb with a new one (E14, same power rating as the one provided by the manufacturer) and replace the cover. • Do not dispose of the blown bulb with organic waste.
Information on appliance noise Cooling in the refrigerators-freezers is enabled by a cooling system with a compressor (with some appliances also a fan), which emits a certain level of noise during operation. The level of noise depends on installation, proper use, and appliance age. • After appliance startup, the compressor may be somewhat louder (fluid noise, noise caused by refrigerant flowing through the system). This is not a sign of malfunction and it will not affect the appliance useful life.
HZS3567 HZS3567F HZS3567AFV HZS4066AFV HZS4066F HZF3261AF HZF3267A HZF3767AF HZF3767AFV HZOS3567 HZOS4066 COMBI BASIC en (02-13)