
Operation Manual

Instructions for Use20
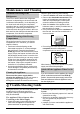
Ice Making
(certain models only)
Recommended thermostat position for ice
making is on the middle setting. Fill two thirds
of the ice tray with cold water or any other
liquid convenient for freezing. Insert the ice tray
into the guides or on the cooling plate. Time
required for the ice to form, largely depends on
ambient temperature, thermostat setting and
on how often you open the door. It usually
takes 2-6 hours (depends on which model of
refrigerator you have). With smaller
refrigerators we recommend you make a stock
of ice cubes (store them in a separate plastic
box). The easiest way to empty the ice tray is
to turn the tray around, pour it with cold water
and slightly twist it (bend it).
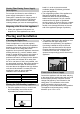
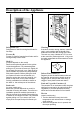
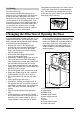
Changing the Direction of Opening the Door
If you find the direction of opening the door on your
appliance inconvenient, you can change it. Holes
on the opposite side have already been prepared
in the factory and are now plugged.
• Remove the cover on the upper hinge,
unscrew the hinge and take off the freezer
door (the door is not fixed on the middle
hinge), don't forget to remove the washer
from the middle hinge.
• Unscrew the lower hinge with foot and
remove the refrigerator door.
• Unscrew the middle hinge and the other foot.
• Take off all door corners and interchange
them (instead of the corner with a hole insert
the one without the hole and vice versa).
• Fix the lower hinge with foot to the opposite
side and fix the other foot on the place where
previously was the hinge.
• Put the refrigerator door on the lower hinge.
• Rotate the middle hinge for 180°, replace it
to the opposite side of the door and fix it.
• Put on the washer first and then the upper
door.
• Fix the upper hinge and cover it.
• Unscrew the handles and replace them to
the opposite side (not for handles mouinted
horizontally). Some screws are covered with
caps. Take them off before undoing the
screws.
• Plug the remaining holes with decorative
caps.
• Check the gasket, it shouldn't be creased
and it should seal well. In case it does not fit
perfectly, pull it out and rotate for 180°. In
certain models it is not possible to replace
the door gasket. Should the seal not adhere
to the casing of the appliance perfectly, it will
have to be heated from a suitable distance
(by means of hair drier, for example) and
lightly stretched to the required height. In
certain models it is not possible to replace
the door gasket.
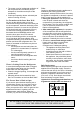
1 Cover for the upper hinge
2 Upper hinge
3 Middle hinge
4 Middle hinge washer
5 Lower hinge with foot
6 Foot
7 Handle
8 Corner without a hole
9 Corner with a hole