
Operation Manual


Instructions for Use
13
Maintenance and Cleaning
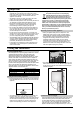
Automatic Defrosting of the Refrigerator
There is no need to defrost the refrigerator, because ice
depositing on the inner back wall is defrosted automatically.
Ice is depositing on the inner back wall during the compressor
operation; later on, when the compressor is not operating ice is
defrosting and water drops collect and drain through the outlet
in the inner back wall into the drain pan situated above the
compressor, from where it evaporates.
Cleaning the Appliance
Disconnect the power supply before cleaning the
appliance.
Do not use coarse or aggressive cleaning agents as you can
damage the surface. Be careful to remove any cleanser agent
remaining after cleaning.
• Clean the exterior with water and detergent.
Varnished surfaces are cleaned with soft cloth and an
alcohol based cleaning agent (for example glass cleaners).
You may also use alcohol (ethanol or isoprophylic alcohol).
The application of abrasive and specially aggressive
cleaners, such as the stainless steel cleaners, is not
appropriate for the cleaning of plastic and coated parts.
• Remove the detachable accesories in the interior of the
appliance and clean it with water and liquid detergent.
Plastic parts cannot be washed in washing machine.
• Wash the interior of the appliance with lukewarm water, in
which you added one or two spoonfuls of vinegar.
• Every now and then wipe the condenser on the rear wall.
Use soft non-metal brush or vacuum cleaner.
• Do not forget to clean also the defrost water receptacle
above the refrigerator compressor (do not remove the
receptacle).
After cleaning, connect the appliance to power supply and
reload it.
Switch Off the Appliance When Not In Use
If you do not intend to use the appliance for a longer period, set
the thermostat knob to the STOP (0) position, disconnect the
power supply, take out the foods and defrost and clean the
appliance. Leave the door slightly open.
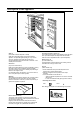
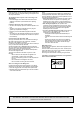
Changing the Direction of Opening the Door
If you find the direction of opening the door on your appliance
inconvenient, you can change it. Holes on the opposite side
have already been prepared in the factory.
• Unscrew the kick-plate and remove it by pushing
downwards.
• Unscrew the lower hinge and take off the door together with
the upper hinge washer.
• Unscrew the upper hinge fastener and fix it on the opposite
side of the appliance.
• Take off, change and replace the door hinge fixture and the
fixture plugs.
• Put the door with the upper hinge washer on the upper hinge
fastener.
• Fix the lower hinge with washer on the new position.
• Replace the cover plate of the lower hinge to the opposite
side of the kick-plate and place it to the appliance.
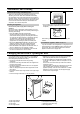
• In case your appliance is equipped with a handle mounted
on the side of the appliance, take it off and replace it on the
other side.
Some screws are covered with caps. Take them off before
undoing the screws.
Check the gasket, it shouldn't be creased and it should seal
well. Should the seal not adhere to the casing of the
appliance perfectly, it will have to be heated from a suitable
distance (by means of hair drier, for example) and lightly
stretched to the required height.
1 Upper hinge fastener 5 Kick plate or control panel
2 Upper hinge washer 6 Cover plate of the lower hinge
3 Lower hinge 7 Fixture plug of the door hinge
4 Lower hinge washer 8 Door hinge fixture