
Operating Instructions and Installation Instructions
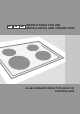

492203
• After connecting the glass ceramic hob to the power
mains, all symbols on the display will light up briefl y. The
cooking hob is then ready for operation.
• The cooking hob is fi tted with electronic sensors which
are activated by touching the designated surface areas
with your fi nger for at least one second.
• Each time a sensor is activated, this is confi rmed by a
beep.
• Do not place any objects on the sensor area. Make sure
the sensor area is always clean.
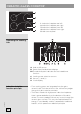
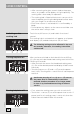
Touch the on/o sensor (A) and hold it for at least 1
second.
The cooking hob is activated »0« will appear on all power
level displays (B) and decimal points (B1) will fl ash.
The following setting must be e ected in the next
ten seconds; otherwise, the cooking hob will be
switched o .
After you have switched on the hob with the on/o key
(A), you may activate the desired cooking zone within the
following 10 seconds.
• After you touch the sensor for the desired cooking zone
(C), »0« on the relevant power level display will be lit more
intensively.
• Touch the sensors »+« (E) and »–« (E) to set the power
level (1-9-P). Touching the »–« sensor fi rst will set the power
level to 9.
Continuous pressing of »+» (C) or »-« (E) ssensor
the power level is automatically increased or
reduced. Another procedure is to change power
in steps is by intermediate touching of relevant
sensors.
• First, select the cooking zone you wish to switch o .
• Touch the »–« sensor (E) to set the power level to »0«. If
power level for all cooking zones is set to »0«, then the
hob will be switched o after 20 seconds.
Switching on the
cooking hob
Turning hotplates on
Turning hotplates o
10
HOB CONTROL