
Operation Manual


7.5.201521211717
17
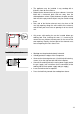
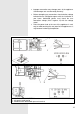
Gas connection joint
A EN 10226 R1/2 connection
B Nonmetal gasket of thickness 2 mm
C Pipe extension for liquid gas
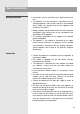
After connection check proper functioning of burners. Gas
must burn with clearly displayed blue-green flame hubs. If the
flame is not stable, increase minimum power setting. Instruct
the user in regard to burner button controls and read the
instructions or use together.
For the conversion procedure the appliance need not be
pulled out from its location.
Before starting to work on conversion, disconnect the
appliance from the mains and shut the gas inlet off.
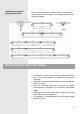
Replace the existing nozzles of declared nominal heat input
with adequate nozzles for the new type of gas (see table).
In case of conversion to the liquid gas propane/butane, the
minimum heat input setting screw shall be tightened all the
way.
In case of conversion to natural gas, unscrew the setting
screw to arrive at minimum heat input, but never for more
than 1,5 turn.
After the conversion is done, stick the new sticker with the
actual gas specifications of the appliance over the old one.
Upon completion check the gas tightness of the appliance.
Check sealing of all joints and couplings after
connection.
Conversion to another
type of gas