
Operation Manual
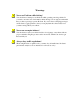

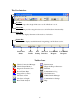
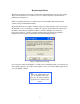
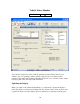

which is made conveniently accessible by means of the Manage Profiles button (Blue
Circle, Image 2). Once you have defined a profile for the vehicle, you can make it the
active vehicle profile by selecting it from the drop-down list (Blue Circle, Image 2).
Step-by-step instructions for establishing communication with a vehicle are conveniently
displayed on the left half of the window (Orange Circle, Image 2).
Establishing a Vehicle Connection
Verify that ProScan’s communication settings are correct for the hardware you are
using. See “Communication Settings” for more information.
Make sure you have selected the correct vehicle profile. If one does not already
exist, create a new profile for the vehicle and then select it. See “Vehicle Profile
Manager” for more information.
Physically attach the required cables and interface hardware between the vehicle and
your laptop computer.
Turn the vehicle’s ignition key to the ON position, or go ahead and start the vehicle.
Click the Connect button at the bottom of the window to begin the connection
process (Pink Circle, Image 2).
After you click the Connect button, ProScan will
attempt to detect and initialize the interface hardware
and then establish communication with the vehicle.
Each step of this process can be monitored with the
Connection Status Checklist that is displayed on the
right half of the window (Green Circle, Image 1). A green checkmark (Image 3) will
appear next to tasks once they have been successfully completed. If a task fails, a red X
(Image 4) will appear next to the task.
TIP
If you don’t see the Connect
button, make sure your display
is set to 96 dpi.
Image 3: Task Succeeded Indicator
Image 4: Task Failed Indicator
Once all tasks complete successfully, the red “Disconnected” label will change to a green
“Connected” label, and the ProScan software will have an active connection with the
vehicle. You can then switch to the ProScan tool of your choice and begin your
diagnostic session.
9