-
Google Web Security for Enterprise Administration Guide
-
Google, Inc. 1600 Amphitheatre Parkway Mountain View, CA 94043 www.google.com Part number: WSCG_R6.36_21 February 27, 2011 © Copyright 2011 Google, Inc. All rights reserved. Google, the Google logo, Google Message Filtering, Google Message Security, Google Message Discovery, Postini, the Postini logo, Postini Perimeter Manager, Postini Threat Identification Network (PTIN), Postini Industry Heuristics, and PREEMPT are trademarks, registered trademarks, or service marks of Google, Inc.
-
This software is provided “AS IS.” The copyright holders disclaim all warranties, either express or implied, including but not limited to implied warranties of merchantability and fitness for a particular purpose, with respect to this code and accompanying documentation. Although their code does not appear in gd 1.8.4, the authors wish to thank David Koblas, David Rowley, and Hutchison Avenue Software Corporation for their prior contributions.
-
Contents Chapter 1: Introduction 7 Welcome to Web Security for Enterprise Features 7 Service Components 8 7 Chapter 2: Activating Web Security 9 Overview 9 Preparing for Activation 9 Installing and Using the Connector 10 Activating and Deploying to Your Enterprise 12 Chapter 3: Administration Console 13 About the Administration Console 13 Login Page 13 Web Content Tab 14 Dashboard Page 15 Chapter 4: Web Virus 17 About the Web Virus Page 17 Web Virus Statistics Page 17 Web Virus Notifications 18 Chapter
-
Edit Your Account Details 45 Authentication Key Management Group Management 50 Installing the Connector 54 Chapter 8: Reports 55 About Web Security Reports 55 System Requirements for Reports Viewing Reports 57 Filtering Reports 61 Creating a Search 63 Creating Composite Reports 69 Report Scheduling 71 45 56 Appendix 9: Website Attributes / Categories Introduction 75 75 Appendix 10: Pre-defined Searches and Reports Introduction 81 Index 6 85 Google Web Security for Enterprise Administration Guide 81
-
Chapter 1 Introduction Chapter 1 Welcome to Web Security for Enterprise The web security service is a managed service that provides protection from webbased security threats such as malware, spyware, adware, phishing, and browser-based viruses. Additionally, you can restrict access to “blacklisted” web sites or objectionable URLs, and set individual or group policies according to your corporate guidelines.
-
Service Components Web security includes two main components: Web Scanning and Web Filtering. You can choose from the following combinations of these components when purchasing the service: Web Scanning: Includes the Web Virus and Spyware features. The Web Virus feature blocks all web content that contains malicious programs and viruses before it enters the network. The Spyware feature blocks all web content for spyware, adware, and phishing attempts. Web Filtering: Includes the Filtering feature only.
-
Chapter 2 Activating Web Security Chapter 2 Overview When you first sign up for the web security service, an activation specialist will discuss planning your deployment and will walk you through the activation process. This process involves three phases: • Preparing for activation: To set up your service, you must complete a few preliminary steps before you can begin.
-
5. Discuss the following issues with your activation specialist: a. Verify that port 8080 is allowed through your corporate firewall. b. Be sure that port 80 is blocked or locked down on the firewall. This will ensure that all outgoing web traffic can only go through the web security service. c. Identify your internal network subnets. d. Gather your corporate NAT address or range and domain name. 6.
-
During installation, you can choose to install one of the following Connector types, depending on which type works best with your existing infrastructure: • Enterprise Connector • Workgroup Connector Enterprise Connector Select this option to integrate Connector with your enterprise's existing web traffic gateway server (for example; a Microsoft ISA Server or other ICAP capable gateway). Workgroup Connector Select this option if your organization does not have an existing gateway.
-
Activating and Deploying to Your Enterprise Your activation specialist will guide you through this process (see also “Preparing for Activation” on page 9). Please contact your activation specialist for more information.
-
Chapter 3 Administration Console Chapter 3 About the Administration Console The Administration Console is a secure web-based interface for managing and configuring the email protection service. If your company is provisioned with web security, administrators can manage and configure this service by clicking the Web Content tab. For more information about using the Administration Console, see the Email Protection Service Administration Guide.
-
5. Click Web Virus, Spyware, or Web Filtering. (For information about navigating within each of these pages, see “Web Virus” on page 17, “Spyware” on page 21, and “Web Filtering” on page 27). Web Content Tab The Web Content tab in the Administration Console includes the following main pages: • Web security dashboard • Web Virus • Spyware • Web Filtering • Web Admin page • Reports page The Dashboard page is displayed when you click the Web Content tab.
-
For each feature, a navigation menu will appear in the left-hand column. This menu includes links to the following pages: • Reports: provides access to a number of custom management reports. • Management: enables the administrator to configure and deploy usage and security policies for each of the web security services (this link is not included with the Web Virus page). • Notifications: enables the administrator to set up user messages and email alerts.
-
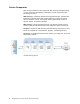
Chapter 4 Web Virus Chapter 4 About the Web Virus Page The Web Virus page enables you to monitor and manage the web security Web Virus feature. If a web page or attachment is found to contain a virus, then access to that web page or attachment is denied, and an automatic virus alert web page is displayed to the user. A notification may also be sent by email to an administrator at your company. Web Virus scanning will scan the first 100Mb of each file transfer.
-
Viruses Blocked (table): This table displays all the malware (viruses, worms, Trojans, backdoors, etc.) caught by the web security service for the given time period. The table only shows 100 entries at a time and orders them by most recent. There are links at the bottom of the table to step back in lots of 100, until you reach the very first virus caught by the web security service for the given time period.
-
The web security service allows for fully customizable block pages, which means that you can define the entire HTML output of the block page up to and including the opening and closing tags. This allows you to customize block pages with your own logo and text on the block page. To set User Messages: 1. Click the “Anti Virus” link. 2. Click the “User Messages” button in the Notifications sub-menu in the left hand column. This will bring up the “User Messages” screen. 3.
-
Custom message text will appear in end-user block page: Email Alerts The Web Virus Email Alerts are emails that notify the administrator of incidents when a virus has been blocked by the web security service. The email will contain the following information: • The IP address of the request that left your organization. • The reason the requested file was blocked (malware name).
-
Chapter 5 Spyware Chapter 5 About the Spyware Page The Spyware page enables you to monitor and manage the spyware protection provided by the web security service. If a web page or attachment is found to contain spyware, then access to that web page or attachment is denied, and an automatic spyware alert web page is displayed to the user. A notification may also be sent by email to an administrator at your company. Spyware scanning scans the first 100Mb of each file transfer.
-
Spyware/Adware/Phishing Blocked (table): This table displays all the spyware, adware and phishing incidents caught by the web security service for the given time period. The table shows 100 entries at a time and orders them by most recent. There are links at the bottom of the table to step back in lots of 100, until you reach the very first virus caught by the web security service for the given time period.
-
Note: All Spyware (truly malicious code, such as: viruses, worms, Trojans, back- doors, key loggers, etc.) are automatically blocked by the web security Web Virus component. (Similarly, all known Phishing exploits are automatically blocked the Spyware component.
-
6. Once you are happy with the Alert Page modifications you have made, click the “Save” button located at the bottom of the screen. 7. Click the preview button just beneath the text area to see how the additional information is rendered. You must save your changes before preview displays your new settings. Using Variables to Customize Block Page Text You may insert #r into the HTML in your custom block page and the block page will show the reason for the block event.
-
To set up Spyware Email Alerts: 1. Click the “Spyware” link. 2. Click the “Email Alerts” link in the Spyware Notifications box in the left hand column. This will bring up the “Email Alerts” page. 3. Select whether or not you want to be notified when a spyware application is blocked by selecting “Yes” or “No” from the drop down box. 4. Enter the email address (or addresses) you want notifications to be sent to in the empty text fields provided. 5.
-
Chapter 6 Web Filtering Chapter 6 About the Web Filtering Page The Web Filtering page enables you to: • Configure, enforce, and monitor web content filtering for your organization. • View comprehensive, filtering related information in the form of statistical reports, graphs, tables and exportable data files, based on your web traffic and the filtering blocks the web security service has made for your organization. • Customize the HTML block alert page.
-
Note: To enable web filtering per user or group within your company, you will need to download the relevant Connector. For more information, contact your web security service account representative. See also “Installing and Using the Connector” on page 10. Click the Web Filtering link to open the Web Filtering Statistics page. Web Filtering Statistics Page This view gives you a live, ‘at-a-glance’ view of the filtering status. To access click ‘Web Filtering’ link at the top of the screen.
-
Web Filtering Management The process of configuring Web Filtering policies requires the use of several “filtering objects.” Each of these objects is listed in the left hand column under the Management box.
-
Categories: These are presented as a selectable list of all the different categories that a website might fall under. Through the use of categories you can quickly select a wide range of websites simply by clicking on a check box next to each category you wish to include in your rule. Domains/URL: this is a list of websites in relation to the particular policy rule which contains them. A common use for this is to create a global allowed list and a global blocked list.
-
2. Under the Management sub-service dropdown, click the ‘Filter’. This will bring up the ‘Manage Filter’ screen. 3. The main ‘Manage Filters’ page presents you with a list of all your current filters. To review the settings for a particular filter, click the restriction name in question or click the ‘Edit’ button. The components of the requested Restriction will then appear. You can also click the ‘Edit a Filter’ tab and select the filter you wish to edit from the Name dropdown list. 4.
-
5. To make viewing of your listed pages easier, you can click the ‘sort alphabetically’ button at the bottom of the text area. 6. To recall the Domains/URL entries from the Default Filter, click the ‘Set to Default’ link. This may be useful for quickly configuring new filters which are typically just modifications of the Default set of filters. 7. Once you are satisfied with the Domains/URL entries, click the ‘Save’ button located at the bottom of the page. 8.
-
4. If you wish to filter all the available file extensions, then you can click the ‘Select All’ button located in the bottom of the page. This will place a check mark for every file extension. A second click the ‘Deselect All’ button will remove the filter on all content types. 5. If you wish to enter your own custom file extensions, you can type these into the ‘other file extensions’ text box area. The file extensions must be entered using the same syntax as the following example: tif aac psd 6.
-
Schedules When implementing Web Filtering within an organization, you may wish to change the type of rules a group of users has based on the time of day and/or day of the week. For example, you might like to let your staff have access to Internet banking, online shopping and news sites only during their lunch hour.
-
7. Select the days of the week for which you would like the Schedule to be active. This is done by clicking on the check boxes located next to each day of the week. If you click the weekdays check box, Mon-Fri will be selected, if you click the Weekends check box, Sat-Sun will be selected and if you click the Everyday check box Mon-Sun will be selected. Note: You cannot create a Schedule without selecting at least one day of the week. 8.
-
Policies The Policy page provides you with a visual overview of the Filtering Rules you have configured for your organization and a means to add more in an ordered manner. The simple layout enables you to see all the User Groups and their applied filtering rules. Each combination of a Filter and a Schedule within the Policies page is referred to as a Pairing. Each Policy Rule must consist of at least one pairing. To create a typical, time-dependent policy, multiple pairings can be used.
-
10. Define ‘WHAT’ this rule will filter on. You can select any of your filters from the drop down box and click the Add button. Adding more than one filter will have the action of ‘ANDing’ the filters together. You can make the filter into a NOT action by clicking the ‘Set as an exception’ check box. (If you do this with only one filter, it becomes a ‘NOT’, if it is a second filter, then it becomes an ‘AND NOT’). 11. Define ‘WHEN’ this rule will be in effect.
-
2. Click the ‘Policy’ link in the ‘Management’ sub-service menu. This will then bring up the main ‘Manage Policy’ page. 3. Find the Rule within the listed Policy that you want to delete, and then click the ‘Delete’ Button located to the right of the pairing. 4. You will then be presented with a pop-up dialog box asking you if you are sure you want to delete the rule. Click the ‘OK’ button to proceed. 5. You should now see that the rule is no longer listed in the ‘Company Policy’ listing. 1.
-
Quotas The Quotas feature is available only when using the Connector. Quotas enable you to limit the amount of Web access a user can have on a daily or weekly basis.
-
8. Click the ‘Save’ button to save your new Quota. To edit a Quota: 1. Click the ‘Web Filtering’ service tab on the main navigation bar at the top of the screen. 2. Under the Management sub-service dropdown, click the ‘Quota’. This will bring up the ‘Manage Quotas’ screen. 3. There are three ways to edit a Quota. • Click the name of the Quota in the rules list. • Click the edit button in the same row as the quota you want to edit.
-
Categories (HTTPS) tab: This tab opens a page to define the restrictions for HTTPS-only traffic. If you later disable separate HTTP/HTTPS filtering, the system will default back to the HTTP restrictions for both HTTP and HTTPS websites. Acceptable Usage Policy Page The Acceptable Usage Policy (AUP) page enables you to inform your users of company policy related to using the Internet usage To help our customers, the web security service provides a click-through Acceptable Usage Policy screen.
-
4. Click the preview button just beneath the text area to see how the additional information is rendered. You must save your changes before preview displays your new settings. Note: The AUP screens rely on the Quota functionality of the Connector. If the Connector is reset, the tallies will also reset to zero and the AUP screens will be displayed again to the end users.
-
6. Once you are happy with the Alert Page modifications you have made, click the “Save” button located at the bottom of the screen. 7. Click the preview button just beneath the text area to see how the additional information is rendered. You must save your changes before preview displays your new settings. Using Variables to Customize Block Page Text You may insert #reason, #url, #category or #username into the HTML in your custom block page and the block page will show the reason for the block event.
-
Email Generation You can specify a maximum of 5 different email addresses that you wish to have these alerts sent to. If you require the alerts to be sent to any more addresses than this, we recommend that you set up a group mailing address and then enter it into Web Content tab. To set up email alerts: 1. Click the “Filtering” link. 2. Click the “Email Alerts” link in the left hand column. This will bring up the “Email Alerts” page. 3.
-
Chapter 7 Admin Page Chapter 7 About the Admin Page The Admin page enables you to manage groups, manage authentication keys, and download the Secure Connector. Edit Your Account Details Click the Admin link on the main navigation bar at the top of the screen to display the Account Details page. To edit your account details, fill in the relevant fields and then click the Save button at the bottom of the page.
-
Authentication Keys can be created using the Web Admin page. You can create a Company, Group, or User Authentication Key which will be used to identify and authenticate the user to the web security service. A User Authentication Key enables more detailed user behavior reporting and policy management, but requires administrators to manage more keys.
-
Case 2: Group Authentication Key • • Scenario Setup • There are three branch offices and they do NOT currently use Active Directory groups. A connector is installed at each branch office, with a group authentication key installed for each workgroup connector coordinating to each office.
-
Note: If you are using Active Directory, you are advised to use Case 1 (Company Authentication Key) to appropriately apply group policy. Case 3: User Authentication Key • • Scenario Setup • There are three mobile laptop users that you want to apply web security protection to while the user is surfing the web remotely at home or traveling (away from the corporate network). The Connector is installed on each of these laptops, and the User Authentication Key for each laptop identifying each user.
-
Note: User Authentication Key overrides all user information reported, so only use ONE user authentication key per ONE connector on ONE system. Summary • If you want to use Active Directory for granular policy and user reporting - you should use the Company key installed the Domain Controller with an Enterprise or Workgroup Connector. • If you have satellite offices where you want to apply a group policy to everyone in that office, use the Group Authentication Key.
-
To deactivate an Authentication Key: 1. Click the Web Admin link, and click ‘Authentication Keys’ under Authentication. 2. Look for the Authentication Key you wish to deactivate and click the corresponding ‘Deactivate’ button, which will not delete the Authentication Key, but sets the Authentication Key state to ‘Inactive’.
-
Each of these groups will be discussed in further detail. For either of these groupbased web access controls to function, you must have a Connector installed within your infrastructure. If the Connector is not installed, all web requests will be managed by Alert page that is displayed to users within your organization when web content is blocked by the default policy.
-
Note: The Directory Group name, itself, is functional and therefore no further parameters are required to configure the Directory Group. To edit a Directory Group Name: 1. Click the “Admin” service tab on the main navigation bar at the top of the screen. 2. Click the “Group” button in the “Authentication” sub-service tab in the left hand column. This will bring up the “Groups” screen. 3. Click the group button which corresponds to the Directory Group which name you want to change. 4.
-
WinNT://ACTIVE_DIRECTORY_REALM\USER_NAME 3. The syntax is case insensitive and there may be spaces in the names, however the names should be spelled exactly as they appear within your Windows Domain or Active Directory. 4. To save the entered usernames, click the “Save” button. Otherwise click “Cancel” to abort the entries and to return to the Manage Groups page. To create a Group using IP Addresses: 1. Click the corresponding existing group button on the Group listing page. 2.
-
Installing the Connector To install the Secure Connector: 1. Log in to the Administration Console. 2. Select the Web Admin link on the Web Content tab. 3. Click Secure Connector. 4. Click Download. During installation, the Secure Connector provides the following configuration options: • Enterprise Connector • Workgroup Connector • Mobile Connector (coming soon) For more information on the Secure Connector, see the Web Security Connector Installation Guide.
-
Chapter 8 Reports Chapter 8 About Web Security Reports Google Web Security reports are accessible via the Reports link on the Web Content tab.
-
To run a search, do the following: 1. Choose a time period for the search, from the last hour to the last year. 2. Choose a pre-defined search or create a new search. 3. Add filters based on reporting attributes or metrics. 4. Choose the number of results to view, from 10 to 1000. 5. Choose a reporting attribute to group the results by. 6. Choose to sort the results by name, bandwidth, browse time, bytes sent, bytes received or hits. 7. Choose to view the top or bottom results. 8.
-
Viewing Reports Reports are generated from predefined or previously saved searches. They can be viewed online or downloaded as a PDF. When a report has been generated you can refine the search by adding filters or changing the conditions of the search. You can save your changes as a new search or replace a previously saved search, and filters can be saved separately as a filter set. To view reports from a predefined or saved search: 1.
-
6. In the View as list, click a chart type. The available charts depend on the type of report and may include: • Grid • Bars • Pie • Columns • Line 7. Click the search to generate and view a report (see “Viewing Reports” on page 57). Alternatively, click the Download icon to download the report in PDF format. See “Downloading Reports” on page 60.
-
You can refine your search by clicking entries in the primary attribute column. Click an entry, and then click is equal to to include only that entry in the report. Alternatively, click is not equal to to exclude the entry. When you have made your changes, click Launch search to display the refined report. Adding and Removing Metrics To add or remove columns from the display: 1. Click the +|- button to display the Choose which columns you would like to see dialog. 2.
-
Click the hyperlink at the top of the chart to change the sort metric: Right-click the chart to print or save the chart. Choose Print Chart to print the chart. Choose Save as JPEG Image to export to a JPEG image. Choose Save as PNG Image to export to a PNG image. Choose Save as PDF to export to Adobe PDF. Bar Chart The bar chart displays the data as horizontal bars. Column Chart The column chart displays the data as vertical bars. Pie Chart The pie chart displays the data as a 2D or 3D pie chart.
-
Downloading PDF Reports To download a report in PDF format without viewing the report on-screen: 1. Click the Reports tab to display the Reports pane. Alternatively, on the Reports menu, click Reports. 2. Click a folder to show or hide the reports for that folder. 3. In the View as list, click a chart type. The available charts depend on the type of report and may include: Grid Bars Pie Columns Line 4. Click the Download icon to download the report.
-
To add a filter: 1. Click the Add link. 2. In the attribute list, click the required attribute (see “Website Attributes / Categories” on page 75). 3. Enter a value in the box. 4. Click Add. To activate filters: 1. Select the check box for each filter you want to activate. 2. Click the Activate hyperlink. Activated filters are shown with a green triangle. To deactivate filters: 1. Select the check box for each filter you want to deactivate. 2. Click the Deactivate link. Deactivated filters are dimmed.
-
3. For each filter you want to add to the set: a. Click Add Filter. b. In the Select filter type list, click a filter type. You can add attribute or metric filters, or existing filter sets (see “Adding Filters to a Search” on page 61). c. Click Add. Copying a Filter Set To copy a filter set: 1. Click the filter set. 2. Enter a unique name for the copy in the box and press Enter. Renaming a Filter Set To rename a filter set: 1. Click the filter set. 2. Enter a unique name in the box and press Enter.
-
3. Click the tab for the type of search you want to create. The tabs are: Search Time Analysis Detailed Search Alternatively: 1. Click the Reports tab to display the Reports pane. 2. Click the Create a new report hyperlink. 3. Click the tab for the type of search you want to create. Creating a Standard Search To create a standard search: 1. Select a time period. 2. Add any required filters (see “Adding Filters to a Search” on page 61). 3.
-
The available metrics are: name bandwidth browse time bytes received bytes sent hits 6. Click the hyperlink to change the primary sort order. The hyperlink indicates the current order to ascending or descending. 7. Clear the check box to exclude secondary attribute criteria. Alternatively select the check box to enable additional criteria, then do the following: a. Choose the number of secondary attributes to display from and their dropdown box. The available options are first: 1 2 3 4 5 10 20 b.
-
3. In the View list, click the number of attributes to display. 4. In the attribute list, click the required attribute. See “Website Attributes / Categories” on page 75. 5. In the sort metric list, click the required sort metric. The available metrics are: name bandwidth browse time bytes received bytes sent hits 6. In the sort metric list, click the required sort metric. 7. Click Launch search. When the report has been generated it is displayed below the button. 8.
-
Allowed Traffic You can also create a detailed report from an allowed traffic report. The allowed traffic report shows all of the allowed traffic by category for a single day. To view an allowed traffic report: 1. Click the Reports tab to display the Reports menu. 2. In the Reports menu, click Allowed Traffic. 3. In the Type list, click a filter type. The available types are: User Group Internal IP 4. Enter a Date in the box or click the Calendar icon to choose a date. 5.
-
Saving a Search To save a search: 1. Click Save. Alternatively, click "Save as" to save a copy of the report. Then use current settings to create a new Report dialog is displayed. 2. Enter a name for the search (up to 256 characters) in the Choose a report title box. Alternatively, select the use the default name check box to use the name adjacent to the check box. 3. In the Choose an existing folder from the list list, click a folder.
-
Deleting a Search To delete a search: 1. Click the Reports tab to display the Reports pane. Alternatively, on the Reports menu, click Reports. 2. If the search you wish to delete is contained within a folder, click the folder to display the search. 3. Click the Delete icon. You will be prompted to confirm your action. 4. In the dialog click OK to delete the search. Alternatively, click Cancel to abandon deleting the search. Note: You cannot delete a search that is part of a composite report.
-
5. For each search you wish to include: • In the Report(s) to include in composite list, click the required search, and then click add. To change the order in which the searches will be displayed: • In the Report table, click the required search, and use the move up and move down icons to change the position of the search. To remove a search from the composite report, click the Delete icon 6. Add any required filters (see “Adding Filters to a Search” on page 61). 7.
-
Deleting Composite Reports To delete a composite report: 1. Click the Reports tab to display the Reports menu. 2. On the Reports menu, click Composite Reports. 3. Click the Manage composite reports tab. 4. Click the Delete icon next to the composite report you wish to delete. You will be asked to confirm that you want to delete the report. Report Scheduling Report scheduling enables you send reports via email to specific recipients.
-
Email Recipients Scheduled reports are sent to groups of email recipients. If you want to send a report to a single recipient then you will need to create a group with only one recipient. Creating an Email Recipient To add recipients to an email group: 1. Click the Reports tab to display the Reports menu. 2. On the Reports menu, click Recipients. 3. Click the group you want to add recipients to. 4. Enter the first part of the email address in the Recipients for box. 5.
-
5. In the Delivery schedule area, click one of the following to set when the report will run: Daily - every day Weekly - every week on the day specified Monthly - every month on the first day of the month Four weekly - every four weeks on the day specified Reports contain data for the period up to midnight on the day before the report is run: Daily contains the previous 24 hours Weekly contains the previous seven days Monthly contains the previous month Four weekly contains the previous 28 days 6.
-
4. Click the Edit icon next to the composite report you wish to edit. Alternatively: 1. Click the Reports tab to display the Reports menu. 2. On the Reports menu, click Schedule. 3. Click the Edit composite reports tab. 4. In the Report schedule name list, click the report you wish to edit. When you have finished editing the report, click Save changes to save your changes. See “Creating a Scheduled Report” on page 72. Deleting a Scheduled Report To delete a scheduled report: 1.
-
Website Attributes / Categories Appendix 9 Introduction Google Web Security enables you to filter for website categories when setting up your filtering service. The following list includes the names and definitions of these categories. Note: This list is subject to change. If a category was removed from the list, it is now included in a different, related category. Adult: Directed at adults, but not necessarily pornographic.
-
Business and Industry: Marketing, commerce, corporations, business practices, workforce, human resources, transportation, payroll, security and venture capital; office supplies; industrial equipment (process equipment), machines and mechanical systems; heating equipment, cooling equipment; materials handling equipment; packaging equipment; manufacturing: solids handling, metal fabrication, construction and building; passenger transportation; commerce; industrial design; construction, building materials; shi
-
Fashion: Clothing and fashion; hair salons; cosmetics; accessories; jewelry; perfume; pictures and text relating to body modification; tattoos and piercing; modeling agencies. Dermatological products are classified as Health and Nutrition. File Transfer Services: Primary purpose of providing download services and hosted file sharing. Filter Avoidance: Promoting and aiding undetectable and anonymous web usage, including cgi, php and glype anonymous proxy services.
-
Illegal Activities: Promoting crime, such as stealing, fraud, illegally accessing telephone networks; computer viruses; terrorism, bombs, and anarchy; websites depicting murder and suicide as well as explaining ways to commit them. Illegal Downloads: Providing the ability to download software or other materials, serial numbers, key generators, and tools for bypassing software protection in violation of copyright agreements. Torrents are classified as Peer File Transfer.
-
Online Trading: Online brokerages; websites that enable the user to trade stocks online; information relating to the stock market, stocks, bonds, mutual funds, brokers, stock analysis and commentary, stock screens, stock charts, IPOs, stock splits. Services for spread betting on stocks and shares are classified as Gambling. Other financial services are classified as Finance. Organizational Email: Websites used to access business email.
-
Shopping: Bartering; online purchasing; coupons and free offers; general office supplies; online catalogs; online malls. Social Networking: Social networking sites. See also Professional Networking. Social Science: Sciences and history related to society; archaeology; anthropology; cultural studies; history; linguistics; geography; philosophy; psychology; women's studies. Society and Culture: Family and relationships; ethnicity; social organizations; genealogy; seniors; child-care.
-
Pre-defined Searches and Reports Appendix 10 Introduction Google Web Security provides a set of pre-defined searches and reports. To view these reports, do the following: 1. Click the Web Content tab in the message security Administration Console. 2. Click the Reports link on the blue bar. 3. From the left-navigation menu, click Reports. 4. Click any of the analytical categories shown in the Predefined reports section of this page -- for example, Bandwidth Analysis. 5.
-
What were the Top 10 Categories that consumed the most Bandwidth? What were the Top 10 Sites by Bandwidth for Social Networking Sites? What were the Top 10 Sites by Hits for Media Sites? Which groups are consuming the most bandwidth in streaming media? Which Groups were consuming the most Bandwidth? Which Hosts were consuming the most Bandwidth for the Top 10 Users? Which of the company's offices had the highest Bandwidth usage broken down by Internal Subnets? Which of the company's offices had the highest
-
Which Users spent the most time online? Category Analysis What was the total number of Hits for all Categories? What were the Top 10 Categories visited by each Internal Subnet? Group Analysis What were the Top 10 Groups by Hits? What were the Top 10 Groups consuming the most Bandwidth? Who were the Top 10 Users with the highest Browse Time for the Top 10 Groups? Host Analysis What was the number of Hits for each of the most popular Hosts? What were the Top 10 Hosts by Hits? What were the Top 10 Hosts vis
-
What were the Top 10 Threats blocked per protocol? Who were the Top 10 Users browsing Spyware Hosts? Who were the Top 10 Users making outbound Spyware requests? Who were the Top 10 Users that had the highest number of Virus blocks? Security Analysis What were the Top 10 Categories that were blocked? What were the Top Categories where Users were blocked for Spyware? Who were the Top 10 Users blocked by Outbound Content Control? Who were the Top 10 users per risk category? User Analysis Where were the Top 1
-
Index A activation 9 activation email 10 activation specialist 10 Admin page 45 Administration Console 7, 13 Adware 7, 21 Anti-Virus 14, 17 attachment 27 available options 9 B bandwidth quotas 7 creating a directory group 51 creating or editing 51 default group 53 deleting a group 52, 53 evaluating and prioritizing 51 I internal IP address 10 IP ranges 10 L license keys 45 login page 13 C Categories 75 company license key 46 configuration 9 Connector 8, 10, 45, 54 downloading 54 corporate NAT address 10
-
U user license key 48 User Messages 23, 42 V viruses 7 W Web Admin page 14 Web Content tab 9, 13, 14 Web Filtering 8 web filtering scenario 9 web form 10 Web Scanning 8 Web Scanning component 17 website categories 75 Windows Domain name 10 86 Google Web Security for Enterprise Administration Guide