Google Search Appliance Getting the Most from Your Google Search Appliance Google Search Appliance software version 7.
Google, Inc. 1600 Amphitheatre Parkway Mountain View, CA 94043 www.google.com GSA-QS_100.06 December 2013 © Copyright 2013 Google, Inc. All rights reserved. Google and the Google logo are, registered trademarks or service marks of Google, Inc. All other trademarks are the property of their respective owners. Use of any Google solution is governed by the license agreement included in your original contract.
Contents Chapter 1 Introduction .............................................................................................................. 6 About This Document Using Google Search Appliance Documentation What Is Universal Search? Providing Universal Search with a Google Search Appliance Crawling and Indexing Content Sources Serving Search Results to Users Document Overview Chapter 2 Planning ............................................................................................................
Indexing Database Content Synchronizing a Database Learn More about Database Synchronization Indexing Entities Learn More about Entity Recognition Testing Indexed Content Chapter 5 27 28 29 29 29 29 Search Experience ......................................................................................................
Displaying Translations of Search Results Enabling Translation of Search Results Learn More about Translation of Search Results Showing Document Previews in Search Results Providing Document Previews in Search Results Learn More about Document Previews Enabling Wildcard Search Learn More about Wildcard Search Customizing the User Interface How Does the Search Appliance Create the User Interface? Tools for Customizing the User Interface Editing an XSLT Stylesheet Learn More about User Interface Customization
Chapter 1 Introduction Chapter 1 The Google Search Appliance enables you to provide universal search to your users. You can get the most from your Google Search Appliance by using some or all of its many features to fine-tune and enhance universal search. Become familiar with the Google Search Appliance’s features by reading this document and apply those features that best suit your search solution.
Using Google Search Appliance Documentation Google offers a comprehensive library of public documentation about the Google Search Appliance. These documents contain in-depth information about how to use the features and functions described in this document. See the Google Search Appliance help center, http://support.google.com/gsa, for more information.
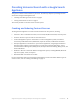
Providing Universal Search with a Google Search Appliance Your goal is to deliver universal search to your users. The two major aspects of providing universal search with a Google Search Appliance are: • “Crawling and Indexing Content Sources” on page 8 • “Serving Search Results to Users” on page 9 This section provides an overview of each of these aspects.
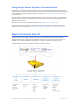
Serving Search Results to Users When users search for information, the Google Search Appliance returns a single set of search results that are integrated from different types of sources. Results are ranked based on relevancy. The following figure shows a set of search results that are integrated from sources including an intranet, two content management systems, and a file share.
Chapter 2 Planning Chapter 2 Like other software system deployments, planning is the first and most important phase.
Google recommends using the Google Search Appliance “Notes from the Field” (https:// support.google.com/gsa/answer/2721831) as your primary resource when planning and deploying a search solution with the Google Search Appliance.
Chapter 3 Setting Up Chapter 3 Setting Up a Search Appliance Before you can start implementing a universal search solution, you need to set up your Google Search Appliance. The following sections provide an overview of the set up process: • “Installing and Configuring a Search Appliance” on page 12 • “Configuring Search Appliances for Load Balancing or Failover” on page 13 These topics are covered in depth in Google Search Appliance documentation.
After you complete the installation process, record the identification number of the search appliance, which is useful in troubleshooting if the search appliance experiences any problems.
Creating User Accounts The Google Search Appliance has a default administrator account with the user name “admin” and password “test.” The default account cannot be deleted. After you install the search appliance, you can create additional user accounts. The Google Search Appliance has two levels of user accounts: • Administrator accounts (see “Administrator Accounts” on page 14) • Manager accounts (see “Manager Accounts” on page 14) Each type of account has different permissions.
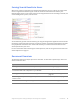
Setting Up User Accounts Set up a user account by selecting an account type and providing user information on the Administration > User Accounts page in the Admin Console, shown in the following figure. Learn More about User Accounts For more information about creating user accounts, refer to the Admin Console help page for the Administration > User Accounts page.
Chapter 4 Crawling and Indexing Chapter 4 After the Google Search Appliance has been set up (see “Setting Up a Search Appliance” on page 12), you can configure the search appliance to crawl the content sources that you identified during the planning phase, as described in “Planning” on page 10. Crawl is the process by which the Google Search Appliance discovers enterprise content and creates a master index. The resulting index consists of all of the words, phrases, and meta-data in the crawled documents.
• Product documentation • Marketing literature The Google Search Appliance supports crawling of many types of formats, including word processing, spreadsheet, presentation, and others. The Google Search Appliance crawls content on web sites or file systems according to crawl patterns that you specify by using the Admin Console. As the search appliance crawls public content sources, it indexes documents that it finds. To find more documents, the crawler follows links within the documents that it indexes.
Configuring Crawl of Public Content To configure a search appliance to crawl a content source, you specify top-level URLs and directory addresses and links that the search appliance should follow by using the Content Sources > Web Crawl > Start and Block URLs page in the Admin Console. In addition to specifying start URLs, you can also specify URLs that the search appliance should not follow and crawl. By default, the search appliance crawls in continuous crawl mode.
3. Saving the crawl schedule. To schedule crawl times for a specific host, you can change the host load and times in the Content Sources > Web Crawl > Host Load Schedule page. By setting a host load of 0, the crawler will not crawl that host during the configured time period. If you wish to have a document added to the crawl queue right away, then you can do so by entering in the URL in Re-Crawl These URL Patterns on the Content Sources > Web Crawl > Freshness Tuning page.
The following table lists the access-control methods that the search appliance supports and whether the methods are supported for crawl, serve, or both. Method Crawl Serve HTTP Basic X X NTLM HTTP X X LDAP (Lightweight Directory Access Protocol) X Forms Authentication X X x.
Managing Serve of Controlled-Access Content When a user issues a search request for controlled-access content, the search appliance verifies the user’s identity and determines whether the user has authorization to view the content. This check is performed before the search appliance displays any content in search results. By performing the results access control checks in real-time, the Google Search Appliance ensures that users only see results they are authorized to view.
• To configure the search appliance to require X.509 Certificate Authentication for search requests from users, use the Search > Secure Search > Universal Login Auth Mechanisms > Client Certificate page. • To enable the search appliance to use IWA/Kerberos authentication during secure serve, use the Search > Secure Search > Universal Login Auth Mechanisms > Kerberos page.
Also, Google partners have developed connectors for other non-web repositories. For information about these connectors, visit the Google Solutions Marketplace (http://www.google.com/enterprise/ marketplace/). The connector manager is the central part of the connector framework for the Google Search Appliance.
Obtaining the Connector Manager and Connectors To run a connector, you need the software for the connector manager and the connector. The following table lists methods for obtaining the software components that you need to use connectors, as well as the support provided for each component. Component Obtain by Support Source code for the connector manager and connectors Download the code from the Google Search Appliance Connector Manager project (http:// code.google.
6. If required by the connector, configuring secure crawling of the content management system by using the Admin Console page that is appropriate for the specific connector. 7. Restarting the connector. 8. Verifying that the search appliance is indexing URLs from the connector by using the Index > Diagnostics > Index Diagnostics page. Learn More about Connectors For in-depth information about connectors, refer to the Google Search Appliance connector documents.
The following figure provides an overview of indexing hard-to-find content by using feeds.
2. Configuring the search appliance to accept the feed by using the Content Sources > Feeds page, shown in the following figure. To prevent unauthorized additions to your index, feeds are only accepted from machines that are specified on this page. 3. Running the feed client script. 4. Monitoring the feed by using the Admin Console. 5. Checking for search results from the feed within 30 minutes of running the feed client script.
The following figure provides an overview of indexing content in databases. Synchronizing a Database Synchronize a database by performing the following tasks with the Admin Console: 1. Creating a new database source on the Content Sources > Databases page, shown in the following figure.
2. Setting URL patterns that enable the search appliance to crawl the database by using the Content Sources > Web Crawl > Start and Block URLs page. 3. Starting a database synchronization by using the Content Sources > Databases page.
You can find a link to the Test Center at the upper right side of the Admin Console. When you click the Test Center link, a new browser window opens and displays the Test Center page, as shown in the following figure.
Chapter 5 Search Experience Chapter 5 Using Features to Enhance the Search Experience A user’s search experience is based on accessing the Google Search Appliance to enter a search and receive results. The Google Search Appliance provides many built-in features that ensure a satisfactory search experience for users. For a list of these features, refer to “Built-In Search Experience Features” on page 32.
This section briefly describes each feature that you can use to enhance the search experience and contains links that you can follow to get more information about each feature. Built-In Search Experience Features Without any administrator intervention, the Google Search Appliance provides a rich search experience by using its built-in search features. The following table lists these built-in search features.
The URL for the default search page is http://SEARCH_APPLIANCE_NAME. For example, if your search appliance is named compgsa, the built-in search page is available at http://compgsa. You can also link this URL from your website to provide user access to it.
3.
Setting Up KeyMatches You set up a KeyMatch by matching a search term to a specific URL and specifying a title for the match. In the preceding example, there are two KeyMatches for the search term “gsa.” In the first KeyMatch: • The URL is http://pm.altostrat.com/products/products/gsa • The title is “Google Search Appliance” In the second KeyMatch: • The URL is https://pm.altostrat.
Suggesting Alternative Search Terms along with Results The Google Search Appliance can suggest alternative search terms to users for their original keyword searches with its related queries feature. When users search with that term, the search appliance always presents the related query at the top of the search results. When a user clicks the related query, the search appliance runs the search again and returns additional results.
2. Setting up the related query on the Search > Search Features > Front Ends > Related Queries page, shown in the following figure. 3. Saving the related query. Learn More about Related Queries For in-depth information about setting up and using related queries, refer to “Using Related Queries to Suggest Alternative Searches” in Creating the Search Experience. Grouping Search Results by Topic The Google Search Appliance can group search results by topic with its dynamic result clusters feature.
For example, suppose a user who is looking for information about the expense budget for NYSSA and searches for this information using the term “expense nyssa.” A dynamic result cluster appears with the results, as shown in the following figure. Setting Up Dynamic Result Clusters By default, dynamic result clusters are disabled.
2. Enabling dynamic result clusters and specifying their placement by using either the Page Layout Helper or the XSLT Stylesheet Editor on the Search > Search Features > Front Ends > Output Format page, shown in the following figure. 3. Saving the page layout. Learn More about Dynamic Result Clusters For in-depth information about setting up and using dynamic result clusters, refer to “Using Dynamic Result Clusters to Narrow Searches” in Creating the Search Experience.
Providing Options for Navigating Search Results In many cases, content already has considerable metadata associated with it. As a search appliance administrator, you can use metadata to help users explore search results by using dynamic navigation. With dynamic navigation, when a user clicks on a metadata attribute value, the search results are filtered to contain results from the original search query that also have that specific attribute value.
2. Saving the dynamic navigation configuration. 3. Showing dynamic navigation attributes in a front end by using the Page Layout Helper on the Output Format tab of the Search > Search Features > Front Ends page. Learn More about Dynamic Navigation For information about using dynamic navigation, refer to “Using Dynamic Navigation to Help Users Explore Results” in Creating the Search Experience.
Learn More about Expert Search For complete information about enabling and configuring expert search, click Admin Console Help > Search > Search Features > Expert Search in the Admin Console. Providing Real-Time Connectivity to Business Applications In some instances, the most relevant result for a search query is real-time, structured data, such as delivery tracking numbers. This type of data does not usually reside in the search index because it would be obsolete before it could be indexed.
Setting Up a One Box Module Before you can set up a OneBox module, you must choose a front end where you want to implement it. For information about front ends, refer to “Using Front Ends” on page 33. Set up a OneBox module by: 1. Defining what you want the OneBox module to do, what the search appliance needs to do when it invokes the OneBox module, and how you want the OneBox module results to appear. 2. Developing a provider. 3.
Integrating Personal Content from Google Apps Relevant results for a search query can include information from outside the search index, including personal content from Google Apps, as shown in the following figure. Integrating personal content is a feature that enables the Google Search Appliance to serve both private and public content directly from your Google Apps domain.
Set up integrating personal content by performing the following tasks with the Admin Console: 1. Enabling integration of personal content with a search appliance by using the Content Sources > Google Apps page, shown in the following figure. 2. Showing personal Google Apps content in a front end by using the Page Layout Helper on the Output Format tab of the Search > Search Features > Front Ends page.
Setting Up Filters Set up a filter by performing the following steps with the Admin Console: 1. Creating or choosing a front end for the filter on the Search > Search Features > Front Ends page. 2. Setting up the filter on the Filters tab on the Search > Search Features > Front Ends > Output Format page, shown in the following figure. 3. Saving the filter.
Controlling Automatic Searching of Synonyms The Google Search Appliance can automatically widen a search by adding terms that are synonymous with the search terms through query expansion. Query expansion helps users get search results that they would otherwise miss. When a user searches on a term, the search appliance expands the search to include synonymous terms.
Influencing Results Rankings The Google Search Appliance enables you to influence the order in which the Google Search Appliance ranks search results with its result biasing feature. Result biasing helps ensure that users see results that are relevant to their interests or roles.
2. Configuring source biasing, date biasing, or metadata and entity biasing for the policy on the Search > Search Features > Result Biasing > edit page, shown in the following figure. A menudriven interface allows weak or strong increases or decreases, and requires no complex coding or scripting. You can use 11 settings to adjust result biasing from least influence to most influence. 3.
Segmenting the Index The Google Search Appliance enables you to divide your search index into sections and provide search across different content to different groups of users with its collections feature. A collection is a subset of the complete search index. Search results from a collection have the same relevance ranking as full index searches. Only the content searched differs because it is restricted to the individual collection’s content.
Set up a collection by performing the following steps with the Admin Console: 1. Providing a name on the Index > Collections page, shown in the following figure. 2. Entering the URL patterns you want to include in the collection, as well as URLs that you don’t want to include. 3. Saving the collection. Before you add a pull-down menu for searching by collection, you must choose a front end where you want to implement it. Add a collection menu by performing the following steps: 1.
Providing User Results The search appliance enables users to enhance their search experience with the capability of assigning keywords to search results for a specific front end, as shown in the following figure. Setting Up User Results To add a user results configuration, use the Search > Search Features > User Results page. For each configuration, you can specify: • A name for the configuration. • A description of the configuration.
Enabling User Alerts The Google Search Appliance enables users to monitor topics of interest with its alerts feature. Alerts are email updates of the latest relevant search results based on a user’s topic of interest. A user sets up an alert by clicking My Alerts on the search page, logging in to the search appliance by using her LDAP user name and password, and choosing an hourly, weekly, or monthly schedule.
Learn More about Alerts For an in-depth information about setting up and using alerts, refer to “Providing Alerts for End Users” in Creating the Search Experience. Displaying Translations of Search Results The Google Search Appliance can translate titles and snippets in search results, as well as cached documents into the user’s language in real time. The user’s language is determined by the default language set in the user’s browser. When translation is enabled, translation links appear in search results.
Providing Document Previews in Search Results To provide document previews to your users, perform the following tasks: 1. Enable the document preview module by using the Search > Search Features > Document Preview Module page. 2. Show document previews in a front end by using the Page Layout Helper on the Output Format tab of the Search > Search Features > Front Ends page. Document previews are not supported in custom front ends at this time.
Customizing the User Interface The Google Search Appliance offers a default user interface that is simple and intuitive, like Google.com. The following figure illustrates the default search and results pages. A Google Search Appliance user interface is associated with a single front end (see “Using Front Ends” on page 33). The search appliance has a default front end, which uses the default user interface. You can use the default user interface without any customization.
The AltoStrat examples in this document present a customized user interface, as shown in the following figure. How Does the Search Appliance Create the User Interface? After the search appliance receives and executes a search query: 1. The search appliance returns search results in XML. 2. The search appliance applies an XSLT stylesheet to the XML results and creates the search results page in HTML. 3. The Web browser presents the HTML search results page to the user.
Using the Page Layout Helper Even if you do not have any special knowledge of XSLT, you can effectively customize a Google Search Appliance user interface using the Page Layout Helper. Use the Page Layout Helper to perform the following tasks: • Changing Global Attributes—In the Global Attributes section, you can quickly put your logo on pages, specify the fonts to use, and add the HTML header and the HTML footer code used on your web site.
Using the XSLT Stylesheet Editor If the elements that you want to change are not available in the Page Layout Helper, you must use the XSLT Stylesheet Editor to change them. This editor enables you to make changes directly in the XSLT stylesheet. The XSLT stylesheet contains sections for various components, preceded by comments so that you know whether a section can be customized. To work in the XSLT Stylesheet editor, you need knowledge of XSLT, XML, and HTML.
Collecting Metrics about User Clicks The Google Search Appliance’s advanced search reporting feature enables you to gather information about user clicks on search results. By using advanced search reporting, you can determine if: • Users a finding what they’re searching for • Groups of users are searching for the same information • Certain URLs are harder for users to find than others By analyzing user clicks, you can also identify ways to improve the search experience.
Chapter 6 Essentials Chapter 6 Using the Admin Console After the search appliance has been installed and configured, you can begin to use the Admin Console to crawl and index content sources in your organization, as well as to enhance, fine-tune, and optimize your search solution. The Admin Console is a web-based interface with pages that you use to set up and manage a search appliance.
Logging in to the Admin Console To log in to the Admin Console, enter your administrator User Name and Password. You can log in to the Admin Console using HTTP or HTTPS: • For a secure connection, use HTTPS on port 8443. Using HTTPS provides better protection for passwords and other information. • For an unsecure connection, use HTTP on port 8000. Using HTTP increase the risk of exposing passwords and other information to users on the network who are not authorized to see such information.
By clicking the Help link you can navigate to the Help Center Welcome page. From this page, you can browse various help topics. By clicking a help link for a section of a page in the Admin Console, you can navigate to context-sensitive help about the page section. Using Language Options The Google Search Appliance supports search and indexing in almost every language.
• Italian • Japanese • Korean • Norwegian • Polish • Portuguese-Brazil • Portuguese-Portugal • Russian • Slovak • Spanish • Swedish • Thai • Turkish • Vietnamese The language of the Admin Console is determined by the language setting in your browser. If the Admin Console does not appear in the language that you prefer, set your browser for your preferred language.
Front End Language Options The Google Search Appliance can present search results pages in a language other than English, the default. You also can have several languages active for your users and the search appliance will present search results for an active language based on the settings detected in the user’s computer. The search appliance allows multiple stylesheets that present the search page, advanced search, and results pages in different languages, all associated with a single front end.
• Greek • Hebrew • Hungarian • Icelandic • Italian • Japanese • Korean • Latvian • Lithuanian • Norwegian • Polish • Portuguese • Romanian • Russian • Spanish • Swedish • Turkish Selecting Languages for Filtering To select languages for filtering search results, use the Filters tab on the Search > Search Features > Front Ends page in the Admin Console.
Query Expansion in Multiple Languages The Google Search Appliance provides preconfigured local synonyms files for query expansion in the following languages: • Arabic • Czech • Dutch • U.S. English • French • German • Italian • Polish • Portuguese • Russian • Slovak • Spanish • Swedish Whenever a user enters a search query that matches a synonym in one of these languages, the term is expanded.
Controlling Results with the Search Protocol The Search Protocol is an HTTP-based protocol that enables you to control how search results are requested and presented to a user. A search request is a standard HTTP GET command to the Google Search Appliance. The search appliance returns results in either XML or HTML format, as specified in the search request. HTMLformatted results can be displayed directly in a web browser.
Learn More about the Search Protocol For complete information about the Search Protocol and the XML results format, refer to the Search Protocol Reference. Writing Applications with the Feeds Protocol The Feeds Protocol enables you to write a custom application to feed a data source into the Google Search Appliance for processing, indexing, and serving. You can also use a feed to remove content from the index. Use the publicly available GSA Feed Manager (http://code.google.
Authentication SPI The Authentication SPI allows search users to authenticate to the Google Search Appliance. Instead of authenticating search users itself, the search appliance redirects the user to an Identity Provider, a customer-implemented server, where the actual authentication takes place. The Identity Provider then redirects the user back to the appliance, while passing information that includes the identity of the search user.
Learn More about the SAML Authentication and Authorization SPIs For more information about how the SAML Authentication and Authorization SPIs work and how to set up the Identity Provider and Policy Decision Point web services that are required by the Authentication and Authorization SPIs, refer to the Authentication/Authorization for Enterprise SPI Guide.
Using Search Appliance Reports Reports are available from the Admin Console. The following table lists and describes each report and gives the Admin Console page where you can find the report. Report Description Admin Console page Crawl status Crawl status shows documents served, crawling rate and errors. Content Sources > Diagnostics > Crawl Status Crawl diagnostics Crawl diagnostics provide interactive navigation through directories to see the status of each page.
Monitoring a Search Appliance with SNMP You can also set up the search appliance so that status information can be monitored using any thirdparty SNMP management application. Through SNMP, the search appliance provides a subset of the information that appears in the Admin Console. The data provided through SNMP is read-only.
Your support account information includes the terms of the Technical Support Guidelines for your search appliance. For details on how to contact support, go to http://support.google.com/enterprisehelp/bin/ answer.py?answer=1120726. To request escalation of an Google for Work ticket, do so in your email to Google for Work Support, providing the ticket number, reason for the request and the current business impact.
Taking Google Training Google offers the following types of training for customers and partners: • Self-paced tutorials • Instructor-led webinars • Instructor-led public courses and private classes held at your location • All courses are delivered by certified Google for Work instructors Learn More about Google Training For more information about training, visit the Google Search Appliance training page (http:// www.learngsa.com/).
Chapter 7 Quick Reference Chapter 7 Google Search Appliance Administration Checklist The following table provides an checklist of common activities for administering the Google Search Appliance. To read about a specific activity, refer to the section listed in the table.
Activity Described in Section Enabling a search appliance to show alternative search terms above search results “Suggesting Alternative Search Terms along with Results” on page 36 Enabling a search appliance to show groups of similar results above search results “Grouping Search Results by Topic” on page 37 Enabling a search appliance to return expert profile information with keyword searches “Displaying Expert Profiles with Search Results” on page 41 Enabling a search appliance to return real-time,
Activity Described in Section Enhancing the search experience with experimental features “Monitoring a Search Appliance” on page 71 Monitoring crawling, serving, and your search appliance “Monitoring a Search Appliance” on page 71 Google Search Appliance: Getting the Most from Your Google Search Appliance Quick Reference 78
Index A access-control methods 20 accounts administrator 14 manager 14 setting up 15 user 14 Admin Console description 61 help center 62 languages 63 logging in 62 Administration > Certificate Authorities page 20 Administration > Event Log page 72 Administration > License page 13 Administration > SNMP Configuration page 73 Administration > System Status page 72 administrator accounts 14 advanced search page 32 advanced search reporting 60 alerts 53 anaytics 60 appliance ID 13 authentication methods 20 SAML
crawling configuration for public content 18 configuration for secure content 19, 20 content sources 8 excluding content 17 public content 16 secure content 19 customer support 73 highlighted query terms 32 HTML, view as 32 HTTP port 62 protocol 68 HTTP basic 20 HTTPS port 62 I D expert search 41 index collections 50 segments 50 testing 29 Index > Alerts page 53 Index > Collections page 51 Index > Diagnostics > Content Statistics page 72 Index > Diagnostics > Index Diagnostics page 25, 72 indexing conte
OneBox Modules tab 34 Output Format tab 34, 65 P Page Layout Helper 39, 58, 65 partners 74 planning search appliance deployment 10 preinstallation checklists 12 public content, crawling 16 Q query expansion description 47 languages 67 setting up 47 query terms 68 R rankings 48 real-time diagnostics 72 related queries 36 Related Queries tab 34 relevance 32 Remove URLs tab 34 reports 72 Reports > Search Logs page 60, 72 Reports > Search Reports page 72 Reports > Serving Logs page 72 result biasing descript
X XML search results 68 XSLT Stylesheet Editor 39, 59, 65 Google Search Appliance: Getting the Most from Your Google Search Appliance Index 82