Postini Message Security Using Postini with Google Apps Education Edition
Google Inc. 1600 Amphitheatre Parkway Mountain View, CA 94043 www.google.com July 9, 2010 © Copyright 2010 Google Inc. All rights reserved. Google, the Google logo, Google Apps, Google Apps Mail, Google Docs, Google Calendar, Google Sites, Google Video, Google Talk, Gmail, Google Message Filtering, Google Message Security, Google Message Discovery, Postini, the Postini logo are trademarks, registered trademarks, or service marks of Google Inc.
Using Postini Message Security with Google Apps Education Edition Chapter 1 Overview Postini Message Security for Google Apps provides additional security features and controls for Google Apps Gmail. This guide shows you how to use Postini Message Security to meet common needs for Google Apps Education Edition customers, including: • Email policies just for students: Set up different user organizations, such as groups of students, faculty, or IT administrators, and apply specific email policies.
Getting Started Postini Message Security for Google Apps provides additional security features and controls for Google Apps Mail. See the Service Overview in the Help Center for more information on Postini features and how they work. The Postini Message Security service is available with: • Google Apps Education Edition: K-12 (primary or secondary education) institutions may also be eligible for Postini Message Security for Google Apps at no cost. See the Help Center for more information.
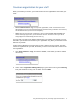
Create an organization for your staff When you activate your service, your Postini service has two organizations that contain your users: • Account Administrators org: The top-level organization, which contains the account administrator's account (the initial administrator specified during activation of the service) and the Default User (a user account template). • Users org: The second-level organization, which contains all the user accounts that existed in Google Apps when you activated the service.
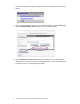
The name in the gray bar changes, indicating that you're now looking at your new org's settings. 3. Next, move your staff users to the new org. In the Administration Console’s Home page, click the Add/Delete/Move Users link, just above the System Test links. 4. On the Add, Delete, and Move Users page, enter addresses of your staff. Separate addresses with a comma or put them on a separate line. Each user should already have an email account in your Google Apps Edu domain.
Tip: Enter several users at once by pasting their addresses from a text file or user database. 5. Leave Welcome users upon creation unchecked. 6. Move your users by choosing the “Staff” org you created from the list at the bottom of the panel. 7. Click the Move Users button. Each user receives service settings from the organization, and default filter levels from the org’s Default User.
Add Your Approved Senders Before limiting your incoming mail to your domain only, you may want to add certain senders to the Senders Lists, which bypass the inbound Content Manager filters. Approved senders typically include: • Trusted partners or organizations. For example, another school or group that you want to allow to send messages to your students. • Automated email notifications sent by Google. For example, your Google Calendar appointment reminders or Google Site update notifications.
Approved senders addresses for Google notifications: Notification Address Google Calendar reminders calendar-notification@google.com Google Sites updates noreply@google.com WARNING: We strongly recommend that you do not add your own domain/addresses or popular domains to the Approved Senders list. Spammers routinely spoof these domains to bypass the message security service filtering.
Set up a Content Manager Filter Postini Message Security includes Content Manager, which you can use to create custom filters based on a message’s content, senders, and recipients. This section describes how to use Content Manager to: • Prevent users outside of your domain from sending mail to your students. • Reduce the potential for students to send mail outside for your domain.
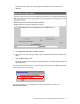
4. On the Inbound Content Manager page, click Edit Settings. 5. Set Content Filtering to On. 6. In the Quarantine Administrator field, enter the address of the administrator who should receive messages captured by content filters. (Content Manager sends these messages to the administrator’s quarantine in the Message Center.) 7. Select “Allow mail from Approved Senders to bypass Content Manager filters” (so messages from the org’s Approved Senders aren’t blocked by content filters). 8.
5. Under Rules, in the Match drop-down list, choose whether Content Manager executes this filter’s disposition if an email message contains a match for any rule or all rules you specify. 6. Specify up to three rules for this filter. For each rule, enter the following: • Location: The part of the message to scan. Note that Entire Message also scans content in file attachments. Choose “Sender”. • Filter Type: Choose “does not contain”.
Create a Filter to Help Limit Outbound Messages Content Manager can be configured to help limit students from sending messages to users outside of your domain. However, at this time, outbound messages sent to external users can bypass the Content Manager in two cases: • A user sends a message to multiple recipients and includes both internal and external users on the “To” line of a message. • A user includes an external recipient in the “Bcc” line of a message.
Set up an Attachment Manager Filter The Postini Message Security service includes Attachment Manager, which you can use to filter messages based on file attachment size and type. For example, you can block or quarantine MP3 files or movie files. You can set up attachment filters for both inbound and outbound email. Set up Attachment Manager 1. Access the Administration Console: a. Log in to Google Apps using your administrator account. b. On the Google Apps dashboard, click Postini services. c.
5. On Attachment Manager’s Edit page: a. Set Filter Status to On. b. Enter the address of an administrator who should handle all messages quarantined by attachment filters. c. Check Approved Senders (so messages from the org’s Approved Senders don’t get blocked by attachment filters). d. Click Save. 6. Click the Filters link in the dark gray bar. 7. On the Filters page, enter a Maximum Message Size that users in this organization can receive.
Approve Skips all remaining Attachment Manager filters. Bounce Rejects the message and returns the sender an error message. Quarantine Diverts the message to the administrator Quarantine you specified above, without delivering it to the user. BCC Quarantine (Blind Carbon Copy) Copies the message to the administrator Quarantine, but also delivers it to the recipient (if the messages passes through remaining filters).
Set up an outbound footer Outbound messages can be configured with footer text that describes an email policy or standard address information. This compliance footer is added into the last existing text portion of a message after the user’s personal signature (configured in Gmail). Compliance footers are configured at the organization level. The compliance footer currently supports ASCII and English character sets only. Add a footer to outgoing Gmail messages 1. Access the Administration Console: a.
3. In the Organization Management page, scroll to the Outbound Services section, and click the Compliance Footer icon. 4. In the Outbound Compliance Footer page: • Set the footer Status to On. • Add the footer text. We recommend plain-text footers. • Choose whether to propagate the footer to sub-orgs. 5. Click Save. 6.
To include line breaks, press Enter at each point where you would like a break: Sentence 1[press Enter] Sentence 2[press Enter] For more information about the outbound footer, see the Compliance Footer section in the Administration Guide.
Turn off the Quarantine Summary The Quarantine Summary is an email message that contains a list of any new messages that your message security service has quarantined for a user and a link to deliver the message to the user’s Google Apps inbox. Users receive this message a maximum of once a day, depending on the frequency you select. You may want to turn off the Quarantine Summary for students if you do not want them to see any junk message titles or to deliver quarantined messages to their Gmail inbox.
3. On the Organization Management page, scroll down to the bottom of the page, and click Notifications. 4. On the User Notifications page, click the Edit link, in the dark gray bar. 5. On the User Notifications Edit page: a. Set My First Spam to Off. b. Set Spam to Off. 6. Click Save. For more information on the Quarantine Summary and other notifications, see the Notifications chapter in the Administration Guide.
Using Postini Message Security with Google Apps Education Edition