
Services Administration Guide Instruction Manual

72 Release 1.3.32, October 2009
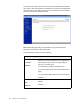
3. Complete the Scheduled Task wizard using the following information. (Steps
may vary depending on your version of Microsoft Windows.)
• Choose the program
sync-cmd.exe
, located where the directory sync
utility is installed.
• The frequency of the task depends on your synchronization needs. For
most environments, twice per week is appropriate.
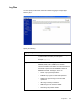
• Use Advanced Properties to specify an exact command line. The
appropriate command line is:
[path]\sync-cmd -a -c [filename]
Replace
[path]
with the path where the directory sync utility was
installed. Replace
[filename]
with the name of the XML file you created
in the Configuration Manager.
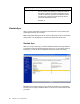
4. Test the scheduled task by running manually once. In the Scheduled Tasks
window, right-click the task you created and select Run from the right-click
menu. Check the log file for errors.
Linux and Solaris: cron
In Linux and Solaris environments, schedule synchronization using
crontab
.
Note: These steps apply to most common Linux and Solaris configurations. Linux
and Solaris are third-party products and are not supported directly by the Google
(or Postini) team. In the event of an issue with
cron
, contact your administrator.
To add a cron job
1. Run
crontab -e
to update the
crontab
file.
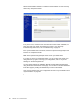
2. Add a line in the
crontab
file for the following command:
sync-cmd -a -c [filename]
The syntax of this line will depend on your operating system and version of
cron. For instance, to schedule the task to run at 3:30 AM twice per week, on
Monday and Thursday, add the following entry:
30 3 * * 1,4 [path]/sync-cmd -a -c [filename]
Replace
[path]
with the path where the directory sync utility was
installed.Replace
[filename]
with the name of the XML file you created in the
Configuration Manager.
3. Save the
crontab
file and exit your text editor.
•