ANYWHERE+ DEPLOYMENT GUIDE V1.0.1 Anywhere+ Deployment Guide V1.0.1 ANYWHERE+ DEPLOYMENT GUIDE V1.0.
ANYWHERE+ DEPLOYMENT GUIDE V1.0.1 TABLE OF CONTENTS PAGE TABLE OF CONTENTS 2 INTRODUCTION 3 THINGS YOU WILL NEED TO KNOW AND DO BEFORE YOU BEGIN 4 ENTERPRISE MODE 6 FLOW CHART 6 STEP BY STEP INSTRUCTIONS 9 USER MODE 23 FLOW CHART 23 STEP BY STEP INSTRUCTIONS 26 TROUBLESHOOTING 41 APPENDIX A – CREATE A TEST RESTRICTION 42 APPENDIX B – ENABLING SEARCHAHEAD 44 APPENDIX C – IMPORT USER LIST 48 ANYWHERE+ DEPLOYMENT GUIDE V1.0.
ANYWHERE+ DEPLOYMENT GUIDE V1.0.1 Introduction The number of employees who work outside the traditional office is rapidly increasing and perhaps surprisingly now constitutes the majority for many businesses. According to Gartner, 50-70% of the US workforce may now be classified as roaming or remote workers. This trend, coupled with the need for ‘always-on’ connectivity, means the network boundary is now ‘elastic’ and the traditional fixed network perimeter is becoming irrelevant.
ANYWHERE+ DEPLOYMENT GUIDE V1.0.1 Things you will need to know and do before you begin Before you begin the installation of Anywhere+ you will need the following information to create the Anywhere+ configuration file: • • • • Public VPN ingress IP addresses – these are IP addresses your VPN clients connect to when the user is on the public internet side of the corporate network (Note: There may be one or more IP addresses.).
ANYWHERE+ DEPLOYMENT GUIDE V1.0.1 Pros of User Mode • • • User keys can be deactivated, switching off Web access for that user. Grouping can be achieved for users that are not in an Active Directory. Easy test mode for the service. Cons of User Mode • May be unwieldy to manage a very large numbers of users. ANYWHERE+ DEPLOYMENT GUIDE V1.0.
ANYWHERE+ DEPLOYMENT GUIDE V1.0.
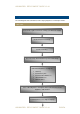
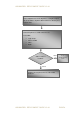
ANYWHERE+ DEPLOYMENT GUIDE V1.0.1 Check Anywhere+ config file has installed correctly Perform Acceptance tests • • • • Can I surf internally as normal? Can I connect to the internal proxy as normal? Outside of corporate network, does the VPN connection work correctly? Do all of my different network adapters work with Anywhere+ correctly (e.g. Ethernet, Wireless, 3G etc)? No Go to Troubleshooting section Yes Do you have an Active Directory group that is unique to remote users (e.g.
ANYWHERE+ DEPLOYMENT GUIDE V1.0.1 Run ConfigObfuscate on the Anywhere+ config file and put this along with the Anywhere MSI installer in a directory on a network share Roll out Anywhere+ to small subset of users Tested with • • • • Login Script Microsoft SMS GPO Bigfix Gather end-user feedback. Bad Go to Troubleshooting section Good Continue roll-out plan to the rest of the mobile workforce. ANYWHERE+ DEPLOYMENT GUIDE V1.0.
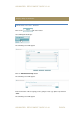
ANYWHERE+ DEPLOYMENT GUIDE V1.0.1 Step by Step Instructions CREATING THE TEST GROUP Click on the tab of the Portal. Go to Management>Groups. The following screen will appear: Click on ‘Add Custom Group’ button. The following screen will appear: Enter in the name of the test group you are going to create (e.g. Aplus test) and click ‘Save’. The following screen will appear: ANYWHERE+ DEPLOYMENT GUIDE V1.0.
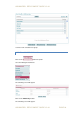
ANYWHERE+ DEPLOYMENT GUIDE V1.0.1 You have now created the test group. CREATING THE TEST POLICY Click on the tab in the portal. Go to the Management>Policies The following screen will appear: Click on the ‘Add Policy’ button. The following screen will appear: ANYWHERE+ DEPLOYMENT GUIDE V1.0.
ANYWHERE+ DEPLOYMENT GUIDE V1.0.1 From the drop down group name, select the test group you have created. You now need to select a schedule for this policy. The default anytime policy should be used. You now need to select a restriction. You should pick a restriction that already has some category blocks in it. If you don’t have a restriction other than the default, please see Appendix A. The Policy should look like the following: Click on the ‘Save’ button.
ANYWHERE+ DEPLOYMENT GUIDE V1.0.1 CREATING THE GROUP AUTHENTICATION KEY Click on the tab of the Portal. Go to Authentication>Group Keys The following screen will appear: Click on the ‘Create Key’ button next to the test group you have created. The following screen will appear: Copy and paste the Authentication Key somewhere safe and then enter your email address and click the ‘Send’ button. Please note you cannot retrieve this key once you leave this screen.
ANYWHERE+ DEPLOYMENT GUIDE V1.0.1 E DITING THE DEFAULT ANYWHERE+ CONFIGURATION FILE The default Anywhere+ configuration file looks like the following (The areas you will be editing are highlighted in yellow.): 1.0.1.
ANYWHERE+ DEPLOYMENT GUIDE V1.0.1 3000 300 3000 300 http://80.254.145.118/anywhere-config-v1.xml 60 10.*;127.*;169.254.*;172.*;192.*;224.*;240.*;liveupdate.syma ntecliveupdate.com For example you may want to add in the following: Internal Domains not already included in the default are: 193.
ANYWHERE+ DEPLOYMENT GUIDE V1.0.1 61.45.43.54 The fourth edit is the Enterprise domains. If you have two domains (WinNT://COMPANY and WinNT://COMPANY2) then it will look like the following (Please note that the list is a comma separated list, do not use semi-colons.): COMPANY,COMPANY2 The fifth edit is the authentication key you have created for the test user.
ANYWHERE+ DEPLOYMENT GUIDE V1.0.1 The tenth edit is to select which of the five locations you will allow your end users to select from. Please note that if this is left blank then the end users will not see the selection location feature on the systray icon. Please delete any you do not want your users to select from. EMEA,US East Coast,US West Coast,Australia,Asia Pacific Please now save the Anywhere+ configuration file. You have now created your test configuration file.
ANYWHERE+ DEPLOYMENT GUIDE V1.0.1 Click on the ‘I accept’ button and then click on the ‘Next’ button (which will be greyed out until you select the ‘I accept’ button). Select the Destination folder for the installation. You can change the default install directory by clicking on the ‘Browse’ button. Click ‘Next’ to continue. ANYWHERE+ DEPLOYMENT GUIDE V1.0.
ANYWHERE+ DEPLOYMENT GUIDE V1.0.1 Click the ‘Next’ button and the installation will now begin. Please note that during the installation you may lose network connectivity for a few seconds as the driver installs. You will now see an installation progress bar. The following screen appears once the installation is complete: ANYWHERE+ DEPLOYMENT GUIDE V1.0.
ANYWHERE+ DEPLOYMENT GUIDE V1.0.1 Click on the ‘Finish’ button to complete the installation. Please note that on rare occasions, you may be asked to reboot your PC at the end of the installation. If this happens it is very important that you do this immediately. You should now check to make sure the correct Anywhere+ config file has been loaded. To do this go to the installation directory (by default this is c:\Program Files\Anywhere+) and open the anywhere+.config file with notepad.
ANYWHERE+ DEPLOYMENT GUIDE V1.0.1 • • • • • • Do I get a web virus block if I try to download the EICAR test file (http://www.eicar.org/download/eicar.com)? Do I get a spyware block if I try to go to http://www.gator.com? Do I get web filtering blocks for categories I have blocked in my test policy (e.g. if you have blocked pornography, does http://www.playboy.
ANYWHERE+ DEPLOYMENT GUIDE V1.0.1 If the product did not work correctly, you should go to the troubleshooting section of the document. If the ease of use was in question, this feedback should be sent to Support and you may need to look at how the use of the application is communicated to your user base. ANYWHERE+ DEPLOYMENT GUIDE V1.0.
ANYWHERE+ DEPLOYMENT GUIDE V1.0.
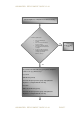
ANYWHERE+ DEPLOYMENT GUIDE V1.0.1 Check Anywhere+ config file has installed correctly Perform Acceptance tests • • • • Can I surf internally as normal? Can I connect to the internal proxy as normal? Outside of corporate network, does the VPN connection work correctly? Do all of my different network adapters work with Anywhere+ correctly (e.g.
ANYWHERE+ DEPLOYMENT GUIDE V1.0.1 If you are going to give each user their own authentication key, these need to be generated in ScanCenter and sent to the individual users (Bulk Import to do this easily). If you are going to operate a single policy for remote users regardless of whom they are, and have no need to do cancel individuals then you can leave the test user key in place and make sure the correct policy is applied.
ANYWHERE+ DEPLOYMENT GUIDE V1.0.1 Step by Step Instructions CREATING THE TEST GROUP AND USER Click on the tab of the Portal. Go to Management>Groups. The following screen will appear: Click on ‘Add Custom Group’ button. The following screen will appear: Enter in the name of the test group you are going to create (e.g. Aplus test) and click ‘Save’. The following screen will appear: ANYWHERE+ DEPLOYMENT GUIDE V1.0.
ANYWHERE+ DEPLOYMENT GUIDE V1.0.1 You have now created the test group. Please click on the new test group name. The following screen will appear: Under the user section add in a test user and click ‘Save’. Click the ‘Done’ button to return to the Groups page. You have now created the test user. ANYWHERE+ DEPLOYMENT GUIDE V1.0.
ANYWHERE+ DEPLOYMENT GUIDE V1.0.1 CREATING THE TEST POLICY Click on the tab in the portal. Go to the Management>Policies The following screen will appear: Click on the ‘Add Policy’ button. The following screen will appear: From the drop down group name, select the test group you have created. You now need to select a schedule for this policy. ANYWHERE+ DEPLOYMENT GUIDE V1.0.
ANYWHERE+ DEPLOYMENT GUIDE V1.0.1 The default anytime policy should be used. You now need to select a restriction. You should pick a restriction that already has some category blocks in it. If you don’t have a restriction other than the default, please see Appendix A. The Policy should look like the following: Click on the ‘Save’ button. The following screen will appear: You policy is now active. CREATING THE USER AUTHENTICATION KEY Click on the tab of the Portal.
ANYWHERE+ DEPLOYMENT GUIDE V1.0.1 Click on the ‘Create Key’ button next to the test user you have created. The following screen will appear: Copy and paste the Authentication Key somewhere safe and then enter your email address and click the ‘Send’ button. Please note there is no way to generate this key once you leave this screen. If you lose the key, you will need to revoke the current key and generate a new one.
ANYWHERE+ DEPLOYMENT GUIDE V1.0.1 2 100 10 ssl 10.*;127.*;169.254.*;172.*;192.*;224.*;240.*;liveupdate.syma ntecliveupdate.com; 80.254.145.
ANYWHERE+ DEPLOYMENT GUIDE V1.0.1 EMEA EMEA,US East Coast,US West Coast,Australia,Asia Pacific US West Coast true 72.37.244.89 443 8080 US East Coast true 72.37.244.
ANYWHERE+ DEPLOYMENT GUIDE V1.0.1 update.microsoft.com *.salesforce.com Please note that the list is a semi-colon separated list, do not use commas. The new host exceptions will now look like the following: 10.*;127.*;169.254.*;172.*;192.*;193.*;224.*;240.*;liveupdate .symantecliveupdate.com;windowsupdate.microsoft.com;update.microsoft.com;*.salesfo rce.com The second edit is the internal proxy server settings.
ANYWHERE+ DEPLOYMENT GUIDE V1.0.1 For example, if you want to change the password to ‘password’ it would look like the following: password Please note there are currently a 1 character minimum size and a 256 character maximum size to the password. It is also case-sensitive and supports special characters, but not two byte characters such as Japanese. The sixth edit is to define the number of days you wish to keep of the log files.
ANYWHERE+ DEPLOYMENT GUIDE V1.0.1 Click on the ‘Next’ button to continue. You can click on the ‘Cancel’ button at any stage to stop the installation. ANYWHERE+ DEPLOYMENT GUIDE V1.0.
ANYWHERE+ DEPLOYMENT GUIDE V1.0.1 Click on the ‘I accept’ button and then click on the ‘Next’ button (which will be greyed out until you select the ‘I accept’ button). Select the Destination folder for the installation. You can change the default install directory by clicking on the ‘Browse’ button. Click ‘Next’ to continue. ANYWHERE+ DEPLOYMENT GUIDE V1.0.
ANYWHERE+ DEPLOYMENT GUIDE V1.0.1 Click the ‘Next’ button and the installation will now begin. Please note that during the installation you may lose network connectivity for a few seconds. You will now see a progress bar showing you how far through the installation you are. The following screen appears once the installation is complete. ANYWHERE+ DEPLOYMENT GUIDE V1.0.
ANYWHERE+ DEPLOYMENT GUIDE V1.0.1 Click on the ‘Finish’ button to complete the installation. Please note that on rare occasions, you may be asked to reboot your PC at the end of the installation. If this happens it is very important that you do this immediately. You should now check to make sure the correct Anywhere+ config file has been loaded. To do this go to the installation directory (by default this is c:\Program Files\Anywhere+) and open the anywhere+.config file with notepad.
ANYWHERE+ DEPLOYMENT GUIDE V1.0.1 ConfigObfuscate anywhere+.config anywhere+enc.config This will create an encrypted version of the anywhere+.config file called anywhere+enc.config. You will now need to get ready to install the software on a small subset of machines. You will need to have the anywhere+.msi file and a copy of the encrypted config file (which will need to be renamed to anywhere+.config once in the same directory) on a network share ready for the installation. The Anywhere+ V1.
ANYWHERE+ DEPLOYMENT GUIDE V1.0.1 They should cut and paste in the key from the email sent to them. GATHER INFORMATION Once deployed to the small subset of users, you should then gather in feedback from these users to ascertain if the product worked correctly and if it was simple to use. If they answered yes to both of these you should now be ready to roll out the product to all of your roaming and remote users.
ANYWHERE+ DEPLOYMENT GUIDE V1.0.1 Troubleshooting THE MANUAL INSTALLER DOES NOT WORK. If the manual installer does not work, please make a note of the error code the installer brings up and then provide this to the Support team. Please provide as much information about the machine you have tried to install it on as possible (O/S, memory, processor, service packs installed, other software installed etc.). ANYWHERE+ IS RUNNING BUT IT DOES NOT SEEM TO BE REDIRECTING TRAFFIC TO THE SERVICE CORRECTLY.
ANYWHERE+ DEPLOYMENT GUIDE V1.0.1 Appendix A – Create a test restriction Click on the tab in the portal. Go to the Management>Restrictions The following screen will appear: Type in the name of a test restriction and click the ‘Add Restriction’ button. This will now appear in the list of restrictions. Click on the name and it will take you to the edit restriction page. Click on Step 1 and select some categories to block (e.g. Pornography). ANYWHERE+ DEPLOYMENT GUIDE V1.0.
ANYWHERE+ DEPLOYMENT GUIDE V1.0.1 Once done click on the ‘Save’ button. You will be returned to the edit restriction screen where you should click on the ‘Save’ button. ANYWHERE+ DEPLOYMENT GUIDE V1.0.
ANYWHERE+ DEPLOYMENT GUIDE V1.0.1 Appendix B – Enabling SearchAhead Most users web-searching habits are based around a small number of set sites they always visit, along with a search engine to provide links to requested information. It is often during these searches that users can visit inappropriate websites and/or dangerous sites.
ANYWHERE+ DEPLOYMENT GUIDE V1.0.1 The following screen will appear: The SearchAhead option is a global setting for the company and cannot currently be deployed by group. Click on the check box to enable the SearchAhead function. Changes to the Search Engine screens: End users will perform searches in exactly the same way as they currently do (including advanced searches).
ANYWHERE+ DEPLOYMENT GUIDE V1.0.1 Annotations: Annotation This site is compliant with the web usage policy set by your administrator for the following reason. While this content is not blocked by your administrator, it is advisable to proceed with caution. By clicking on this link, you will be violating the web usage policy set by your administrator. Use Caution. This site may contain a web risk such as Spyware, Adware, Viruses or Phishing.
ANYWHERE+ DEPLOYMENT GUIDE V1.0.1 • Erotic/Sex • Unclassified The SearchAhead Bubble: By placing the mouse over the annotation, more detailed information is shown to the end-user. The SearchAhead Bubble details whether or not the link is safe and passes the corporate web-filtering policy. It will also show you the categorization for the site as well. Sites which fail the corporate web policy clearly show this by the use of the Red Cross icon.
ANYWHERE+ DEPLOYMENT GUIDE V1.0.1 Appendix C – Import User List We have provided users the ability to create users and keys automatically by importing a CSV file. The format of this file is Group, Username, Email, with only one user on each line. Here is an example: pm,WinNT://Marketing\parker posey,parker.posey@xyz.com dev,WinNT://DEV\davide smith,davide.smith@xyz.com dev,WinNT://DEV\steven jones,steven.jones@xyz.
ANYWHERE+ DEPLOYMENT GUIDE V1.0.1 Clicking on the error log will display the reasons why the file failed. If any user appears in a different group or already has a key generated a screen will appear which shows these users. By clicking on Import it will over-ride the current user information with what is in the CSV file. Clicking on Discard List will take you back to the first import screen. ANYWHERE+ DEPLOYMENT GUIDE V1.0.
ANYWHERE+ DEPLOYMENT GUIDE V1.0.1 The following screen will appear if the CSV file is correct: Click on the confirm button to add these users. An email will be sent to each user using the email template created in the section below. If a user already has a key then this current key will be revoked and a new one created. If the user appears in a different group, the user will be moved to the new group. You can check the users have been added by going to the Management>User Keys screen.
ANYWHERE+ DEPLOYMENT GUIDE V1.0.1 ANYWHERE+ DEPLOYMENT GUIDE V1.0.