ANDROID Quick Start Guide TM Android Mobile Technology Platform 4.
Copyright © 2013 Google Inc. All rights reserved. Edition 1.11. Google, Android, Gmail, Google Maps, Chrome, Nexus, Google Play, YouTube, Google+ and other trademarks are property of Google Inc. A list of Google trademarks is available at http://www.google.com/permissions/ trademark/our-trademarks.html. All other marks and trademarks are properties of their respective owners. This book introduces Android 4.4 for Nexus and Google Play edition devices.
Table of contents 1 2 3 Welcome to Android 1 About Android 4.
Try some apps 33 All Apps 33 Google Play 34 Phone 35 Gmail 36 Gallery 40 Photos 41 People 42 Hangouts & SMS 43 Calendar 44 5 Settings 46 6 Accessibility 49 ANDROID QUICK START GUIDE iv
1 Welcome to Android About Android 4.4 Android 4.4 (KitKat®) is the latest version of the world’s favourite operating system for mobile phones and tablets. This guide introduces the Android 4.4 software available on Nexus and Google Play edition mobile devices. It doesn't describe hardware details such as SIM card instructions, battery information, specs and so on.
When prompted, you can sign in with your Google Account or create one at that time. You can also choose to skip this step and create one later. An email address that you use for any of the following counts as a Google Account: • • • • • Gmail YouTube Google Apps AdWords Any other Google product When you sign in with a Google Account, all the email, contacts, Calendar events and other data associated with that account are automatically synced with your device.
• • To send an SMS message from a phone, use Hangouts. From the Home screen, say “Ok Google” to search your phone or the Internet and start telling Google what to do (Nexus 5 only). Or touch Google at the top of the screen to do the same thing. On brand new devices, you may also see your Google Play library widget on one of your Home screens. This widget displays some of the Google Play content that you already own or that’s available in your library for free.
Get around At the bottom of every Home screen you’ll find the Favourites tray: another quick way to get to your apps. Here’s what it looks like on a Nexus 7. To open an app, touch it. To drag an app in or out of the Favourites tray or anywhere else on a Home screen, touch & hold it, then move it with your finger into position.
Some apps hide these buttons temporarily or fade them to small dots in the same position. To bring them back, touch the dots, touch the screen in the middle or swipe up from the bottom. Google Play edition navigation buttons Some Google Play edition devices have two or three physical buttons just below the screen: • • • Menu: This button opens options relating to the screen you’re on. Home: Opens Home. If you’re viewing a left or right Home screen, the main Home screen opens.
To add an app icon to a Home screen: 1. Go to the Home screen where you want to place the app. 2. Touch the All Apps icon. 3. Swipe from right to left, if necessary, to find the app that you want. 4. Touch & hold the app until the Home screen appears, slide it into place and lift your finger. NEXUS 5 TIPS: The Home screens on Nexus 5 work differently from Home screens on the other Nexus devices.
To move between Home screens, slide towards the edge of the screen. To bump another icon out of the way, slide slowly into it. 3. Lift your finger. To create a folder, slide one icon quickly over another. To name or rename a folder, open it and touch its name. Touch & type To select or activate something, touch it. To type something, such as a name, password or search terms, just touch where you want to type. A keyboard pops up that lets you type into the field.
• • • • Swipe or slide. Quickly move your finger across the surface of the screen, without pausing when you first touch (so you don’t drag something instead). For example, you can slide a Home screen left or right to view the other Home screens. Double-tap. Tap quickly twice on a web page, map or other screen to zoom. For example, double-tap a picture in Chrome to zoom in, and double-tap again to zoom out. Scale.
This book introduces just a few of the key features and apps that come with Android 4.4. For more details about Android software and apps, Nexus and Google Play edition devices available on Google Play and all forms of support, visit: • • support.google.com/nexus support.google.com/playedition Android version & updates To check your version number or get the latest system update for a Nexus or Google Play edition phone, first go to Settings > System > About phone or About tablet.
2 Essentials Google Now Google Now is about getting you just the right information, at just the right time. It tells you today’s weather before you start your day, how much traffic to expect before you leave for work, and even your favourite team’s score while they’re playing. For example, here’s a Google Now card that appears when you’re about to start your commute home: After you decide to start using Google Now, you don’t need to do anything else.
How it works When you decide to use Google Now, you’re also turning on Location Reporting and Location History: • • Location Reporting allows Google to periodically store and use your device’s most recent location data in connection with your Google Account. Location Reporting is a per-device setting. Location History allows Google to store a history of your location data from all devices where you’re logged into your Google Account and have enabled Location Reporting.
For example, if you have searches stored in your Web History, Google Now can show cards based on sports scores, flight status and so on. To manage your Web History, visit google. com/history/. You can delete or pause your Web History and still use Google Now, but certain kinds of information, such as flight details, won’t show up. Similarly, Google Now can use data that you may have stored in third-party products that you allow Google to access.
When you want to see more cards, touch More at the bottom of the screen. When you don’t need them any more, swipe them out of the way. NEXUS 5 TIP: To dismiss a card on Nexus 5, swipe from left to right. Swiping from right to left returns you to the main Home screen. Updates appear in the form of Google Now cards. When you don’t need a card any more, swipe it out of the way. That’s all there is to it. Google Now is always working for you as you go through your day.
IMPORTANT: To detect when you say “Ok Google” to launch Voice Search or Voice Actions, Google analyses sound picked up by your device’s microphone in intervals of a few seconds or less. The sound is immediately discarded after analysis and is not stored on the device or sent to Google. To see some examples of what you can tell Google to do, say or type “help”. Turn hotword detection on or off The ability to trigger a search or action by saying “Ok Google” is called hotword detection.
Voice Actions Voice Actions are supported only in English, French, German, Spanish and Italian. You can use Voice Actions to perform common tasks, such as sending an email or opening an app. Microphone icon or saying “Ok Google”, After touching the speak the Voice Action that you want to use. Or say “help” to see examples of the kinds of things that you can tell Google to do for you. Examples include: • • • “Set alarm for 8:30 a.m.” “Send email to Marcus Foster.
Pending notifications Bluetooth, Wi-Fi, mobile network & battery status TIP: Wi-Fi and mobile signal strength are indicated at the top of the screen by white bars. To see whether the selected Wi-Fi network has a full Internet connection, open Quick Settings: swipe down from the top right on tablets or with two fingers on phones.
Certain notifications can be expanded to show more information, such as email previews or calendar events. The one at the top is always expanded when possible. To expand a notification, position one finger inside it and swipe down slowly. To open the related app, touch the notification icon on the left. Some notifications also allow you to take specific actions by touching icons within the notification. For example, Calendar notifications allow you to Snooze (remind you later) or send email to other guests.
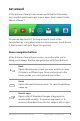
Quick Settings Use Quick Settings to easily access Wi-Fi settings, manage display brightness, open the main Settings menu and more. To open Quick Settings: • • On tablets: Swipe down from the top right corner of any screen On phones: Swipe down from the top of the screen with two fingers On a Nexus 4 or Nexus 5, Quick Settings look like this.
Lock screen If a lock is set for your screen, the screen goes dark and locks when the display goes to sleep or if you press the Power button. You can set locks of different strengths using lock settings: 1. Go to Settings > Personal > Security > Screen lock. 2. Touch the type of lock you’d like to use. Lock screen actions From the lock screen: • • • If you have a tablet that’s set up for more than one user, you may need to touch your image at the bottom of the screen to see your own lock screen.
TIP: After you set up Face Unlock, look under Settings > Personal > Security for two additional settings: Improve face matching and Liveness check. Use these to make Face Unlock more reliable and secure. Android Beam You can beam a web page, a video or other content from your screen to another device by bringing the devices together (typically back to back). Before you begin: Make sure that both devices are unlocked, support Near Field Communication (NFC), and have both NFC and Android Beam turned on.
To turn on NFC, go to Settings > Wireless & networks > More > NFC. Settings To turn on Android Beam, go to Settings > Wireless & networks > More > Android Beam. Tap & pay When NFC is turned on, you can use the tap & pay feature to pay for items just by touching your phone to a reader at a register. To manage your tap & pay apps: 1. Go to Settings > Device > Tap & pay. 2. Touch an app to make it your default payment app.
Before you can print, you need a printing service installed on your device. To check what services are currently available, go to Settings > System > Printing. From here, you can open each available service to turn it on or off, check which printers it makes available, add new printers and adjust the service’s settings. To print a document, such as a web page in Chrome: 1. Touch Menu > Print. 2. In the dialogue that appears, adjust settings such as printer, copies, orientation and so on. 3. Touch Print.
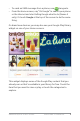
A set of thumbnails appears. To view more choices, touch the Drawer icon at the top left. You’ll see something like this: From here, you can view any of these sources: • • • • • Recent shows you the photos or videos that you've taken or opened most recently. Drive lets you attach any Drive documents associated with your account. Images displays any photos, videos or other images on your device. Downloads includes most files (excluding Play content) that you’ve downloaded from emails or the web.
In the Downloads app: • • • • Touch an item to open it. Touch headings for earlier downloads to view them. Tick items that you want to share. Then touch the icon and choose a sharing method from the list. Tick items that you want to delete. Then touch the Recycle bin icon. Share Because Google Play streams your purchases and rentals from Google servers while you’re playing them, they don’t occupy storage space persistently.
2. Press the Power and Volume down buttons simultaneously. The screenshot is automatically saved in your Gallery. TIP: To easily share your screenshot via Gmail, Google+ and more, swipe down the notification shade and touch Share icon below the preview of your screenshot.
3 Use the keyboard Enter & edit text Use the on-screen keyboard to enter text.
Keyboards on tablets work in a similar way. To make the keyboard go away, touch the Back button below it. Some apps open the keyboard automatically. In others, you first need to touch where you want to type. Basic editing • • • • • • Move the insertion point. Touch where you want to type. The cursor blinks in the new position, and a blue tab appears below it. Drag the tab to move the cursor. Select text. Touch & hold or double-tap within the text.
Emoji Android 4.4 vastly expands the variety of emoji available at your fingertips. On a phone, touch and hold the Return key to display emoji. On a tablet, just touch the emoji symbol in the lower right. You’ll see a panel like this. To move between categories, swipe left or right or touch the symbols in the top row.
Use next-word suggestions 1. Touch the location where you want to input text. 2. Start typing out a word. When the word you want is displayed in a list above the keyboard, touch it. 3. Continue to touch words unless the one that you want doesn't appear. If so, type it. Android continues to suggest words as you type. To change your keyboard and input methods, go to Settings > Personal > Language & input.
If the word that you want isn't shown while using Gesture Typing, you can type it out manually. If you gesture a word and want to change it, touch the word to see other choices in the suggestion strip. TIP: If there are letters that you want to emphasise – for instance, if the keyboard displays a similar word instead of the one that you want – pause over it slightly longer before moving on to the next letter.
Personal dictionary You can add your own words to your personal dictionary so that your device remembers them. To add a word or phrase, including an optional shortcut, touch the Settings icon beside the keyboard that you’re using, then Personal dictionary and the language of the dictionary that you want to modify, then the Add icon. Add-on dictionaries 1. Touch the Settings icon next to Google keyboard or whatever keyboard you’re using. 2. Touch Add-on dictionaries.
When you pause, what you spoke is transcribed by the speechrecognition service and entered in the text field, underlined. You can touch the Delete key to erase the underlined text. If you start typing or entering more text by speaking, the underline disappears. To improve processing of your voice input, Google may record a few seconds of ambient background noise in temporary memory at any time. This recording remains on the device only fleetingly and is not sent to Google.
4 Try some apps All Apps To see all your apps, touch the All Apps icon in the Favourites tray on any Home screen. All Apps This is where you can see all your apps, including those downloaded on Google Play. You can move app icons to any of your Home screens. From All Apps, you can: • • • • • Move between screens. Swipe left or right. Open an app. Touch its icon. Place an app icon on a Home screen. Touch & hold the app icon, slide your finger, and lift your finger to drop the icon in place.
To view info about an app from an All App screen, touch & hold it, slide your finger toward the top of the screen and drop the app App Info icon. over the TIP: Some apps can harm you or your device. However, you don’t need to purchase anti-virus software for Nexus or Google Play edition devices. Google can verify apps to help prevent harmful software from being installed. To control app verification, go to Google Settings > Verify apps. For more details, visit Protect against harmful apps.
To set preferences, clear your search history and turn on user controls, go to Menu > Settings. For example, to filter Android apps based on maturity level or require a PIN before completing any purchase, touch Content filtering or Password. To find your content, open any of the Google Play apps from the All Apps screen. Google Play support For more details about Google Play, including phone and email support options, visit support.google.com/googleplay.
To view recent calls, touch the call log icon at the bottom of keypad icon. the screen. To use the keypad, touch the TIP: On Nexus 4 and Nexus 5 only, Caller ID by Google identifies inbound and outbound numbers, even for callers not saved as contacts in the People app. For more details, visit Use your phone. Gmail Use the Gmail app to read and write email from any mobile device. To open it, touch the Gmail icon on a Home or All Apps screen. Gmail But Gmail isn't just about email.
Organise your conversations: From the Inbox, touch & hold a conversation to select it. Then use the icons and menu along the top of the screen to manage the selected messages. To change your settings, add an account or get help, touch the menu icon or button. No matter where you are in Gmail, you can always get back to the Gmail icon at the top of the screen. Inbox by touching the From the Inbox, touch the same icon to open the drawer that reveals available accounts, labels and so on.
The first time you open Camera, you may be asked if you want it to remember photo locations. This allows you, for example, to pinpoint the location of a particular photo with Google Maps. The shutter and other controls float above the framed image at the bottom of the screen. The camera icon indicates Camera mode. To take a picture in this mode: 1. Frame your subject and watch for the focus ring: To focus on a different part of the image, touch it. 2.
Panorama To take a panoramic photo, touch the blue shutter button, slowly pan across the scene and touch the button again to stop. Photo Sphere To capture a 360-degree or wide angle shot, pan or tilt until the circle in the centre of the screen moves over a white dot and records that portion of the image. Keep moving over the dots until you've finished and then touch the shutter button to finalise. To change camera settings such as flash, exposure and so on, touch the circle to the right of the shutter.
Gallery Gallery The Gallery app gives you an easy way to browse pictures and videos that you've taken with Camera. It also displays screenshots, synced G+ or Picasa albums, and auto backups from other devices. To open Gallery from the: • • Camera app. Swipe from right to left. Home screen. Touch the Gallery icon. To get to the top level of the Gallery app, touch the icon in the upper left. From there, open the drop-down menu to view the available categories.
Photos Photos The Photos app gives you instant access to all your photos and videos associated with any Google Account set up on your phone or tablet. To open it, touch the Photos icon. Photos makes it easy to auto-backup all the photos and videos that you take, organise them and share with friends. You can also browse, search, crop, edit and tag photos, and create albums and movies. To explore your photos and videos, touch the Photos icon at the top of the screen.
• • Explore Auto-Awesome animations, panoramas or merged group shots created for you automatically. Browse photos of yourself. For more details, visit Photos help. People The People app gives you quick access to everyone you want to reach. To open it, touch the People icon on a Home or All Apps screen. People When you first turn on your device and sign into a Google Account, any existing contacts from that account are synced with your People app.
• • Edit details. While viewing a contact, touch icons at the top Menu icon to edit or share contact of the screen or the details, delete a contact and so on. You can also touch the star beside the contact’s name to add that contact to your Favourites list. Change your settings. While viewing the main list screen, touch the menu to import or export contacts, choose display options for the Groups and All tabs and add or edit accounts.
To switch from one type of message to another, or in the case of SMS to a different phone number, touch the drop-down menu at the top of the screen. To adjust notification preferences and other settings, touch Menu > Settings. For more details, visit Hangouts help. Calendar Use the Calendar app to view and edit your schedule. To open it, touch the Calendar icon on a Home or All Apps screen.
To email everyone who’s invited to an event, you have two options: • • Open the event from the Calendar app at any time and touch Email guests. When a notification of the event arrives just before the meeting starts, swipe down the notification shade. Then swipe using one finger to expand the notification if necessary, and touch Email guests. For more information, visit Calendar help.
5 Settings Most apps include their own settings, typically available from Menu > Settings on Nexus devices or from the Menu button on some Google Play edition devices. The fastest way to adjust system settings that you access frequently, such as Wi-Fi or brightness, is through Quick Settings.
To open Quick Settings: • • On tablets: Swipe down from the top right corner of any screen. On phones: Swipe down from the top of the screen with two fingers. To open the Settings app from Quick Settings, touch the Settings icon. The Settings app controls the core Android settings for networks, hardware, location, security, language, accounts and so on. Settings All Apps. To get You can also open the Settings app from more information about most Settings screens, choose Help from the screen’s menu.
Settings Google Settings lets you adjust adjust preferences for commonly used Google apps and services in one place, including Google+, Location, Search and the Android Device Manager. To open Google Settings, touch its icon in All Apps. From here, you can also: • • Control how interest-based Google ads are displayed in nonGoogle apps. View all the apps that have access to your Google Account information, including the type of access granted to each app.
6 Accessibility To use the accessibility options, open Settings > System > Accessibility. To view detailed information about setting up these options, visit Nexus Accessibility. Options for people with visual impairments include the following: • • • TalkBack is a pre-installed screen reader from Google. It uses spoken feedback to describe events, such as notifications, and the results of your actions, such as opening an app.
You can also try magnification gestures, which allow you to zoom in and out, as well as temporarily magnify what’s under your finger. To try magnification gestures, go to Settings > Accessibility > Magnification gestures.