
Guide


2019 | Condential and Proprietary | Do not distribute
This is your comprehensive guide to installing Nest Hello.
Don’t have time to read through the steps? Go to the Additional Resources section to watch
the installation video.
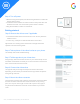
Get Prepared:
Nest Hello needs to be powered by wires delivering 16 - 24 V AC, and at least 10 VA.
Check with a meter or visit the voltage requirements suppo page here or the compatibility widget here.
Step 1: Gather what you’ll need
Tools:
● Phillips screwdriver
● Power drill with Phillips bit
● Ladder
● Bubble level
● Voltage meter
● Transformer
Nest app and Internet requirements:
● Customer’s compatible phone or tablet, check here
for requirements
● Wi-Fi network password
● Broadband Internet connection with minimum of 2
Mbps upload speed for each camera in the home
● Check Wi-Fi signal at doorbell location
Step 2: Have customer sign into account or create one
● To download the Nest app and create a free account direct them to Google Play or the Apple App Store.
If Nest products are already in the household the customer should be signed in already.
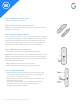
Step 3: Scan the QR code
● If the customer is new to Nest: Tap Add New + on the app home screen.
● If the customer already has account: Tap Seings in the top right corner of the
home screen then select Add product.
● Scan the QR code on the back of the camera body. This helps the app know what
you’re installing.
● Scan the code in good lighting with no shadows. Sta with the phone about a foot
away and move closer to the code till it scans.
● If you can’t scan the code, tap Continue Without Scanning and type in the
numbers above the QR code.
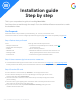
Installation guide
Step by step