
TXV Installation Instructions

3
4. Torque the 13/16 nut to 10-30 ft/lb. or tighten 1/6
turn.
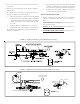
5. Connect equalizer tube with 1/4 flare nut to suction
line fitting on the equalizer stub (as shown in Figure 1)
or coil suction manifold (as shown in Figure 2) and
torque to 12-14 ft/lb.
6. Secure expansion valve bulb to suction line with banding
straps provided at the 10 o’clock or 2 o’clock position.
If the suction line is a combination of copper and
aluminum tubes, neither the copper strap nor the bulb
should be touching any of the aluminum tubes. The
copper strap should attach the bulb only to the copper
section of the suction tube.
IMPORTANT: Insulate the bulb and adjacent area.
7. Check for leaks.
8. Enclose expansion valve with the supplied expansion
valve blanket.
9. During the superheat adjustment on the TXV, the torque
applied on the nut cannot exceed 25 in-lbs
EXPANSION VALVE TROUBLESHOOTING:
Before replacing an expansion valve, check the following
items:
1. Bulb location: Must be tightly secured to the suction line
upstream of the equalizer connection.
2. Insulation: Bulb must be properly insulated with the
material supplied in the TXV kit.
3. Equalizer: Must be connected to the 1/4” SAE connection
on the suction line.
4. Charge: Ensure the system is properly charged. There
MUST be a minimum of 10°F Sub-Cooled liquid at the
valve inlet.
If the system appears to be “starving” (low suction
pressure but insufficient cooling):
1. Check the Superheat (SH) at the evaporator outlet. If SH
is between 5°F - 12°F, the TXV is controlling properly.
• Verify that there is proper airflow to the evapora-
tor (fan is operating and filter is unrestricted).
2. If SH is above 12°F, the setting of the TXV may be too
high.
• Adjust the SH by turning counter-clockwise to de-
crease SH.
• Wait 20 minutes for the system to balance and ad-
just again, as required.
• If adjusting the valve has no effect on the SH, the
valve may be stuck because of dirt or debris or it
may have lost the Power Element charge.
i. After properly reclaiming the refrigerant, re-
move the TXV and check for dirt and debris.
Clean, if possible, or replace the TXV and fil-
ter/drier.
If the system appears to be “flooding” (compressor frosting
or moisture condensing at the suction connection):
1. Check the SH at the evaporator outlet. If SH is between
5°F - 12°F, the TXV is controlling properly.
2. If SH is less that 5°F, the SH adjustment may be too low.
a. Adjust the SH by turning the adjustment stem clock-
wise to increase the SH.
b. Wait 20 minutes for the system to balance and ad-
just again as required.
c. If adjusting the valve has no effect on the SH, the
valve may be stuck open because of dirt or debris
or moisture in the refrigerant.
i. After properly reclaiming the refrigerant, re-
move the TXV and check for dirt and debris.
Clean, if possible, or replace the TXV and fil-
ter/drier. Add a moisture indicator to allow
checking of moisture if this is believed to be a
probable cause.