
TXV Installation Instructions


2
4. Use a tube cutter to remove the spin closure on the
suction line.
5. Slide the 13/16 nut into place on the tailpiece supplied
with the unit.
6. For Applications requiring a Field-Installed Access
Fitting (see Figure 1 on following page).
a. Braze the appropriate equalizer stub to suction line
field connection on coil. Slide grommet and insula-
tion back before brazing. Plan fitting position for
convenient connection to 1/4" flare nut on equal-
izer tube.
b. Braze suction line tubing (line set) to the stub.
c. Reinstall the suction line grommet and insulation.
For Applications NOT Requiring a Field-Installed Access
Fitting (see Figure 2).
a. Braze the suction line field connection on coil. Slide
grommet and insulation back before brazing and
feed the valve equalizer line through the grommet.
b. Reinstall the suction line grommet and feed the
equalizer line through the opening.
I
NSTALLATION
I
NSTRUCTIONS
1. Connect expansion valve outlet with new seal supplied
with kit to flowrator body. Make sure the seal is in
place.
NOTE DIRECTION OF FLOW (Fluid is flowing towards
the evaporator coil).
2. Slide the 13/16 nut into position. Braze tailpiece to
the liquid tube (line set).
3.
AFTER THE TAILPIECE HAS COOLED, position the seal
and hand tighten the nut.
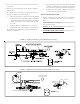
FIGURE 1: Applications Requiring A Field Installed Access Fitting
FIGURE 2: Applications NOT Requiring A Field Installed Access Fitting
EVAPORATOR COIL
1/4' FLARE
CONNECTION
BULB
SUCTION LINE
EXPANSION VALVE
REMOVE BEFORE
INSTALLING
EXPANSION VALVE
SEAL SUPPLIED W/ KIT
SEAL SUPPLIED W/ KIT
BULB TO BE LOCATED
AT 10 OR 2 O'CLOCK
TAILPIECE
3/8"-
SWEAT
7/8" NUT
DISTRIBUTOR
BODY
PISTON
SEAL
EXPANSION VALVE
BLANKET