
Installation Instructions

3
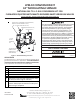
MANIFOLD PRESSURE CHECK
See Table 2 for the required L.P. gas manifold pressure. The gas valve outlet pressure is automatically adjusted for LP by installation
of the jumper in step 8. Only minor changes to manifold pressure should be made by adjusting the gas valve pressure regulator. Minor
adjustments may be made by removing the access plug and turning the fine-adjustment screw with a 1/8" flat blade screwdriver.
Adjustment should only be done while monitoring outlet pressure with a suitable manometer properly attached to the outlet pressure
tap.
Propane Gas Manifold Pressure Range
Low Stage - 50% High Stage - 100%
2.3" - 2.7" w.c.
9.7" - 10.3" w.c.
Table 2
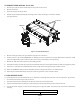
1. Turn OFF electrical power & gas supply to the unit.
2. Use a 3/16" Allen wrench to remove the 1/8" outlet pressure tap from the gas valve.
3. Connect a calibrated water manometer or appropriate gas pressure gauge at the gas valve outlet pressure tap.
4. Turn ON the power and gas, put the unit into heating cycle on high fire (100%).
5. Remove the White cap located on top the gas valve next to the + & - symbols.
6. Use a 1/8" flat blade screwdriver to turn the fine adjustment screw; clockwise (+) to increase manifold pressure, counterclockwise
(-) to decrease manifold pressure.
7. After adjustment is made, turn OFF gas to the unit at the manual shutoff valve and disconnect manometer. Reinstall outlet pressure
tap plug. The pressure tap must be leak checked after resealing.