
LPKMOD Installation Instructions

2
NOTE: Do not use power tools for any adjustments on gas
valves.
The following tools and supplies are required:
• 2 – Pipe wrenches, properly sized to accommodate the
gas piping and connectors
• 1 - 5/16" nut driver
• 1 – 1/4" nut driver
• 1 – manometer to read inlet and outlet pressure of the
gas valve (Minimum range: 0”-20” W.C.)
• Pipe joint compound or pipe thread tape
• Gas leak detection solution like
a soap and water solu-
tion. Always wipe the solution from the joints when test-
ing is completed.
Prior to performing this conversion, refer to the National Fuel
Gas Code (NFPA 54-02) or in Canada, CAN/CSA-B149.2-05
to ensure that the installation is in compliance with those and
all local codes.
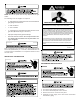
IMPORTANT INFORMATION
CARBON
MONOXIDE
POISONING
HAZARD
B10259-216
Carbon monoxide producing devices (such as an automobile, space
heater, gas water heater, etc.) should not be operated in enclosed areas
such as unventilated garages, utility rooms or parking areas because of
the danger of carbon monoxide (CO) poisoning resulting from the exhaust
emissions. If a furnace or air handler is installed in an enclosed area such
as a garage, utility room or parking area and a carbon monoxide producing
device is operated therein, there must be adequate, direct outside
ventilation.
This ventilation is necessary to avoid the danger of CO poisoning which
can occur if a carbon monoxide producing device continues to operate in
the enclosed area. Carbon monoxide emissions can be (re)circulated
throughout the structure if the furnace or air handler is operating in any
mode.
CO can cause serious illness including permanent brain damage or death.
Special Warning for Installation of Furnaces or Air Handling Units in
Enclosed Areas such as Garages, Utility Rooms or Parking Areas
CONVERSION INSTRUCTIONS
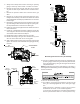
1. Turn off the gas supply to the furnace.
2. Turn off the electrical power to the furnace.
3. Remove the furnace control access panel.
4. Separate the gas supply union and remove associated
downstream piping.