
Installation Manual


5
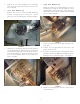
5. Remove the two screws holding the rear mounting
plate. Note the orientation of the heater box covers
for reassembly.
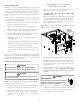
6. Three-Phase HKR Kits only
Remove the contactor from the HKR mounting
bracket, leaving the wires connected. Attach
contactor to rear mounting plate as shown in Figure
5.
FIGURE 5
7. Install heater element(s) with the four (4) pointed
screws included in the unit literature bag. Note the
air flow direction label located on the heater element
base shown in Figure 6. Orient the heating element
base to match airflow direction on package unit
blower assembly.
FIGURE 6
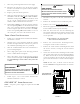
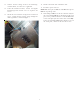
8. Single Phase HKR Kits only
Mount the breaker (or terminal block) to the rear
mounting plate using the four (4) blunt tip screws
included in the unit literature bag. The screw heads
should all be located on the outside of the mounting
plate as shown in Figure 7.
FIGURE 7
9. Locate the 9-pin harness in the unit and remove the
male plug.
10. Connect the 9-pin plug from the unit to the 9-pin
plug in the heater kit.
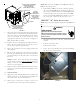
11. Feed the 9-pin harness wires through the rubber
grommet, and feed the HKR wires through the plastic
bushing in the rear mounting plate. See Figure 8.
FIGURE 8
12. Install rear mounting plate with the two (2) screws
removed in step 6.