
Installation Manual


7
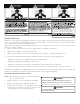
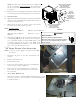
7. Install heater element(s) with the four (4) pointed screws included
in the unit literature bag. Note the air flow direction label located
on the heater element base shown in Figure 10. Orient the heating
element base to match airflow direction on package unit blower
assembly. Ensure scews attaching horseshoe contactor plate fit
into relief cuts of package unit.
FIGURE 10
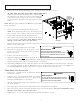
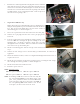
FIGURE 11
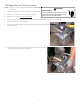
FIGURE 12
8. Single Phase HKR Kits only
Mount the breaker (or terminal block) to the rear mounting plate
using the four (4) blunt tip screws included in the unit literature
bag. The screw heads should all be located on the outside of
the mounting plate as shown in Figure 11.
9. Locate the 9-pin harness in the unit and remove the male plug.
10. Connect the 9-pin plug from the unit to the 9-pin plug in the
heater kit.
11. Feed the 9-pin harness wires through the rubber grommet, and
feed the HKR wires through the plastic bushing in the rear
mounting plate. See Figure 12. Ensure 6 gauge wires are going
through heater kit cover holes. Tuck excess into side of unit and
route wires over top of horshoe plate.
12. Install rear mounting plate with the two (2) screws removed in
step 5.
13. Connect the line voltage leads to the breaker(s), terminal block, or contactor as
applicable.
14. If heat kit includes breakers, remove rectangular knockout(s) from outside cover as
required for access.
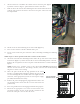
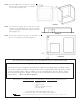
15. Install the cover with the two (2) screws removed in step 4, routing the line voltage
wires through the rubber grommet as shown in Figure 13.
16. Install control box door and blower door.
17. Reconnect power and test.
NOTE:
In Package Units:
HKP-05C replaces HKR-05C HKP-10C replaces HKR-10C
HKP-15C replaces HKR-15C HKP-20C replaces HKR-20C
NOTE: If installing an HKP heater kit on a unit that only has
the corresponding HKR heater kit shown on the serial
plate, use a permanent marker to add the HKP model
to the serial plate (the data is the same as the HKR). If
the corresponding HKR model number is not on the
serial plate, the heater kit can not be used.
FIGURE 13