
Installation Instructions
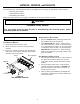

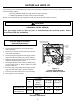
Table Of Contents
- Contents
- General Information
- HANG13, HANG14, and HALP11
- Orifice Installation
- Gas Manifold Removal
- Burner Orifice Replacement
- Gas Manifold Re-Installation
- Adjustments and Checks - HANG13 & 14
- Orifice Leak Check
- Line Pressure Check
- Manifold Pressure Check
- Unit Operation Checks - HANG13 & 14
- Check Normal Operating Sequence of Ignition System
- Verify Gas Input Rate(s)
- Inspect Burner Flame
- Check and Adjust Unit Temperature Rise
- Adjustments and Checks - HALP11
- Orifice Leak Check
- Line Pressure Check
- Manifold Pressure Check
- Unit Operation Checks - HALP11
- Check Normal Operating Sequence of Ignition System
- Verify Gas Input Rate(s)
- Inspect Burner Flame
- Check and Adjust Unit Temperature Rise
- Label Attachment
- HAPS28 and HAPS 29
- Pressure Switch Assembly
- Removal/Replacement

4
HANG13, HANG14, and HALP11
The conversion from “standard altitude” orifices (as shipped from the factory) to “high altitude” orifices requires:
• Removing gas manifold
• Replacing burner orifices
• Reinstalling gas manifold
Before proceeding, shut OFF gas supply at manual shut-off and turn off power to the unit.
CAUTION
PERSONAL INJURY HAZARD
The gas supply must be shut off prior to disconnecting the electrical power, before
proceeding with the installation.
Orifice Installation
GAS MANIFOLD REMOVAL
1. Disconnect wiring from the gas valve.
2. Where necessary, cut wire ties securing wiring to
manifold.
3. Remove the screws securing the gas manifold and
valve to the burner bracket. Separate gas manifold
and valve from burner bracket.
Burner Bracket
Burner
Manifold
Gas Valve
Figure 1
Gas Manifold Removal
BURNER ORIFICE REPLACEMENT
1. Remove standard altitude natural gas orifices from
gas manifold using a box end wrench.
2. Install high altitude gas orifices. Tighten orifices
with a box-end wrench; do not use a socket wrench
as it could damage the orifices; do not cross-thread
or overtighten. Refer to Table 1 for the appropriate
high altitude kit and orifice size. Orifice usage de-
pends on an installation’s gas usage (natural or pro-
pane) and altitude.
GAS MANIFOLD RE-INSTALLATION
1. Re-install gas manifold and valve. Make certain that
the orifices are inserted in each burner and that
each burner remains properly seated in the burner
bracket.
2. Reconnect wiring to gas valve. Secure wiring to
manifold using wire ties provided. CAUTION: Wir-
ing must not interfere with orifices or burners, or
contact any hot surfaces.
3. Refer to natural gas
(HANG13 & 14) Adjustments
and Checks
or propane gas
(HALP11) Adjustments
and Checks
section.