
Installation Instructions


5
Derating Example 2: 11,500 BTU at 7,501 ft.
Sea level (high stage) input = 115,000 Btu/hr
From Table 2: Derate at 7,001 ft. = 24 ± 2%
Since this installation is at the lower end of the elevation
range, use the lower derate:
(24 - 2) = 22%.
Expected Input = 115,000 x (1 - .22) = 89,700 Btu/hr
7. Remove jumper wires from integrated control module.
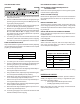
INSPECT BURNER FLAME
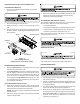
The burner flames should be stable, soft and blue (dust may
cause orange tips but they must not be yellow). They should
extend directly outward from the burners without curling, float-
ing, or lifting off.
Check the burner flames for:
1. Good adjustment
2. Stable, soft and blue
3. Not curling, floating, or lifting off.
Figure 3
Burner Flame
CHECK AND ADJUST UNIT TEMPERATURE RISE
Check and adjust unit temperature rise(s) as described in the
installation manual.
Temperature rise must be within the range shown on the fur-
nace rating plate.
PROPANE GAS UNIT KIT INSTALLATION - HALP13
IMPORTANT: Propane gas is heavier than air and does not
vent upward as natural gas fuels.
LOW PRESSURE LP KIT ACCESSORY INSTALLATION -
HALP13
To guard against poor burner flame and possible sooting, in-
stall a Low Pressure LP kit (LPLP01). Follow the directions
outlined in the instructions provided with the kit.
ADJUSTMENT AND CHECKS - HALP13
The following adjustments and checks are a required part of
this conversion. Adjustments and checks include:
• Leak checking orifices
• Checking and adjusting line and manifold gas pres-
sures
• Verifying proper unit operation (input rate, operational
sequence, burner flame, temperature rise, etc.)
ORIFICE LEAK CHECK
Leak check burner orifice threads using a soap solution.