
Installation Instructions Comfort Bridge Models


36
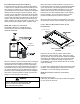
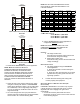
1. Use the wiring diagrams below to connect low voltage
thermostat wires.
note: wHen InstallIng tHe furnace wItH a non
coMMunIcatIng Heat PuMP wIre DIrectlY froM tHe “o” terMInal
on tHe tHerMostat to tHe reVersIng ValVe “o” terMInal on
tHe non coMMunIcatIng Heat PuMP. see fIgure 23 for sIngle
stage anD fIgure 24 for tHe two stage DIagraMs.
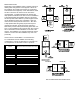
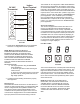
R
C
G
Y
Optional
Optional
Optional
INDOOR
BOARD TERMINAL
CONNECTIONS
1
2
C
R
C
G
Y
C
Y
Remote
Condensing Unit
(Single-Stage Cooling)
24 VAC
Thermostat
non-coMMunIcatIng sIngle stage a/c
fIgure 51
R
C
G
Y
Optional
Optional
INDOOR
BOARD TERMINAL
CONNECTIONS
1
2
C
R
C
G
Y
C
Y
Remote
Condensing Unit
(Two-Stage Cooling)
24 VAC
Thermostat
Y2
non-coMMunIcatIng two stage a/c
fIgure 52
1. Allow the system to remain Idle for 5 minutes.
2. Turn the system verication test on either by using
the phone application, or by entering the SUt menu
through the furnace push buttons.
3. Wait for the test to complete.
cHargIng
1. Inverter units using the CoolCloud HVAC phone
application or control board push button:
a. Inverter units are charged by setting
the CR9 menu (Charge Mode) to ON through
the furnace control board push buttons
or through the CoolCloud HVAC phone
application.
b. The System will remain in charge mode (high
speed) for 60 minutes before timing out.
c. The installer must manually shut off charge
mode once complete.
2. Two-stage outdoor units using the CoolCloud HVAC
application:
a. Using the cooling icon after entering the outdoor
unit menus, energize the outdoor unit at 100%
capacity.
b. Charge the outdoor unit as required using the
charging information provided with the outdoor
equipment.
gas furnace testIng
1. Two-stage Operation using the CoolCloud HVAC
application:
a. Select the gas heat icon after entering the
furnace menus.
b. Select any value less than 50% for low stage
operation and any value greater than 50% for
high stage operation.
4. Conrm thermostat heating and cooling calls function
proprly with equipment.
quIck start guIIDe for non-coMMunIcatIng
outDoor unIts
When setting up a ComfortBridge™ furnace for use
with a Non-Communicating outdoor unit you must
set airow in the “ton” menu on the PCB or in the
CoolCloud HVAC APP. Failure to do so will result in
the furnace PCB displaying “IdL” and the blower will
not operate with a call for cooling. The Board does not
need to be replaced, you MUST set the airow rst.
EXTREMELY IMPORTANT: For two-stage gas heating, the
system only needs a single W input. Internal algorithms
will control staging of the gas furnace automatically based
on the single W input. For non-communicating outdoor unit
wiring see instructions below.