
Installation Guide

- 2 -
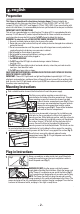
Find a suitable location to mount the fixture that will reach the power supply.
The fixture uses captive mounting screws which are
preinstalled on the inside of the wire compartment. To locate
these mounting screws first remove the screws from both
sides of the wire compartment cover (Fig. 1). Once
the screws are removed place the cover aside to
expose the wire compartment and the captive
mounting screws (Fig. 2). These will be located on
both ends of the wire compartment.
Mounting Instructions
1
2
IMPORTANT: These L.E.D. light heads use light emitting diodes to provide light. L.E.D.’s are
electronic semiconductors, and do not have a filament that can burn out like an ordinary light
bulb. As such, the L.E.D. light heads can last up to 50,000 hours when used intermittently, and
therefore, never need replacing.
3. Do not use an extension cord. Use power strip with integral overcurrent protection to
supply other electrical devices or accessories in cabinet.
4. Not intended for illumination of aquariums.
5. Not intended for recessed installation in ceilings, or soffits.
6. Do NOT attempt to install while plugged in.
7. For INDOOR USE ONLY.
8. Do NOT mount the LED lights to cabinets having a material thickness
less than 1/4 in.
9. Do NOT install these lights inside of enclosed cabinets, unless they are hard wired to
meet your local electrical code.
10. Do NOT mount over sinks or stoves.
SAVE THESE INSTRUCTIONS IN A LOCATION CLOSE TO YOUR LIGHT FIXTURE SO YOU CAN
REFER TO THEM AT A LATER TIME.
IMPORTANT SAFETY INSTRUCTIONS
This unit has a grounded plug as a safety feature. This plug will fit in a grounded outlet only
one way. If it still does not fit, contact a qualified electrician. Never use with an extensions
cord unless the plug can be fully inserted. Do NOT attempt to defeat this feature.
WARNING: To reduce the risk of FIRE, ELECTRIC SHOCK, OR INJURY TO PERSONS:
1. Use only insulated staples or plastic ties to secure the cords.
2. Route and secure the cords so that they will not be pinched or damaged when cabinet is
pushed to the wall.
Preparation
english
This fixture is dimmable with a front phase electronic dimmer. Dimmers tested to be
compatible with this fixture are the Lutron: Diva(r) C*L(tm): DVWCL-153P* or DVCL-153P*,
Lumea(r) C*L(tm): LGCL-153P*, and Toggler(r) C*L(tm): TGCL-153P8. If you are unfamiliar with
electrical installations, it is recommended you have a qualified electrician do your installation.
The fixture can be mounted in two ways. For installation using
pilot holes for the screws place the fixture firmly against the
mounting surface. While holding in position, mark the surface for
the pilot hole locations by turning both screws until they dimple
the surface. Using a 1/16” drill bit, drill the pilot holes for the
screws. Secure the fixture to the cabinet by tightening the
mounting screws into the drilled pilot holes. The fixture can also
be mounted without the use of pilot holes by firmly holding the fixture against the mounting
surface and turning the mounting screws until the fixture is snug against the surface (Fig. 3).
3
Once fixture is secured to cabinent replace the wire
compartment cover (Fig. 4). Plug in the power cord and the
installation is complete.
4
Fig. 1
Fig. 2
Fig. 3
Fig. 4
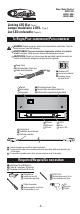
Plug-in Instructions
Fig. 2
Fig. 1
WARNING: DO NOT plug the power cord into the power
supply before finishing the installation. Attach the power cord
to the "Power-In" receptacle on one end of the fixture (Fig. 2).
The 2 receptacles are designed to only accept a specific plug.
NOTE: The Power Cord will only plug into one end correctly,
do not try to force it into the wrong receptacle, this could cause damage to the fixture. The
power cord plug will be fully inserted once the catch on the plug is engaged. Trace the line
cord over to the nearest outlet, and plug in. Your light is ready to use.
Using a screwdriver, or other similar tool, pry off the plastic
receptacle cap that covers the input receptacle in order to
insert the power cord (Fig. 1).
1
2