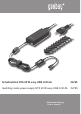
Schaltnetzteil NTS 90 W easy USB LCD 6A 54795 Switching mode power supply NTS 90 W easy USB LCD 6A 54795 Betriebsanleitung User`s manual
Betriebsanleitung NTS 90 W easy USB LCD 6A 54795 ACHTUNG! Lesen Sie die Betriebsanleitung vollständig und sorgfältig durch. Sie ist Bestandteil des Produktes und enthält wichtige Hinweise zur korrekten Installation und Benutzung. Bewahren Sie sie auf, damit Sie diese bei Unsicher- heiten und Weitergabe des Produktes parat haben.
• • • • • • • • • • • • • • • Ihr Produkt ist kein Spielzeug und gehört nicht in Kinderhände, weil zerbrechliche, kleine und verschluckbare Teile enthalten sind, die bei unsachgemäßem Gebrauch Personen schädigen können! Bitte installieren und lagern Sie das Produkt und dessen Zubehör so, dass keine Personen oder Sachen z.B. durch Herabstürzen oder Stolpern verletzt oder beschädigt werden können. Lassen Sie Verpackungsmaterial nicht einfach liegen, da sich spielende Kinder daran schneiden können.
Betriebsanleitung hen. Ein anderer Gebrauch ist nicht gestattet. Die Verwendung darf nur in trockenen Innenräumen erfolgen. Das Nichtbeachten und Nichteinhalten dieser Bestimmungen und der Sicherheitshinweise kann zu schweren Unfällen und Schäden an Personen und Sachen führen.
. Verbinden Sie das Netzgerät jetzt mit Ihrem Laptop. Vergleichen Sie vor dem Einschalten die Betriebsspannungen. 6.2 Laden eines Geräteakkus: Der Geräteakku wird automatisch bei Betrieb über das Netzteil geladen. Den Ladestatus entnehmen Sie Ihrem Gerät. 6.3 Nutzung der USB-Ladefunktion: 1. Folgen Sie Schritt 1-3 aus Kapitel 6.1. C 2. Verbinden Sie ein USB-Ladekabel mit Ihrem USBGerät, wie MP3-Player, Handy, usw.
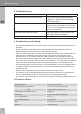
Betriebsanleitung 8 Problembehebung: Problem Abhilfe Die Netzteileinstellung funktioniert nicht. Achten Sie auf die Montagereihenfolge in Kapitel 6.1. Achten Sie auf schlüssige Kabelverbindungen. Die Akkuladefunktion arbeitet nicht. Achten Sie auf die Montagereihenfolge. Prüfen Sie den Ladestatus vorher und achten Sie auf schlüssige Kabelverbindungen. Siehe auch Kapitel 6.2. Die USB-Ladefunktion ist gestört. Lesen Sie Kapitel 6.3 und achten Sie auf schlüssige Kabelverbindungen.
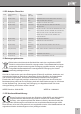
11 DC-Adapter-Übersicht: Größe A Ausgangsspannung max. Adapter- (Range) Ausgangsstrom größe (mm) 19V (18.1-19.9V) 4.74 A 4.8x1.7x10.7 Kompatibilität HP/Compaq: 18.5V-2.7/3.5/3.8/4.9A, DELTA: 19V-2.64A, DC-F ASUS: 19V-2.64A, NEC: 19V-2.64A ... B 15V (14.3-15.7V) 6A 6.3x3x10.7 TOSHIBA: 15V-3/4/5/6A, NEC: 15V/6A ... C 19V (18.1-19.9V) 4.74 A 5.5x2.1x10.7 ACER: 19V-3.16/3.42/4.74A LITEON: 19V-3.16/3.42A, D 19V (18.1-19.9V) 4.74 A 5.5x2.5x10.7 IBM: 19V-4.2A, DELL: 19V-3.16/3.
User`s manual NTS 90 W easy USB LCD 6A 54795 ATTENTION! Read the user`s manual completely and carefully. It is part of the product and includes important information for proper installation and use. Keep this user‘s manual for clarification and only pass it on together with the product.
• Please install and store the product and its accessories in a way persons cannot be injured, or objects not be damaged for example by dropping or stumbling. • Please remove or store the packing materials well, because children may cut themsel- ves on them while playing. Furthermore, there is a risk of swallowing and inhalating of incidentals and insulating material. • Also read the manual of your device, which is to be charged or operated, like Notebook, Mobile Phone, etc.
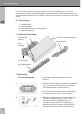
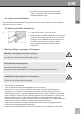
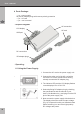
User`s manual 4 Parts Package: - 1 pc power supply -10 pcs DC adaptor plugs with reverse polarity protection - 1 pc AC cord - 1 pc user`s manual 5 Graphic Diagram: LCD display USB port AC connection AC cord DC connection DC adaptor plugs 6 Operating: 6.1 Using the Power Supply: 1. Connect the AC cord to the power supply unit. A 2. Connect the other end of the AC cord with a 100-240 V AC mains socket without having already connected a DC adaptor plug. 3.
6.2 Charging Batteries of a Device: The e.g. notebook battery is charged automatically during operation. Take the charging status from the notebook directly. 6.3 Using the USB Function: C 1. Follow step 1-3 of chapter 6.1. 2. Connect the USB cable of your USB device, like MP3-Players, Mobile Phones, etc. with your USB device and the USB socket of the power supply unit to activate the USB charging function. (Fig. C) Take the charging status from your USB device directly.
User`s manual 8 Troubleshooting: Problem Help The adjustment of the power supply does not work. Mind the assembling in right order in chapter 6.1. Check all cable connections for proper fitting. The charging function of the battery does not work. Mind the assembling in right order. Check the charging status of the battery before charging and mind proper connections of all cables. Also read chapter 6.2. The USB charging function does not work. Read chapter 6.
11 DC Adaptor Plug Overview: Tip Output voltage (Range) Max. output Size (mm) Compatibility 4.8x1.7x10.7 HP/Compaq: 18.5V-2.7/3.5/3.8/4.9A, DELTA: 19V-2.64A, current A 19V (18.1-19.9V) 4.74 A DC-F ASUS: 19V-2.64A, NEC: 19V-2.64A ... B 15V (14.3-15.7V) 6A 6.3x3x10.7 TOSHIBA: 15V-3/4/5/6A, NEC: 15V/6A ... C 19V (18.1-19.9V) 4.74 A 5.5x2.1x10.7 ACER: 19V-3.16/3.42/4.74A LITEON: 19V-3.16/3.42A, D 19V (18.1-19.9V) 4.74 A 5.5x2.5x10.7 IBM: 19V-4.2A, DELL: 19V-3.16/3.42A HP/Compaq: 18.
Betriebsanleitung 14
Revision Date: 2011-01-07 Version 2 Goobay ® is a registered trademark of Wentronic GmbH in Germany and/or other countries. Wentronic GmbH Pillmannstraße 12 38112 Braunschweig, Germany Designed and Developed in Germany.