
User manual


EN
- 3 -
User Manual
2in1 universal mount with wireless charging function
Goobay
®
by Wentronic GmbH | Pillmannstraße 12
38112 Braunschweig | Germany
REV2015-10-23
V1.0
We reserve the right of misprints and changes to
product, packaging or product documentation.
44171
1 Safety Instructions
The user manual is part of the product and contains important informati-
on for correct use.
• Read the user manual completely and carefully before use.
The user manual must be available for uncertainties and passing the
product.
• Keep this user manual.
• Comparethespecicationsofalluseddevicestoensure
compatibility.
• Not meant for children.
• Do not open the housing.
• In case of questions, defects, mechanical damage, trouble
and other problems, non-recoverable by the documentation,
contact your dealer or producer.
• Do not modify or alter products, product parts and accesso-
ries constructively.
• Avoid stresses such as heat and cold, moisture and direct
sunlight, vibration and mechanical pressure.
• Only use in dry ambience.
• Place, install and transport product, product parts and acces-
sories in a safe way.
Ground shorting
• Do not connect already connected devices to other interfaces
of the vehicle simultaneously.
• Do not rotate in inserted state.
Magnetism
The product contains magnetic materials.
• Regarding the compatibility with implanted medical devices,
consult a doctor before use.
• Keep a minimum distance of 20 cm to medical equipment.
• Do not store or operate near bank cards.
Distraction in road trafc
• Select the installation place so, that neither the operation nor
view of the driver is impaired while driving.
• Do not operate the product while driving, so that the driver is
not distracted by optical and/or acoustic signals.
2 Description and Function
2.1 In general
This product is an universal mount with wireless charging function for charging
mobile devices via wireless induction or Micro-USB charging cable. The universal
holder can be mounted on the 2 supplied mounting adapters to windshield, air vents
or other surfaces. The Micro-USB charging cable and the USB car charger supply
energy to the universal mount or to your device directly.
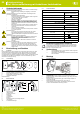
2.2 Scope of delivery
F
A Universal mount with adjustable clamps,
B Mounting adapter for air vents,
C Mounting adapter for windshields,
D Micro-USB charging cable 0.30 / 1.50 m,
E Adapter plate for for other surfaces,
F USB car charger
User manual
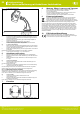
2.3 Operating elements
1
2
3
4
5
6
7
8
9
10
1 Rotation scew
2 Hook buckle
3 Spring clamp lock
4 Support bracket
5 Charging station
6 Locking lever
7 Suction cup
8 Mounting connection for mounting adapters
9 LED
10 Adjustable clamps
2.4 Specications
Universal mount
Connectors
Micro-USB input (IN),
wireless interface
Input 5 V , 1.5 A
Frequency range 110-205 kHz
Wireless charging distance max. 4-10 mm
Minimum distance to medical devices 20 cm
Micro-USB charging cable
Connectors
Micro-USB plug,
USB-A plug
Cable length 0.30 / 1.50 m
USB car charger
Connectors
12 V car plug,
USB-A socket
Input 12 V
, 1.04 A max.
Output 5 V
, 2.1 A max.
Dimensions 57 x Ø27.5 mm
Weight 14 g
3 Intended Use
We do not permit using the device in other ways like described in chapter
“Description and Function“. Not attending to these regulations and safety
instructions might cause fatal accidents, injuries, and damages to
persons and property.
4 Preparing
>> Comparethespecicationsofalluseddevicestoensure
compatibility.
>> Check the scope of delivery for completeness and integrity.
5 Mounting
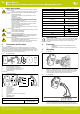
5.1 on air vent
1. Plug the mounting adapter for air vents (B) into an air vent.
2. Adjust it by operating elements (2), (3) and (4) according to your needs.
3. Stuck the universal mount (A) onto the mounting adapter for air vents (B).
4. Adjust the viewing angle by holding the universal mount (A) with one
hand and rotating the rotation screw (1) with the other hand.
5.2 on windshield
5.2 + 5.3
5.3
1. Release the locking lever (6).
2. Press the mounting adapter for windshields (C) against the windshield
and and set the locking lever (6) meanwhile back to starting position.
3. Put the universal mount (A) onto the mounting adapter for windshields (C).