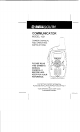
(of T TFA] COMMUNICATOR MODEL 1031 OWNER'S MANUAL Co AND OPERATING INSTRUCTIONS ; i PLEASE READ THIS OWNER'S MANUAL CAREFULLY BEFORE USE. | :} KEEP FOR YOUR REFERENCE. FOR "GETTING STARTED" INFORMATION, PLEASE SEE INSTALLATION INSTRUCTIONS CN PAGE 7 LR YOUR SEPARATE QUICK START GUILE.
Make certain you receive the best performance from your COMMUNICATOR. Read this Owner’s manual first.
Special Features Congratulations oo your selection of a quality Bell South product. With proper care and adherence to the setup and user Instructions in this O'Connor's Manual, his unit will provide vou with years af trouble-leer crevice Elisabeth is committed 1 providing quality products that it your mos. We would ike w have any comments of suggestions you might have on this product. You may mail your comments to U.8.
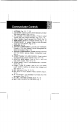
Communicator Controls 1, ANTENNA (Pgs. LCD Serene: Displays current chain selection and other radio stats soaks. (Pye. $12,144) 3. UP A button (MULTICHANNEL: Press to stadium mourner level and change channels. (Pga. 16-11, 183 4, CALL C button: Press © transmit CALL TONES. (Pg. 13) §. MEN button; Allows you 10 changes channels. (Fos. 11, 18} 6. POWER ON/OFF © button: Tress and hold he Hutton © wm your ung ON OFF (Pgs, 8, 10) 7. SPEAKER (Pg. 10} 8. BATTERY COMPARTMENT (LOCATED ON THE REAR): Houses 4 x 1.
FCC Notice Warning: Adjustment 1© tis unit or replacement of any transmitter component (Crystal, semiconductor, ec) to this unit that could result in a canonical of the rules, Note: This presentiment has been sed and found to comply swath the limits for a Class 8 digital device, pursuant to Part 1§ of the FOL Rules. These limits are designed 10 provide reasonable protection against harmful interference in a residential installation.
[Tool fT Safety Information: Your wireless hand-held Jodie INSTINCTIVE! COONSKINS 3 low power transmitter. When the Push-to-Talk (PTT) butter is pushed it sends out relic frequency (RF) signals. In August 1898, the Federal Communications Commissions (FOC) adopted RF exposures guidelines with safety levels for hand-hay wireless devices, important To main tn compliance with the CO's RF exposure guidelines hole the transmitter and antenna at stasis t inch {2.
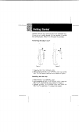
Carefully remove your communicator from its Blister Pack. i tear is any visible ca mags, do not attempt to overate his communicator. Rew it tw the pace of purchase. Removing the BELT CLIP: Figures 1. Figure 2. 1. Frogs the BELT CLIFF SPRING LOCK 2. While pressing the BELT CUP SPRING LOCK, pull out the BELT CLIP to remove i rom 1s unit, 28 shown in Figure 1. Installing the Belg Clip 1. Press the BELT CLIP SPRING LOCK, 2. While pressing me LEST CLIP SPRING LOCK.
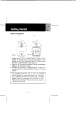
Getting Started Battery Installation: 1. Release the BATTERY COMPARTMENT COVER LATCH dedicated on the rear side of the unit (see Figure 3) and remove the BATTERY COMPARTMENT COVER from the BATTERY COMPARTMENT (See Figure 41, 4. Install 4x1.5V AAA alkaline battens or NLM rechargeable batteries (not included} as shown, 3 Reinstall the BATTERY COMPARTMENT COVER and log the BATTERY COMPARTMENT COVER LATCH into position, The COMMUNICATOR has a built in POWER SAVER feature for maximum battery ie.
Getting Started LCD Screen; CHANNEL NUMBER sox ICON 1 ) | BATTERY ‘ VOX INDICATOR BWA BL SUTTON scan [lll rose E LOCK FX CON CHANNEL SCAN SELECTION BAN Displayed during CHANNEL SCAN mode. o Crass and hold the LAMP button wnt] the BUTTON LOCK symbol is displayed. i Channel Huber changes from seismic by user. Diwali Displays current BATTERY LEVEL, ull Displays current VOLUME LEVEL. BUSY Displayed when resewing a signal. VOX Displayed during Vox mode.
Getting Started Turning the Unit ON: Crass and hold the {0 button. The unit val “esp” with dual tone and the LCD SCREEN will briefly display a SELF. TEST Screen. Turning the Unit OFF: Press and hold the (button. The unit will “beep” swath a signal tans and the LOO Screen will wm plank Adjusting Speaker Volume: 1. Crass the Uo A button tn increase the Speaker Volume, 2. Press the Down '¥ button to desecrates the Speaker Volumes, 3.
Operation Changing Channels: The COMMUNICATOR has 14 available channels, To change channels; 1. Crass he MENU butter unt! the current channel number flashes or the LOD Careen. 2. White the channel number is flashing.
Channel Sean: CHANNEL SCAN barnstorms searches for active signals m an endless loop from Press and release He SCAN button to activate CHANNEL SCAN. The channel number on the LCD Screen changes rapidly unt] an attire signed is detracted, Curing CHANNEL SCAN mods. * Press SCAN bunion and the channel will rem to the original default Chanel automatically Press the CALL C button to change 0 CALL function and to send a CALL TONE on that active channel. 2. When an active signal (one of 14 channels) is screed.
8): Sending Call Tones You can use CALL TONES wo alert the other when you are matting In Contact hem, You can also use CALL TONES © signet the beginning of the end of a transfusion, 1. Crass the CALL C button, the red TX LED indicator will light up amd the CALL TONE continues for 2 seconds. 2.
Of TIE Connecting an Adapter In the avert you wish to use the unit with rechargeable battened {rot Included) you will ba required 1 use an AC/DC roadwork input 120 VAC 80 Hz Output § WDC 100MA (not Included). * insert 4 "AAA" Ni-MG rechargeable sameness (no! in chided) * Tym the unit OFF # Plug the adapter inch the wall and inset te round and into the CHARGE JACK marker CHG on the op of the COMMUNICATOR. * Unplug the adapter. Tum the unit ON.
0) LIE] VOX Function The COMMUNICATOR has a builtin Voice Activated Transmission (VOX) capability Wis in te VOX mace, te COMMUNICATOR will traumatically transmit and race grosgrain without any button beg praised. VOX operation is not recommend if you fan to uss your radio in a noisy or windy environment To wm on the VOX mode: 1. Truss the MENU button three Mes t enter the VOX mode: 2. While the VOX icon is farthing; 3.Press the Up 4 button © select a higher VOX sensitivity 4.
ART ET Te Chalmers Available 14 Channels Quip Power (TX) Amway Battery Life 30 Hours {typical} Range About 2 Mites CHANNEL TABLE CHANNEL NUMBER FREQUENCY (MHz) 1 462.5628 2 462.5875 3 4626125 4 462.6378 5 482.6625 8 462.6875 7 462.7128 8 467.5624 a 487.5875 10 487 8128 11 457.8376 12 ABT 6625 13 467.8875 14 467.
A i Warranty Bell South Products One-Em Limited Warranty This mites warranty sets forth ai Bell South Products responsibilities regarding your COMMUNICATOR. There ate no other expressed or emptied warranties Fom Elisabeth Products. Warranty Service Provided If you purchased the COMMUNICATOR unit new farm a retell vend, Elisabeth Products warrants fie eminent aging defects is male and workmanship for @ dopa of ne (1) year from the longing fete of purchase.
What To Do for Warranty Service During the first they (20) days. a defective product m shield for ovenware-counter exchange at tha reader from whom i was purchased. After titty (30) mys, the defective pro gust Soul De rummest fo the agonized services center, The sipping address of the authorized service curler LLB. Mnemonics CONSUMER CENTER CA Southey Bonded Wirehair 1487 MX Zion Re. Marrow, GA 30280 Your unit wil bo repaired of replaced f examination by the service naan determines (fe unt 1s defective.