
Installation Sheet

IMPORTANT:
• ALLINSTALLATIONWORKSHOULDBEDONEBYACCREDITEDPROFESSIONAL.
• SHUTOFFPOWERSUPPLYATFUSEORCIRCUITBREAKER!
• USEONLYTHESPECIFIEDBULBS.DONOTEXCEEDTHEMAXIMUMWATTAGE!
CONNECTING THE WIRES
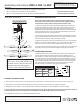
4.Attachthexture’swirestothepowersupplywiresfromthe
junctionbox.Connectblacktoblack(orsmooth);whitetowhite(or
ribbed);groundtoground(greenorcopper).Twisttheendsofthe
wirepairstogether,thentwistonawireconnector.Makesureall
twistsareinthesamedirection.Ifthereisnogroundwire(greenor
copper)fromthejunctionbox,locategroundscrew(E)onmounting
strap(A)andwrapthexture’sgroundwirearoundthegreenground
screw(E).Useascrewdrivertosecuregroundscrew(E)ontothe
mountingbracket.Tuckallwiresneatlyintothejunctionbox.
For Customer Service, please
contact the place of purchase.
AssemblyInstructions:8330-4 / 4SF / 6 / 6SF
CLEANING TIPS
Treat the xture gently! Regular cleaning will reduce the need for deep cleaning. For regular cleaning, turn off the light and wipe down the
xture with a clean lint-free cotton or microber cloth. Never spray cleaner directly onto the xture.
PREPARING FOR INSTALLATION
Remove all of the contents from the carton. See the important notes above. Shut off the power at the circuit breaker and
completely remove the old xture from the ceiling, including the old mounting strap.
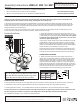
1.Mountingstrap(A)containsseveralpairsofthreadedholes.Findthepairofholesthatmatchesthespacingoftheholesonthe
junctionboxandyourxture’sbackplate.Testcanopy(G)onmountingstrap(A)toensurethatthebackplatewillhangstraightand
enoughofthethreadsofmountingscrews(B)willbeexposedfordeconuts(F)tot.Placethextureaside.Pullthehousewires
throughthecenterofmountingstrap(A).
2.Placemountingstrap(A)overthejunctionboxsothatmountingscrews(D)maybeinserted.Securemountingstrap(A)tothe
junctionboxwithmountingscrews(D)andascrewdriver.Tightenthescrewssecurely.
House Wires
Fixture Wires
Hot
How to Identify the Fixture’s Wires
Hot Neutral Ground
Smooth
Ribbed
Bare Metal,
Green, or
Green Inner
Thread
Black
White
Black Inner
Thread
White Inner
Thread
FINISHING THE INSTALLATION
5.Placethexture’scanopy(G)overmountingstrap(A)sothattheholesinmountingstrap(A)lineupwiththeholesincanopy(G).
6.Threaddeconuts(F)ontotheexposedthreadsofmountingscrews(B)untilcanopy(G)issnugagainsttheceiling.
7.Installalightbulbinsocket(I-notprovided)basedonthexture’sspecications.Donotexceedthemaximumwattage.
8. Please note that you can adjust the position of the light source/ring left or right along the center column using thumb screw
(J). Twist rings (H) up and down to change the look/conguration. See the Burn Risk and Important notes above.
Yourinstallationiscomplete.Turnonthepowerandtestthexture.
BURN RISK! Please turn o power to the
xture before adjusting the angle of the
rings to avoid burns from the exposed bulbs.
3.Spacer(N)andRods(LandK)areonthexture’swires,butnot
connectedtothexture.Bymeasuring,determinethecorrectnumber
ofrodsneededforproperhangingheight.Please note: It is possible
to install the xture without using any of rods (L or K) . For those
instructions, please ip the page.
Ifusingrods(LandK),decideonthenumberandlengthoftherods
neededbeforeconnectingtherodstogether.Toshortenthexture,
slideanyexcessrodsoffthexture’swirestodiscard.Tolengthen
thexture,addadditionalrods.Ifadditionalrodsareneeded,please
contacttheplaceyoupurchasedyourxturetoorder.
Placespacer(N)overpost(O)andscrewtheconnectedrodsonto
post(O).Twistthetoprod(LorK)ontothethreadsofswivelpost(I)
ofcanopy(F).Pullthexture’swiresthroughthetopofcanopy(F).
Pendant Installation
I
J
K
A
G
N
D
B
C
D
E
F
G
H
M
L
N
O
R
Important Note: To avoid snapping the xture’s
wires, do not fully twist rings (H) more than 2 times
in the same direction. Instead twist the rings in the
opposite direction to achieve the look you desire.