
Installation Sheet

PENDANT INSTALLATION
Assembly Instructions: 7151-SF (Bellare)
IMPORTANT:
• ALL INSTALLATION WORK SHOULD BE DONE BY ACCREDITED PROFESSIONAL.
• SHUT OFF POWER SUPPLY AT FUSE OR CIRCUIT BREAKER!
• USE ONLY THE SPECIFIED BULBS. DO NOT EXCEED THE MAXIMUM WATTAGE!
PREPARING FOR INSTALLATION
PREPARING FOR INSTALLATION
Please note that this xture can be installed as a semi-ush or as a pendant and includes
two canopies (G1 and G2).
Pleasedecidehowyouwouldliketoinstallthextureandchoose
theappropriatecanopyandinstructions.Canopy(G2)hasalargeholeinthecenter.Thiscanopy
isusedforpendantinstallation.Forpendantinstallation,pleasefollowtheinstructionsbelow.
Canopy(G1)hastwosmallholesandoneholeinthecenter.Thiscanopyisusedforsemi-ush
installation.Forsemi-ushinstallation,ipthepageandfollowtheinstructions.
Removeallofthecontentsfromthecarton.Seetheimportantnotesabove.Shutoffthepower
atthecircuitbreakerandcompletelyremovetheoldxturefromtheceiling,includingtheold
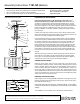
mountingstrap.Fromthepartsbagremovethemountingstrapassembly.Oneendofnipple
(F)shouldbeattachedtomountingstrap(A)withwasherandhexnut(C,D)inplace.The
otherendshouldhavecanopyloop(H)attached.Attachmountingstrap(A)tothejunctionbox
usingmountingscrews(B)andascrewdriver.Tightensecurely.Unscrewcanopyloopcollar
(I)fromcanopyloop(H).Passcanopy(G2)overthemountedcanopylooptotesttheheight.
Approximatelyhalfofthecanopyloop’sexteriorthreadsshouldbeexposed,andthecanopyloop
collarshouldtsnuglyontothecanopyloop.Removecanopy(G2)andadjusttheheightofnipple
(F)andcanopyloop(H)untilthedesiredheightisreached.
ASSEMBLING THE FIXTURE
Toploop(L)maybeonthexture’swires,butnotthreadedontothexture’sframe(Q).Ifitisnot
connected,pullthexture’swiresthroughnipple(O),cover(N),spacer(M)andupthroughtop
loop(L)beforetwistingthebottomofnipple(O)intopost(P)ofthexture’sbody(Q).Securein
placewithhexnut(U).Slidecover(N)downovernipple(O)andthreadspacer(M)ontothetop
threadsofnipple(O)Tightentoploop(L)tonipple(O).
Bymeasuring,determinethecorrectnumberofchainlinksneededforproperhangingheight.If
necessary,useapairofplierstoopenandremoveanyexcesschain.Attachchainconnectors
(K)toeachendofchain(J)beforeattachingoneendofthechainconnector/chaintotoploop(L).
Closethechainconnector.Connecttheotherchainconnector(K)tocanopyloop(H).Feedthe
xture’swiresupthroughtoploop(L)thenthroughchain(J)(everythreelinksorso).Pullthewires
untiltaut.Slidecanopyloopcollar(I)andcanopy(G2)ontothechain/wire.
CONNECTING THE WIRES
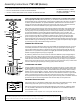
Haveanassistantsupportthexture’sweightwhilecompletingthewiring.Cutawayexcesswire.
Threadthexture’swiresthroughcanopyloop(H)andnipple(F).Attachthexture’swirestothe
powersupplywiresfromthejunctionbox.Connectblacktoblack(orsmooth);whitetowhite(or
ribbed);groundtoground(greenorcopper).Twisttheendsofthewirepairstogether,andthen
twistonawireconnector.Makesurealltwistsareinthesamedirection.Ifthereisnogroundwire
(greenorcopper)comingfromthejunctionbox,locategroundscrew(E)onmountingstrap(A)
andwrapthexture’sgroundwirearoundthegreengroundscrew(E).Useascrewdrivertosecure
groundscrew(E)ontothemountingbracket.Tuckallwiresneatlyintothejunctionbox.
FINISHING THE INSTALLATION
Pushcanopy(G2)uptotheceilingandslidecanopyloopcollar(I)upbeneaththecanopy.Tightly
threadcanopyloopcollar(I)ontocanopyloop(H)tosecurecanopy(G2)inplace.
Reachoverandthroughthecagetoslidecandlesleeves(S)oversockets(T).Installlightbulbs
(R-notprovided)inaccordancewiththexture’sspecications.Donotexceedthemaximum
recommendedwattage.
Yourinstallationisnowcomplete.Turnonthepowerandtestthexture.
CLEANING TIPS
Treat the xture gently! Regular cleaning will reduce the need for deep cleaning. For regular cleaning, turn off the light and wipe down the
xture with a clean lint-free cotton or microber cloth. Never spray cleaner directly onto the xture.
For Customer Service, contact
the place of purchase to arrange
for replacement parts.
BLACK
(Hot)
WHITE
(Neutral)
GREEN
(Ground)
HOUSE WIRES
SMOOTH
(Or Black)
FIXTURE WIRES
RIBBED
(Or White)
BARE COPPER
(Or Green)
A
B
C
D
E
F
G2
H
I
J
K
L
K
M
N
O
R
P
Q
S
T
U