
Installation Sheet

Assembly Instructions: 7151-SF (Bellare)
IMPORTANT:
• ALL INSTALLATION WORK SHOULD BE DONE BY ACCREDITED PROFESSIONAL.
• SHUT OFF POWER SUPPLY AT FUSE OR CIRCUIT BREAKER!
• USE ONLY THE SPECIFIED BULBS. DO NOT EXCEED THE MAXIMUM WATTAGE!
PREPARING FOR INSTALLATION
Please note that this xture can be installed as a semi-ush or as a
pendant and includes two canopies (G1 and G2). Please decide how you
wouldliketoinstallthextureandchoosetheappropriatecanopy.Canopy
(G1)hastwosmallholesandoneholeinthecenter.Thiscanopyisusedfor
semi-ushinstallation.Forsemi-ushinstallation,pleasefollowtheinstructions
below.Canopy(G2)hasalargeholeinthecenter.Thiscanopyisusedfor
pendantinstallation.Forpendantinstallation,pleaseipthepageandfollow
the instructions.
Carefullyremoveallofthecontentsfromthecarton.Seetheimportantnotes
above.Shutoffthepoweratthecircuitbreakerandcompletelyremovetheold
xturefromtheceiling,includingtheoldMountingplate.
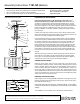
Fromthepartsbagremovethemountingplateassembly.mountingplate(B)
containsseveralpairsofthreadedholes.Findthepairofholesthatmatches
thespacingoftheholesonthejunctionboxandyourxturebackplate.Two
ofmountingscrews(A)shouldbeattachedtomountingplate(B).Youmay
needtotightenthenutsthatholdthesescrewsinplace.Pullthehousewires
throughthecenterofmountingplate(B).Placemountingplate(B)overthe
junctionboxsothatmountingscrews(A)arevertical,andinalignmentwiththe
holelocationsonthexture’scanopy(G1).Securemountingplate(B)tothe
junctionboxwithmountingscrews(D)andascrewdriver.Tightenthescrews
securely.
Takexturebody(Q)outofthebox.Screwnipple(O)intopost(P).Securein
placewithhexnut(U).Slidecover(N)andspacer(M)overnipple(O).Slide
canopy(G1)overtheexposedthreadsofnipple(O).Thenslideongasket(J),
andspacer(I).Twistonhexnut(H)tolockthepiecestogether.
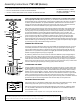
CONNECTING THE WIRES
Attach the power supply wires from the junction box to the xture’s wires.
Connectblacktoblack(orsmooth);whitetowhite(orribbed);groundtoground
(greenorcopper).Twisttheendsofthewirepairstogether,andthentwiston
awireconnector.Makesurealltwistsareinthesamedirection.Ifthereisno
groundwire(greenorcopper) fromthejunctionbox,locate groundscrewon
mountingplate(B)andwrapthexture’sgroundwirearoundthegreenground
screw.UseascrewdrivertosecurethegroundscrewontotheMountingplate.
Tuckallwiresneatlyintothejunctionbox.
FINISHING THE INSTALLATION
Raisecanopy(G1)tomountingplate(B)andpositionmountingscrews(A)
so
thattheyprotrudethroughtheopeningsofcanopy(G1).Securecanopy(G1)in
placewithdecorativenuts(F).
Slidecandlesleeves(S)oversockets(T).Installlightbulbs(R-notprovided)in
accordancewiththexture’sspecications.Donotexceedtherecommended
wattage.
Yourinstallationisnowcomplete.Turnonthepowerandtestthexture.
BLACK
(Hot)
WHITE
(Neutral)
GREEN
(Ground)
HOUSE WIRES
SMOOTH
(Or Black)
FIXTURE WIRES
RIBBED
(Or White)
BARE COPPER
(Or Green)
For Customer Service, contact the
place of purchase to arrange for
replacement parts.
SEMI-FLUSH INSTALLATION
CLEANING TIPS
Treat the xture gently! Regular cleaning will reduce the need for deep cleaning. For regular cleaning, turn off the light and wipe down the
xture with a clean lint-free cotton or microber cloth. Never spray cleaner directly onto the xture.
N
O
P
U
M
R
S
T
A
B
C
G1
D
E
F
Q
H
I
J
L
K