
Installation Sheet

IMPORTANT:
• ALLINSTALLATIONWORKSHOULDBEDONEBYACCREDITEDPROFESSIONAL.
• SHUTOFFPOWERSUPPLYATFUSEORCIRCUITBREAKER!
• USEONLYTHESPECIFIEDBULBS.DONOTEXCEEDTHEMAXIMUMWATTAGE!
CONNECTING THE WIRES
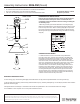
2.Attachthexture’swirestothehousewirespulledearlier
fromthejunctionbox.ConnectHottoHot(thisistheblackwire,
transparentwirewithblackinnerthread,orsmoothwire),Neutral
toNeutral(theneutralwireisthewhite,atransparentwirewith
whiteinnerthread,ortheribbedwire),andGroundtoGround(the
greenwire,transparentwirewithgreeninnerthread,orthecopper
wire).Twisttheendsofeachwirepairtogether.Secureeach
connectionwithawireconnector(usuallyorange).Makesureall
twistsareinthesamedirection.Ifthereisnohousegroundwire
comingfromthejunctionbox,pleaselocategroundscrew(E)on
mountingbracket(B)andwrapthexture’sgroundwirearound
groundscrew(E).Useascrewdrivertotightenthetopofground
screw(E)ontothewiresandintothemountingbracket/mounting
bracket.Tuckthewiresintothejunctionbox.
For Customer Service, contact
the place of purchase.
AssemblyInstructions:3306-FM (Orwell)
CLEANING TIPS
Treat the xture gently! Regular cleaning will reduce the need for deep cleaning. For regular cleaning, turn off the light and wipe down
the xture with a clean lint-free cotton or microber cloth. Never spray cleaner directly onto the xture. Hand wash the glass with warm
waterand mild detergent. Dry with a lint-free or microber cloth.
PREPARING FOR INSTALLATION
Remove all of the contents from the carton. See the important
notes above. Shut off the power at the circuit breaker and
completely remove the old xture from the ceiling, including the
old mounting strap.
1. Mountingscrews(A)shouldbeattachedtomountingstrap(B).
Matchthethreadedholesofmountingstrap(B)tothespacingofthe
holesonthejunctionbox.Attachmountingstrap(B)tothejunction
boxusingmountingscrews(D)andascrewdriver.Tightensecurely.
Mountingscrews(A)shouldprotrudethroughtheholesinmounting
strap(B).
FINISHING THE INSTALLATION
3.Pushcanopy(F)uptotheceilingandtightlythreaddecorativenuts(H)ontotheexposedthreadsofmountingscrews(A).
4.Securespider(I)toshade(L)withscrews(K)anddecorativecaps(J).Carefullyslidespider(I)oversocket(G)andsecuretheshadein
placewithsocketring(M).
Twistlightbulbsintosockets(G)inaccordancewiththexture’sspecications.Donotexceedthemaximumwattage.
Yourinstallationisnowcomplete.Turnonthepowerandtestthexture.
GND
J
K
M
L
B
JUNCTION
BOX
D
A
E
C
F
H
G
I
House Wires
Fixture Wires
Hot
How to Identify the Fixture’s Wires
Hot Neutral Ground
Smooth
Ribbed
Bare Metal,
Green, or
Green Inner
Thread
Black
White
Black Inner
Thread
White Inner
Thread