
Installation Sheet

Assembly Instructions: 2049-SF
IMPORTANT:
• ALL INSTALLATION WORK SHOULD BE DONE BY ACCREDITED PROFESSIONAL.
• SHUT OFF POWER SUPPLY AT FUSE OR CIRCUIT BREAKER!
• USE ONLY THE SPECIFIED BULBS. DO NOT EXCEED THE MAXIMUM WATTAGE!
PREPARING FOR INSTALLATION
Remove all of the contents from the carton. See the important
notes above. Shut off the power at the circuit breaker and
completelyremovetheoldxturefromtheceiling,includingthe
oldmountingstrap.
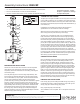
Fromthepartsbagremovethemountingstrapassembly.One
endofnipple(F)shouldbeattachedtomountingstrap(A)with
hexnutandwasher(C&D)inplace.Theotherendshouldhave
canopyloop(H)attached.Attachmountingstrap(A)tothe
junctionboxusingmountingscrews(B)andascrewdriver.Tighten
securely. Unscrew canopy loop collar (I) from canopy loop (H).
Passcanopy(G)overthemountedcanopylooptotesttheheight.
Approximatelyhalfofthecanopyloop’sexteriorthreadsshould
beexposed,andthecanopyloopcollarshouldtsnuglyonto
thecanopyloop.Removecanopy(G)andadjusttheheightof
nipple(F)andcanopyloop(H)untilthedesiredheightisreached.
Remove canopy (G) and canopy loop (H).
ASSEMBLING THE FIXTURE
Tiltglass(V)atanangleandslideitintoframe(R)tositonthetabs
on the inside of frame (R). You can slide it in from either the top or
thebottom.Placethebottomofframe(R)ontoaatsurface.Take
thexture’ssocketcluster(S)andcarefullyslidecandlesleeves(T)
over sockets (U).
Installbulbs(notprovided)inaccordancewiththexture’s
specications.Donotexceedthemaximumwattage.
Attachthexture’ssocketcluster(S)toframe(R)bythreading
deco nuts (Q) onto the posts at the top of frame (R).
Toploop(L)isonthexture’swires,butisnotattachedtothe
bodyofthexture.Passthexture’swiresthroughtoploop(L).
Pull the wires until taut and thread top loop (L) onto post (M) of
thexture’sbody.Bymeasuring,determinethecorrectnumberof
chainlinksneededforproperhangingheight.Ifnecessary,usea
pairofplierstoopenandremoveanyexcesschain(J).Attachone
ofchainconnectors(K)toeachendofchain(J).Twistthesidelock
to secure in place. Use one of chain connectors (K) to attach chain
(J)totoploop(L)andclosethechainconnector.Feedthexture’s
wiresupthroughthechain(everythreelinksorso),pullingthe
wiresuntiltaut.Usethefreechainconnector(K)toattachchain(J)
to canopy loop (H). Untwist canopy loop collar (I) to allow canopy
(G)tobeaddedtothechain.Feedthewiresupthroughthechain.
Allow canopy (G) to drop down onto the chain/wires.
CONNECTING THE WIRES
Haveanassistantsupportthexture’sweightwhilecompleting
thewiring.Cutawayanyexcesswireaddingatleast8to10
inchesofwiretothedesiredlength.Threadthexture’swires
throughcanopyloop(H)andnipple(F).Attachthexture’swires
tothepowersupplywiresfromthejunctionbox.Connectblack
toblack(orsmooth);whitetowhite(orribbed);groundtoground
(greenorcopper).Twisttheendsofthewirepairstogether,then
twist on a wire connector. Make sure all twists are in the same
direction.Ifthereisnogroundwire(greenorcopper)fromthe
junctionbox,locategroundscrew(E)onmountingstrap(A)and
wrapthexture’sgroundwirearoundthegreengroundscrew(E).
Useascrewdrivertosecuregroundscrew(E)ontothemounting
bracket.Tuckallwiresneatlyintothejunctionbox.
FINISHING THE INSTALLATION
Pushcanopy(G)uptotheceilingandslidecanopyloopcollar(I)
upbeneaththecanopy.Tightlythreadcanopyloopcollar(I)onto
canopy loop (H) to secure canopy (G) in place.
Hangcrystaldrops(P)ontohooks(N).
Your installation is now complete. Turn on the power and test the
xture.
CLEANING TIPS
Treat the xture gently! Regular cleaning will reduce the need for deep cleaning. For regular cleaning, turn off the light and wipe down the
xture with a clean lint-free cotton or microber cloth. Never spray cleaner directly onto the xture.
For Customer Service, contact
the place of purchase to arrange
for replacement parts.
BLACK
(Hot)
WHITE
(Neutral)
GREEN
(Ground)
HOUSE WIRES
SMOOTH
(Or Black)
FIXTURE WIRES
RIBBED
(Or White)
BARE COPPER
(Or Green)
A
B
H
I
E
K
J
F
C
D
L
M
N
U
Q
P
S
T
R
G