
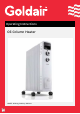
Instruction Manual

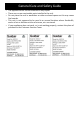
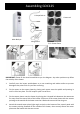


Wing Nut
x1 (7 Fin), x2 (11Fin)
U-shape Bolt
x1 (7 Fin), x2 (11 Fin)
Assembling GOC127, GOC1211
Main Body x1
Castor Plates
7 Fin Castor Plates
11 Fin Castor Plates
Screw x2
Castors x4
IMPORTANT: Please fit the wheel assemblies as per the diagram. Any other position may affect
the stability of the heater.
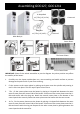
1. Carefully turn the heater upside-down on a non-scratching and stable surface to prevent
damage to the paint finish or your floor surfacing.
2. Fit the castors to the castor plates by placing each castor onto the spindle and pressing in
until it clicks into place. This will require quite a lot of force.
3. 7 Fin - Fit the castors plates onto the heater by placing a U-shaped bolt between the outer
most fin away from the control side of the heater. Place one of the castor plates onto the U-
Bolt and secure with the wing nut. Attach the second castor plate to the bottom of the
control panel then securely fasten the castor plate onto the heater with the two screws.
4. 11 Fin - Fit the castors plates onto the heater by placing a U-shaped bolt between the outer
most fin away from the control side of the heater. Place one of the castor plates onto the U-
Bolt and secure with the wing nut. Repeat for the other castor plate by placing between the
control panel and the second fin.