Contents Safety ................................................................................................................ 3 Environment .................................................................................................... 4 1 Getting Started .............................................................................................. 5 1.1 Getting to know your touch phone................................................... 5 1.2 Installing the SIM card and storage card ................
9.2 Alarm Clock .................................................................................. 28 9.3 Calculator...................................................................................... 29 SAR ................................................................................................................
Safety Never attempt to disassemble your phone. You alone are responsible for how you use your phone and any consequences of its use. As a general rule, always switch off your phone wherever the use of a phone is prohibited. Use of your phone is subject to safety measures designed to protect users and their environment. Do not use your phone in damp areas (bathroom, swimming pool…). Protect it from liquids and other moisture.
manufacturers of such equipment will be able to give you any advice you may need in this area. Hospitals: Always make sure that your phone is switched off in hospitals when so instructed by warning signs or by medical staff. Road safety: Do not use your phone when driving. In order to give your full attention to driving, stop and park safely before making a call. You must comply with any current legislation.
1 Getting Started 1.1 Getting to know your touch phone 1.2 Installing the SIM card and storage card To install the SIM card The SIM card contains your phone number, service details, and phonebook/ message memory. Your device is supported both 2G and 3G (WCDMA) SIM cards. Turn off the phone, pull out card slot. Add the SIM card according to instruction on the card slot. When you need to remove the SIM card, please shut down. * Note: • The phone can be supported the double SIM cards.
1.4 Starting up the device Power on/off To power off your phone, press & hold POWER. On release, the Phone options menu opens. Select ‘Power off’ and confirm. To power on again, press & hold POWER. Screen sleep After a period of inactivity, your screen will go to sleep (display will turn black). In sleep, your phone uses less battery power. You can control this behavior: Set screen timeout period 1. Select Settings > Display. 2. Select Sleep. Select a time from the menu.
• To move an icon or other item on the Home screen, you must first touch & hold it to enter move mode. The object will magnify when it’s ready to be moved. • Without lifting your finger (or you’ll drop out of move mode), drag the object to the new position. To move an item to a section of the Home screen not in view, move it to the edge of the screen and hold it there for a moment. The screen view will shift; position the object and release. 1.
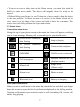
Notifications report the arrival of new messages, calendar events, and alarms. You can clear notifications list by selecting ‘Clear’ notifications at the top of the notifications window. To open the message, reminder, or other notification, you can touch the items. To close the notifications window, slide your finger up the screen.
To dial a number, touch ‘Voice Call’ button to select SIM1 card or SIM2 card to make a call. To end a call, touch ‘END’ button (Red icon). 1. Call log tab: Select an entry listed in the log to call the number. 2. Contacts tab: Contacts with phone numbers are listed. Select a contact, and then select the phone number to dial the call. 2.3 Answering and Ending a call When you receive a phone call, the incoming voice call screen will appear, allowing you to either answer or ignore the call. 1.
4. Tap and hold the selected contact you want to call, and then you can make to do the following options of call, edit number before call, send text message, add to contacts or remove from call log phone on the shortcut menu. 3 Setting on your device Control phone-wide settings from Settings. 3.1 Network & Internet Wi -Fi Wi-Fi on/off: Select this check box if you prefer to use Wi-Fi for your data connection. Wi-Fi settings: Open the Wi-Fi settings screen; select it from the network list.
• Pair or unpair with one of the Bluetooth devices in range - You will be asked to type a PIN before pairing. Refer to the manufacturer’s documentation for the PIN code. • Rescan for devices. 3.3 Display Brightness level Select to open the brightness control, and then slide your finger along the brightness bar to set the level. In sunlight, increase the level. Wallpaper Set a wallpaper as lock screen and home screen from gallery or wallpapers.
Screen unlock pattern: Create a pattern you will be asked to draw before your screen will unlock. You can select to make the pattern visible or invisible as you draw it. SIM card lock settings: Lock your SIM card for extra security. You can also change your SIM card PIN from this screen. If you don’t know your SIM PIN, you can obtain it from your wireless operator. Visible passwords: Select to have your password display as you type it.
Some applications on your phone (Contacts and so on) give you access to the same personal information that you can add, view, and edit on your computer using Web applications. This means that when you add, change, or delete your information in any of these applications on the Web, the updated information also appears on your phone, and vice versa. Also, if you lose your phone or if your phone is destroyed, your personal information is not lost and will appear, as before, on a replacement phone.
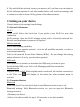
car kit. Turn on Bluetooth services 1. Select Settings > Connected devices 2. Select ‘Bluetooth’ check box to turn on Bluetooth services. 3. When on, the Bluetooth icon appears in the status bar. Discoverability By default, your phone is not “discoverable”. This means other Bluetooth devices will not see your phone in their scans for Bluetooth devices. If you make your phone discoverable, it will be visible to other Bluetooth devices for up to 120 seconds. To make your phone discoverable: 1.
8. To disconnect or unpair with a device, touch & hold the device to open the context menu. Select Disconnect or Unpair, as appropriate. If you select ‘Unpair’ when connected, you will be disconnected as well. Notes: The phone supports only the headset and hands-free Bluetooth profiles, so if you try to connect to a device that is not a headset or hands-free car kit, then you will receive an “unable to connect” message.
label, select the label name to open the label menu. Select a different label or create a custom label. To add more fields, select ‘Add another field’. 4. You can assign a Caller ID icon to your contact by touching Caller ID icon. The Pictures application opens. Navigate to a picture and select it, size the cropper with your fingertips. When finished, select ‘Crop’. The picture is associated with your contact. 5. To save your contact, press BACK, or touch ‘SAVE’.
• Select the contact you want to email. Their Contact details screen opens. • In the Send email section, select the email address. If you are fetching POP3 or IMAP email accounts to your phone, then select the account you wish to use to send. A Compose screen opens for your new message. • Complete your message, select ‘Send’. SIM contacts importer If you have stored names and phone numbers on your SIM card, you can add these to the Contacts stored on your phone by selecting this settings option.
messaging conversations (or chats). Note that messages you send are also listed in the Read view. 1. Reading multimedia messages If you have selected to auto-retrieve your multimedia messages, then both the message header and body will download. If you are downloading only the headers, then you must first select the Download button to retrieve the message body. If you are concerned about the size of your data downloads, you can check the message size before you download.
recordings you make will be stored automatically in the Music application in a play list named “My recordings”. To remove an attachment, select the attachment’s ‘Remove’ button. 4. Type your message. As you type, you’ll be able to track how many characters/messages you’re creating. Remember that text messages have a limit around 160 characters. Once you go over that limit, a new message is actually created but automatically joined into one when received. 5. Select ‘Send’ when ready.
This setting only applies if you have more than one POP3 or IMAP account set up. 5. To add more accounts (up to five), from an Inbox or your Accounts screen, select ‘Add account’. Use your POP3 and IMAP email account Once you’ve set up an account, you can do the following: 1. Refresh Inbox: From the Inbox, Slide down the phone screen to update your Inbox with any previously-unfetched email. 2. Read email: You can display or collapse the messages in your Inbox by selecting Inbox.
7 Internet 7.1 Ways of Connecting to the Internet Your device’s networking capabilities allow you to access the Internet or your corporate network through WLAN, GPRS, or WCDMA(if SIM card supported). (if SIM card supported). You can also add and set up a VPN or proxy connection. Wi-Fi Wi-Fi provides wireless Internet access over distances of up to 100 meters (300 feet). To use Wi-Fi on your device, you need access to a wireless access point or “hotspot”.
4. Copy .jpg or other image files into this folder. To organize pictures into albums that will display in the Pictures application, create a folder and copy pictures there for each album you want to display. 5. When finished, close the USB drive window and eject the drive as required by your computer's operating system. Take a picture Captured pictures are saved to the “DCIM” folder on your memory card or the phone.
Picture options You can do the following while in Pictures. Note: In all the instructions below, you can touch & hold a picture to open the context menu to access all actions, rather than open the picture in full-screen view. 1. View full-screen: Select a picture to open it in full-screen view. 2. Share a picture: In full-screen view, select Share. Select to share your picture via Messaging (MMS), or another application (if you have another application installed on your phone that supports sharing). 3.
A-Z order. If you select an artist, the list opens to display that artist’s albums. Select an album, and the album’s song list displays. Load music onto your Memory card All the music you can listen to on your phone is stored on memory card. Read the instructions below to add music to your memory card. 1.
song. 4. Playback control: from left to right icons: Go to beginning song, Pause/ resume play and Go to next of song. If a song is playing while you are on the Library screen, you can switch to the Playback screen quickly by selecting the lower song bar. Playlists You can create as many playlists as you wish. Note that the “Recently added” playlist is a system playlist and cannot be deleted or renamed.
2. Go to the screen that shows the artist, album, or song that you want to delete. 3. Touch & hold the item to open the context menu. 4. Select ‘Delete’. You will be asked to confirm that you want to delete the item from your memory card. 8.3 FM Radio This device provides radio function. Note: Within doors or shielded environment, the receiving effect of radio may be affected. You can improve the effect in the following ways: Near window, adjust the position of earphone cable or adopt manual adjustment. 8.
event’. 2. Schedule view Events in the current month are shown vertically in a list, one event after the other. Days with no events are not displayed. Repeating events - Marked with icon following the time or date. View event details - Select the event to view its details. Edit an event - First, select the event to view its details. Assuming you have write privileges on an event, select ‘Edit’ to edit. Navigate within the current month - Slide your fingertip up/down. 3.
Navigate within the current day - Slide your fingertip up/down. Navigate to a past or future day - Slide your fingertip left/right. Create new event - Touch an empty time slot to open the new Event details screen. Create an event From any of the views, select ‘New event’ to open the new Event details screen. • Type the information in the fields. • Select date & time. • Name that appears in Day view. • Description can be as long as you like. • Select a calendar if you display more than one.
Repeat: The current repeat selection is shown. To change the setting, select Repeat and make a selection from the menu. To have your alarm will only go off once at the set time, don’t select any of the options. A one-time alarm is shown on the Alarm Clock screen without any days under the set time. Ring tone: The current ring tone selection is shown. Select Ring tone to pick another ring tone that will play when the alarm rings. (When you select a ring tone, it plays briefly.
health. The guidelines use a unit of measurement known as the Specific Absorption Rate, or SAR. The SAR limit for mobile devices is 2 W/kg and the highest SAR value for this device when tested at the ear was 1W/kg per 10 gram of tissue. As mobile devices offer a range of functions, they can be used in other positions, such as on the body as described in this user guide.
FCC Statement 1. This device complies with Part 15 of the FCC Rules. Operation is subject to the following two conditions: (1) This device may not cause harmful interference. (2) This device must accept any interference received, including interference that may cause undesired operation. 2. Changes or modifications not expressly approved by the party responsible for compliance could void the user's authority to operate the equipment.
the phone transmitting at its highest certified power level in all tested frequency bands. Although the SAR is determined at the highest certified power level, the actual SAR level of the phone while operating can be well below the maximum value. This is because the phone is designed to operate at multiple power levels so as to use only the power required to reach the network. In general, the closer you are to a wireless base station antenna, the lower the power output.