
Installation Guide

2
INSTALLATION SETUP
Recessed Housing Compatibility
The LB65R6Z-1 is designed to be installed in a standard 5” or 6” recessed
downlight housing. For adequate clearance, it may be necessary to remove the
housing’s socket mounting plate before installing the light.
✓ NOTE: Not all existing 5” and 6” recessed housings are compatible
with the LB65R6Z-1. To ensure compatibility, test fi t the installation.
Torsion Spring Setup
The two torsion springs that retain the LB65R6Z-1 in the housing can be set for
5” or 6” recessed housings.
• For a 5” recessed housing, install the torsion springs in the clip closest to
the rear of the light.
• For a 6” recessed housing, install the torsion springs in the clip closest to
the front of the light.
INSTALLATION (Recessed Incandescent Housing)
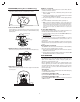
Housing Preparation
If the existing housing has an internal socket plate, remove it from the housing.
Install Edison Base Adapter
Screw the Edison Base adapter into the housing’s electrical socket.
Connect and Mount Fixture
Hold the fi xture up to the housing and press the two electrical quick connect
plugs together. Squeeze the two torsion springs to align them with the housing
mounting hooks.
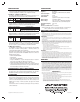
Attach the Fixture to the Housing Hooks
Fit the two torsion springs into the two hooks on the inner downlight housing.
Slide Fixture into Housing
Slide the fi xture up into the housing. The torsions springs will hold the fi xture
securely in place.
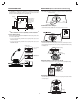
SIDE VIEW
FRONT VIEW
For 5” Recessed
housings
For 6” Recessed
housings
5-3/4” to 6-1/2”
6.5”
Minimum distance
between edge of
fixture and top of
housing or other
obstruction
Electrical
socket
Housing
Ceiling or
soffit
Ceiling
Socket plate
Downlight housing
1
Connectors
Squeeze
Torsion Springs
Downlight housing
Ceiling
Torsion spring
Hook
Ceiling