
Quick Start Guide

(2)(1) (3)
(6)(5) (7)
335100427_RevA
QUICK START GUIDE
Digital Radio
+
(4)
(9)(8)
(12)
(11)
(13)
(10)
(16)
(15)
(17)
(14)
(20)
(19)
(21)
(18)
(24)
(23)
(25)
(22)
(28)
(27)(26)
TO USERS
Thank you for purchasing out product! This Manual
(contains both analog and digital radios) is designed to
make you quickly grasp the use of the device. In order to
avoid physical injury or property loss due to improper
operation, please read this Manual carefully before using
the device.
NOTICE
The device meets the requirements of FCC PART 90 and
PART 15. Local laws and regulations shall be complied with
when setting up or using the equipment, and corresponding
qualifications and relevant procedures shall be obtained if
necessary. Consulting the relevant authorities is suggested.
This equipment has been tested and found to comply with
the limits for a Class B digital device, pursuant to Part 15 of
the FCC Rules. These limits are designed to provide
reasonable protection against harmful interference in a
residential installation. This equipment generates, uses and
can radiate radio frequency energy and, if not installed and
used in accordance with the instructions, may cause
harmful interference to radio communications.However,
there is no guarantee that interference will not occur in a
particular installation.
If this equipment does cause harmful interference to radio
or television reception, which can be determined by
turning the equipment off and on, the user is encouraged
to try to correct the interference by one or more of the
following measures:
• Reorient or relocate the receiving antenna.
• Increase the separation between the equipment and
receiver.
• Connect the equipment into an outlet on a circuit
different from that to which the receiver is connected.
• Consult the dealer or an experienced radio/TV
technician for help.
This device complies with Part 15 of the FCC Rules.
Operation is subject to the following two conditions:
1. this device may not cause harmful interference, and.
2. this device must accept any interference received,
including interference that may cause undesired
operation.
ISEDC RSS warning
This product meets the applicable Industry Canada
technical specifications. / Le présent matériel est
conforme aux specifications techniques applicables
d’Industrie Canada.
SAFETY INFORMATION
In order to use the radio safely and efficiently, please read
the following safety information:
• The radio can only be maintained by professional
technicians. Do not disassemble the radio without
permission.
• Only the batteries and chargers specified by our company
can be used.
• To avoid problems caused by electromagnetic interference
and electromagnetic compatibility, please turn off the radio
in places where the "Please turn off the radio" sign is
displayed, such as hospitals and other health care places.
When taking the flight, please turn off the radio if the crew
requests to do so.
• In vehicles with airbags, do not place the radio in the area
where airbag deployment may be involved.
• Please turn off the radio before entering flammable or
explosive environment.
• Do not replace or charge the battery in a flammable or
explosive environment.
• Please turn off the radio before approaching the blasting
area and the detonator area.
• Do not use the radio with damaged antenna. A damaged
antenna may cause minor burns when it comes into
contact with the skin.
• Do not expose the radio to direct sunlight for a long time
or place it near the heating Radio.
• If you wear a portable radio, make sure the antenna is at
least 2.5 cm away from your body when the radio is
transmitting.
WARNING: Changes or modifications to this unit not
expressly approved by the party responsible for compliance
could void the user’s authority to operate the equipment.
CAUTION:
Use the approved charger to charge the battery. The
remaining lithium-ion battery is limited to 30% pursuant to
the new lithium battery shipment regulation approved by
International Air Transport Association (IATA). Before use,
charge the battery. It is recommended that the radio remain
powered off during charging.
Use of battery not recommend or replaced with incorrect
type of battery may result in a risk of fire and explosion or
personal injury.
Maximum ambient temperature around the power supply
equipment including charger must not exceed 40℃(104ºF)
and device operating temperature not exceed 55℃ (131ºF).
RF Exposure Compliance and Control Guidelines
and Operating Instructions
To control your exposure and ensure compliance with the
occupational/controlled environment
exposure limits always adhere to the following procedures.
Guidelines:
• Do not remove the RF Exposure Label from the device.
• User awareness instructions should accompany device
when transferred to other users.
• Do not use this device if the operational requirements
described herein are not met.
Operating Instructions:
• Transmit no more than the rated duty factor of 50% of the
time. To transmit (talk), push the Push-To-Talk (PTT)
button. To receive calls, release the PTT button. Transmit-
ting 50 % of the time, or less, is important because this
radio generates measurable RF energy exposure only
when transmitting (in terms of measuring for standards
compliance).
• Hold the radio in a vertical position in front of face with the
microphone (and the other parts of the radio, including the
antenna) at least one inch (2.5 cm) away from the nose.
Keeping the radio at the proper distance is important
because RF exposures decrease with distance from the
antenna. Antenna should be kept away from eyes.
• When worn on the body, always place the radio in approved
clip, holder, holster, case, or body harness for this product.
Using approved body-worn accessories is important
because the use other manufacturer’s non-approved
accessories may result in exposure levels, which exceed
the occupational/controlled environment RF exposure limits.
• If you are not using a body-worn accessory and are not
using the radio in the intended use position in front of the
face, then ensure the antenna and the radio are kept at
least 2.5 cm (one inch) from the body when transmitting.
Keeping the radio at the proper distance is important
because RF exposures decrease with increasing
distance from the antenna.
• Use only manufacturer’s approved supplied or replace-
ment antennas, batteries, and accessories. Use of
non-manufacturer-name approved antennas, batteries,
and accessories may exceed the FCC and IC RF
exposure guidelines.
• For a list approved accessories please consult your local
dealer for information.
EU Regulatory Conformance
As certified by the qualified laboratory, the product is in
compliance with the essential requirements and other
relevant provisions of the following directives: 2014/53/EU,
2011/65/EU, and 2012/19/EU. Please note that the above
information is applicable to EU countries only.
European Union (EU) Waste of Electrical and
Electronic Equipment (WEEE) directive:
The European Union's WEEE directive requires that
products sold into EU countries must have the crossed out
trash bin label on the product (or the package in some
cases). As defined by the WEEE directive, this cross-out
trash bin label means that customers and end-users in EU
countries.
RF RADIATION INFORMATION
1. This product is limited to occupational applications that
can meet RF energy radiation requirements. The user
must be fully aware of the RF radiation hazards and
can take corresponding measures to meet the RF
radiation limitation requirements.
2. Radio frequency (RF) refers to the electromagnetic
frequency that can be radiated into space. It is a widely
used technology in the fields of communication, medical
treatment, and food processing. It will generate certain
RF radiation during use.
EXPOSURE RF COMPLIANCE ET LIGNES
DE CONTRÔLE ET INSTRUCTIONS
OPÉRATIONNELLES
contrôle et Instructions opérationnelles
Pour contrôler votre exposition et garantir le respect des
limites d'exposition dans un environnement professionnel
/ contrôlé, suivez toujours les procédures suivantes.
Des lignes directrices:
• Ne retirez pas l'étiquette d'exposition RF de l'appareil.
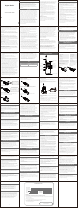
PRODUCT CONTROL
LED Indicator
Battery Installation
Antenna Installation
Belt Clip Installation
Antenna
PTT key
Program key
Menu key
Up key
Down key
State indicator
light
Accessory
connector
Loudspeaker
POWER key
Microphone
Charging contact
Radio Status
LED Indication
Standby Green Slow Flash
Low Battery Red Fast Flash
Transmit (TX) Solid Red
Receive (RX) Solid Green
Programming Mode (Read from Radio) Red Fast Flash
Programming Mode (Write to Radio)
Green Fast Flash
1. Press the dots on the battery
cover and slide to remove the
battery cover.
2. Attaching the lithium
battery pack.to battery
compartment.
1
2
3. Close the battery cover properly.
Note: To remove the
battery pack, please
turn off the radio first.
Note: Do not hold the
radio by the antenna;
as it may reduce radio
performance and
service life of antenna.
Align the screw holes on the belt clip with those on the
radio, and tighten belt clip with screws.
POWER ON/OFF
To turn on radio, press and hold [Power] key 2 seconds,
radio will broadcast the current channel number and battery
power. To turn off radio, press and hold the [Power] key to
turn off the radio and prompt tone will be sounded.
BATTERY CHECK
Press the [Power] key to check current channel number
and battery level status.
VOLUME CONTROL
Press [+] or [-] key to increase or decrease the volume,
which is adjustable from level 0 to 9.
Note: When you press [+] again under the maximum radio
volume, the speaker will prompt an error sound. When the
volume is adjusted to the minimum by pressing [-] key, the
radio is mut
TRANSMITTING/RECEIVING
Press and hold the [PTT] key to transmit the signal of the
current channel and the red LED indicator is on. Release
the [PTT] key to receive the signal from the same channel,
the speaker will make a call sound and the green LED
indicator will be on when a signal is received.
PRECAUTIONS FOR RADIO OPERATION
• When the radio is transmitting, keep the radio in a vertical
position, and keep the microphone 2.5-5 cm away from
the mouth. When transmitting, the radio should be at
least 2.5 cm away from the head or body.
• Do not turn on/off the radio repeatedly during use, and
adjust the volume to a level suitable for your hearing.
1. Before using the radio for communication, please set the
transmitter and receiver to the same frequency point.
2. For the analog channel that requires intercom, please set
the transmitter and receiver to the same sub-audio
frequency.
3. If encryption is enabled for the digital channel that
requires intercom, please set the transmitter and receiver
to the same password.
4. For the digital channel that requires intercom, please set
the transmitter and receiver to the same color code.
5. Transmit/receive at high/low power (switch by P1/P2 key).
6. After inserting the headset, press the [PTT] key to
transmit and receive speech through the headset.
7. Transmit with VOX headset after enabling VOX (turn
on/off VOX through side key and insert the VOX headset).
MENU SELECTION
1. The [Menu] key were set to (i) switch channel, (ii) set
high/low power, and (iii) turn on/off scanning. Continue
press menu button to enter to next function.
2. If the radio is not operated for 3 seconds or [PTT] key is
pressed, it will exit the menu mode.
CHANNEL SELECTION
Press the [Menu] key once to enter the channel selection
menu, and then press the [+] or [-] key to select the channel.
The current channel number will be broadcast every time
you select. There are 1-16 channels to choose from. Press
[PTT] key to save after switching the channel.
CHANNEL SCANNING
Press the [Menu] key twice to enter the channel scanning
menu, then press the [+] key to start channel scanning,
and the speaker will give a voice prompt "Scan". When a
valid signal is scanned and received, press [+] key again
to continue scanning. In scanning mode, press [-] key to
exit the scanning function, and the speaker will give a
voice prompt "Scan Off".
1. The scan list can contain analog channels, digital
channels and relay channels*.
2. After configuring the scan list, the scan switch should be
turned on.
3. The scanning can also be turn on/off through the
[Program] key.
4. During scanning, the channels scanned include the
channels in the scan list and the current main channel.
5. When any channel in the scan list is transmitting a signal,
it will stay on that channel to receive signal.
* Support DMR system only.
MONITORING MODE
1.Configure the [Program] key to monitoring function
through programming software.
2.Analog channel: Press and hold the [Program] key to
enter monitoring mode and release the key to exit the
mode.
PROGRAM KEY
1.Configure the functions of [Program] key through
programming software.
2.The [Program] key includes the following functions: Scan
On/Off, High/Low Power Switch, iVOX/VOX On/Off,
Monitoring Mode, One Touch Call, Emergency Alarm,
etc.
3.Write the set parameters to the radio and press the
corresponding [Program] key to enter the corresponding
function.
DEVICE NAME CONFIGURATION AND
MODIFICATION
1.Enter the basic setting interface of programming
software to enter the device name with any 16
characters.
2.Device name can support: Letters, numbers, Chinese,
special characters, etc.
DEVICE ID
1.The device ID is related to the private call contact, and
the ID range is 1-16776415.
2.When using a private call contact to call the other party,
enter the device ID of the other party and then call.
READING/WRITING PASSWORD SETTING
1.To prevent information leakage, you can set the reading
and writing password through programming software.
2.Each time you read or write, you must enter the correct
8-digit password before operating.
3.To cancel the password, clear the password and confirm.
4.To change the password, input the old password first, and
then enter the new password to rewrite.
5.When you forget the password, you can resume the
factory settings or re-burn it.
SETTING SUB-AUDIO FREQUENCY
1.The sub-audio frequency supports CTCSS, DCS positive
code, DCS reverse code, standard sub-audio and
non-standard sub-audio.
2.Only when the transmitting sub-audio and receiving
sub-audio are the same can they talk to each other.
3.A radio with sub-audio can transmit to radio without, but
cannot receive signal without sub-audio.
CHANNEL SPACING
1.There are two types of channel spacing: 12.5K ,12.5 is
narrow-band .
2.Radios with same frequency point and different channel
spacing can talk to each other.
SETTING/CHANGING FREQUENCY
1. Frequency range: 430MHz -470 MHz (base on models)
2. The frequency can be set to any value within this range.
3. In DM mode, you can talk only when the transmitting
frequency and receiving frequency are the same.
4. In DMR repeater mode, the transmitting frequency and
receiving frequency are different, but it needs to be
supported by repeater.
HIGH/LOW POWER SETTING
Users can set the power level of each channel to high or
low. High power can achieve communication with the radios
which are relatively far away; and low power can achieve
communication with radios which are close.
1. Switch the current channel to "High/Low Power" by
[Menu] key.
2. When switching between high and low power, the voice
prompt "High"/"Low".
3. Press the preset "High/Low Power" key to switch between
high (2W) or low (0.5W) transmission power.
TOT FUNCTION
In order to prevent some users from occupying the same
channel for a long time, users can set to enable the TOT
function. When the user's continuous transmission time on
the current channel reaches the set time, the radio will stop
transmitting and the speaker will give a time-limit prompt
tone. You can set the time limit for transmitting by
programming software. OFF, 30-300 seconds are
available. When OFF is selected, the user can keep on
transmitting.
VOX FUNCTION
When voice control function is enabled, the radio will
automatically transmit after the microphone picks up
enough sound input, and exit the transmit mode after
speaking stops.
1. Preset the [Program] key to [VOX On/Off] key through
programming software.
2. The side key is equipped with a VOX switch and has
an "On"/"Off" prompt sound. VOX levels can be preset
through programming software: Level 1, Level 2, and
Level 3, where Level 3 is the most sensitive. When the
radio VOX function is on, the preset VOX level is used.
3. After VOX is enabled, it is valid on both analog and
digital channels.
4. VOX needs to insert the VOX headset, and the speech
can be directly transmitted by speaking to the headset
MIC without needing to press the [PTT] key. On the
contrary, IVOX transmits directly by obtaining the
sensitivity through the radio MIC. If the sensitivity of
radio is low, VOX transmission will not be triggered.
The speech can be transmitted only after the sensitivity
reaches the transmission threshold.
5. VOX delay detection time refers to the waiting time
after VOX is transmitted.
DTMF FUNCTION
1. The DTMF interface of the programming software can
configure the DTMF function, such as side tone, duration,
interval time, online telegram code, offline telegram code,
transmission start sound, transmission end sound,
transmission start and end sound.
2. After the transmitter turns on the side tone, when the
[PTT] key is pressed to transmit, the transmitter itself will
also give DTMF sound.
3. DTMF coded content only supports numbers 0 - 9,
letters: ABCD, and characters: * #.
EMERGENCY CALL
1. Configure functions of the emergency call through
programming software, such as alarm channel,
re-transmission times, and tone type.
2. Emergency call supports the digital channel and analog
channel.
3. Set the side button as the“Emergency Call” button in the
“programmable button”.
4. When Analog or Digital channel triggers emergency call,
an emergency call code will be sent. Emergency call will
be automatically transmitted after remaining re-transmit
call becomes 0, and automatic emergency calls will
repeat transmit twice.
5. The transmitter will sound the alert tone after the
emergency call is sent. Receiver side also will receive an
alert tone after receiving the emergency call.
DIGITAL ENCRYPTION
1. Add key through programming software, which only
supports basic encryption, maximum 8 characters.
2. Supported characters include: numbers, uppercase
letters, lowercase letters.
3. The same encryption template must be configured for
transmitter and receiver for normal intercom, otherwise
the speech content cannot be heard clearly.
4. The main purpose is to prevent the content of the speech
from being monitored by other people at the same
frequency.
COLOR CODE
1. For digital channels, the color code must be same to call.
2. The color code range of this product can be set: 0-15.
CONTACTS
1. Contacts are only valid for digital channels.
2. There are three kinds of contacts: private call, group call
and all call, which need to be configured through the
programming software.
CALL PROMPT (PRIVATE CALL ONLY)
1. Configure one touch call through programming software
for private call contacts.
2. After writing to the radio, press the side key to trigger the
call prompt.
3. After the transmitter triggers the call prompt, the receiver's
red indicator will flash.
ONE TOUCH CALL (PRIVATE CALL ONLY)
1. Configure one touch call through programming software.
2. After writing to the radio, press the side key to trigger the
one touch call.
3. The transmitter's red indicator stays on for a few seconds,
and then press the [PTT] key to transmit.
4. The receiver's green indicator stays on for a few seconds,
and then it can receive normally.
REMOTE MONITOR (PRIVATE CALL ONLY)
1. Configure one touch call through programming software to
select remote monitor.
2. Press the preset side key to monitor the other party
remotely.
3. After successful monitoring, the green indicator will always
be on, and the sound around the other party can be clearly
monitored.
4. Remote monitoring time can be set to 10s-120s.
SQUELCH STEP (SQ)
1. SQ is only valid for analog channels.
2. After SQ is set to 0, the speaker will automatically turn
on and be in the monitoring state.
3. The higher the SQ step, the better the noise floor
suppression effect.
4. SQ can be configured through programming software
and cannot be switched in other ways.
TAIL TONE ELIMINATION
1. Only valid for analog channels.
2. When the tail tone elimination function is enabled, the
receiver will not have tail tone after the transmission is
completed; otherwise, there will be tail tone.
3. There are two types of tail tone elimination: 55HZ and
62HZ.
POWER SAVING FUNCTION
To extend battery life, the user can enable power saving
mode. When the power saving function is enabled, if no
valid signal is received or no key operation is performed
within 5 seconds, the radio will automatically enter the
power saving mode. In the power saving mode, the user
can press [PTT] key to transmit or the radio can receive
normally when an intercom signal is detected. The power
saving function can be enabled/disabled by programming
software.
1. The power saving function supports three ratios (ratio of
sleep to wake up), i.e. 1:1, 1:2 and 1:4.
2. After the power saving function is enabled, both the
analog channels and digital channels can enter the
power saving mode normally in standby state.
3.When a signal is received during sleep, it will wake up
quickly.
LOW VOLTAGE ALARM FUNCTION
1. When the battery voltage is lower than 3.3V, the radio
will prompt "Please charge" once (every 20 seconds)
and the red LED indicator will flash quickly. At this time,
the radio cannot transmit and stays in standby and
receiving modes only. Please replace with a new
battery or charge the battery.
2. When the battery voltage is lower than 3.0V, the radio
will shut down automatically. Please replace with a new
battery or charge the battery.
LANGUAGE SETTINGS
1. Language supports: Chinese and English.
2. Language can be set by programming software.
3. After switching the language, all voice broadcast will be
changed to the language.
Accessory Installation
1. Open the accessory connector cover.
2. Align the plug of the accessory (matching headset or
programming cable) with the accessory connector.
3. Insert the plug of the accessory properly into the
accessory connector.
(I) radio charging (II) Battery pack charging
Charging Function
1. This product can support both radio charging and
battery pack charging.
2. When charging base is used for charging, the indicator
is red during charging and changes to green after full
charging.
Charging Precautions:
• Please use the matching charging base of the model for
charging.
• When charging the device, it is recommended to turn off
the radio first.
• To obtain the best battery performance, please charge
for at least 5 hours for the first time.
• Do not charge the battery pack for a long time, otherwise
it will shorten the battery pack life. When the battery is fully
charged, please stop charging in time.
• The charger can only be used to charge the battery pack
of the product. Do not use it to charge other battery
packs, otherwise the charger and battery pack may be
damaged.
• The battery pack should be stored in a cool and dry place
after being fully charged. Do not expose the battery pack
near the fire or to the sun, otherwise there are safety
risks.
• During charging, it is not recommended to transmit the
radio.
• The battery pack may slightly heat up during charging,
which is a normal phenomenon.
4. The radio voice announcement is defaulted to English
OPTIONAL ACCESSORIES
The main accessories of the Radio are included in the
product packaging box. For more information about
accessories, please consult your local dealer.
Note: Please use the accessories specified by our
company. If you use unauthorized accessories, you
shall be responsible for all the consequences.
DISCLAIMER
This manual strives for the accuracy and completeness
of its content during the preparation. Repeated review
has been carried out, and the company will not assume
any responsibility for errors or omissions that may occur
during the output and printing process. In addition, due
to the continuous development of technology, the
company reserves the right to change the product
design and specification without prior notice.
Model Number:
Serial Number:
Purchasing Date:
Dealer:
User’s Name:
Address:
Telephone:
Telephone:
Post Code:
REMARKS:
GUARANTEE CARD
1.This guarantee card to be kept by the user ,no replenishment if lost.
2.This guarantee card to be filled & chopped by the dealer,or it is invalid.
3.Don’t alter the guarantee card,please confirm the serial number on the guarantee card is same as
that on the machine.
4.Warranty void if seal broken.
5.1 year guarantee for product, 6 months for charger,battery and antenna .
6.The user can get repairing service from the following ways:
a.Go to the shop where you buy the machine
b.Our local repairing agent
CHOP BY DEALER
• Les instructions de sensibilisation des utilisateurs doivent
accompagner l'appareil lors de leur transfert à d'autres
utilisateurs.
• N'utilisez pas cet appareil si les exigences
opérationnelles décrites ici ne sont pas remplies.
Mode d'emploi:
• Ne transmet pas plus que le facteur de marche nominal
de 50% du temps. Pour transmettre (parler), appuyez
sur le bouton Push-To-Talk (PTT). Pour recevoir des
appels, relâchez le bouton PTT. La transmission 50% du
temps, ou moins, est importante car cette radio génère
une exposition mesurable à l'énergie RF uniquement
lors de la transmission (en termes de mesure pour la
conformité aux normes).
• Tenez la radio en position verticale devant le visage
avec le microphone (et les autres parties de la radio, y
compris l'antenne) à au moins 2,5 cm du nez. Garder la
radio à la bonne distance est important car les
expositions RF diminuent avec la distance de l'antenne.
L'antenne doit être tenue à l'écart des yeux.
• Lorsqu'il est porté sur le corps, placez toujours la radio
dans un clip, un support, un étui, un étui ou un harnais
de corps approuvé pour ce produit. L’utilisation
d’accessoires approuvés par le corps est importante car
l’utilisation d’accessoires non approuvés par d’autres
fabricants peut entraîner des niveaux d’exposition qui
dépassent les limites d’exposition aux RF des
Max. SAR Level(s) Reported Limit (W/Kg)
1.35 W/kg 1g Head SAR
1.92 W/kg 1g Body SAR
8.0
environnements professionnels / contrôlés.
• Si vous n'utilisez pas d'accessoire porté sur le corps et
n'utilisez pas la radio dans la position d'utilisation prévue
devant le visage, assurez-vous que l'antenne et la radio
sont maintenues à au moins 2,5 cm (un pouce) du corps
lors de la transmission. . Il est important de garder la
radio à la bonne distance, car les expositions RF
diminuent avec l'éloignement de l'antenne.
INFORMATION CONCERNING SAR FOR
FCC